ESP32 WebMonitor 예제 웹 기반 시리얼 모니터 튜토리얼
개요
WebMonitor 예제는 전통적인 시리얼 모니터를 네트워크에 연결된 어떤 디바이스에서도 접속 가능한 웹 기반 인터페이스로 대체합니다. ESP32용으로 설계된 교육 플랫폼으로, 향상된 IoT 기능, 내장 센서 모니터링, 그리고 교육 생태계와의 원활한 통합을 제공합니다.
특징
- 실시간 시리얼 출력: 브라우저에서 ESP32 메시지를 즉시 보기
- 명령 입력: 웹 인터페이스에서 Arduino로 명령 보내기
- 다크 테마: 눈에 편안한 터미널 스타일 인터페이스
- 자동 스크롤: 최신 메시지로 자동으로 스크롤됩니다
- 타임스탬프: 모든 메시지에 타임스탬프가 포함됩니다
- 명령 기록: 화살표 키로 이전 명령을 탐색하기
- 지우기 기능: 모니터 디스플레이 지우기
- 복사/붙여넣기: 전체 텍스트 선택 및 복사 지원
준비물
| 1 | × | 38-pin ESP32 ESP-WROOM-32 Dev Module - Narrow | 쿠팡 | 아마존 | |
| 1 | × | (또는) 38-pin ESP32 ESP-WROOM-32 Dev Module - Wide | 쿠팡 | 아마존 | |
| 1 | × | (또는) 30-pin ESP32 ESP-WROOM-32 Dev Module - Wide | 아마존 | |
| 1 | × | (또는) ESP32 Uno-form board | 아마존 | |
| 1 | × | (또는) ESP32 S3 Uno-form board | 아마존 | |
| 1 | × | USB 케이블 타입-A to 타입-C (USB-A PC용) | 쿠팡 | 아마존 | |
| 1 | × | USB 케이블 타입-C to 타입-C (USB-C PC용) | 아마존 | |
| 1 | × | (추천) ESP32용 스크루 터미널 확장 보드 | 쿠팡 | 아마존 | |
| 1 | × | (추천) Breakout Expansion Board for ESP32 | 쿠팡 | 아마존 | |
| 1 | × | (추천) ESP32용 전원 분배기 | 쿠팡 | 아마존 |
공개: 이 포스팅 에 제공된 일부 링크는 아마존 제휴 링크입니다. 이 포스팅은 쿠팡 파트너스 활동의 일환으로, 이에 따른 일정액의 수수료를 제공받습니다.
설치 지침
빠른 단계
다음 지시를 차례대로 따라가세요.
- 이 ESP32를 처음 사용하는 경우, ESP32 - 소프트웨어 설치을 참조하십시오.
- USB 케이블을 사용하여 ESP32 보드를 컴퓨터에 연결합니다.
- 컴퓨터에서 Arduino IDE를 실행합니다.
- 적합한 ESP32 보드(ESP32 Dev Module)와 COM 포트를 선택합니다.
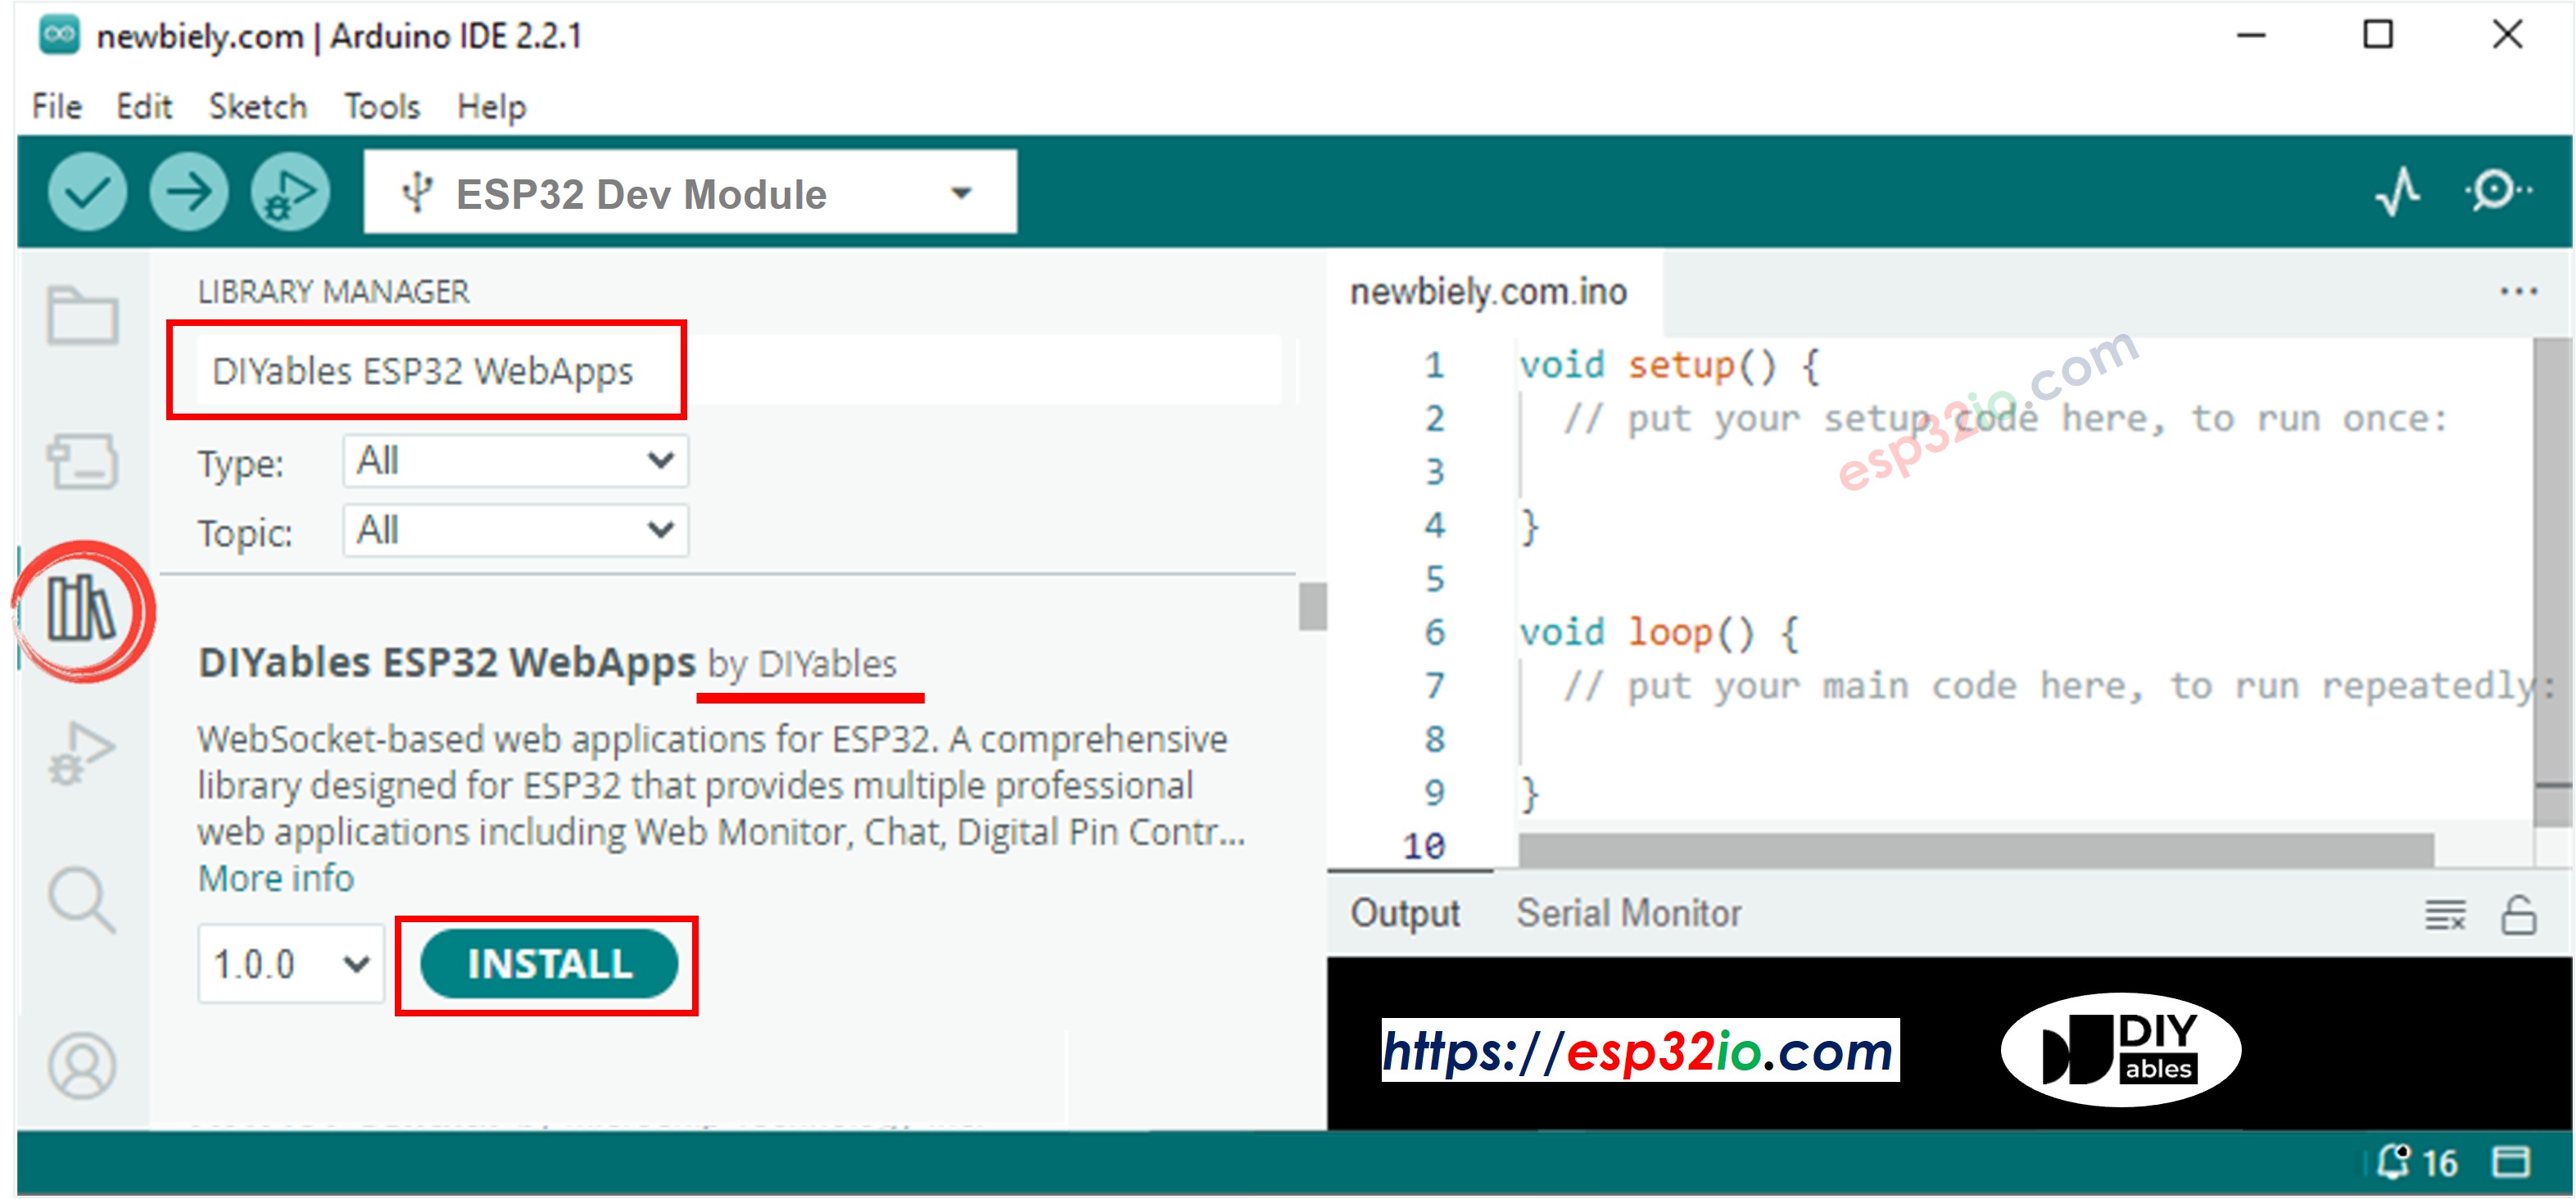
- Arduino IDE의 왼쪽 바에 있는 Libraries 아이콘으로 이동합니다.
- "DIYables ESP32 WebApps"를 검색한 다음, DIYables에서 제공하는 DIYables ESP32 WebApps 라이브러리를 찾습니다.
- 라이브러리를 설치하려면 Install 버튼을 클릭합니다.
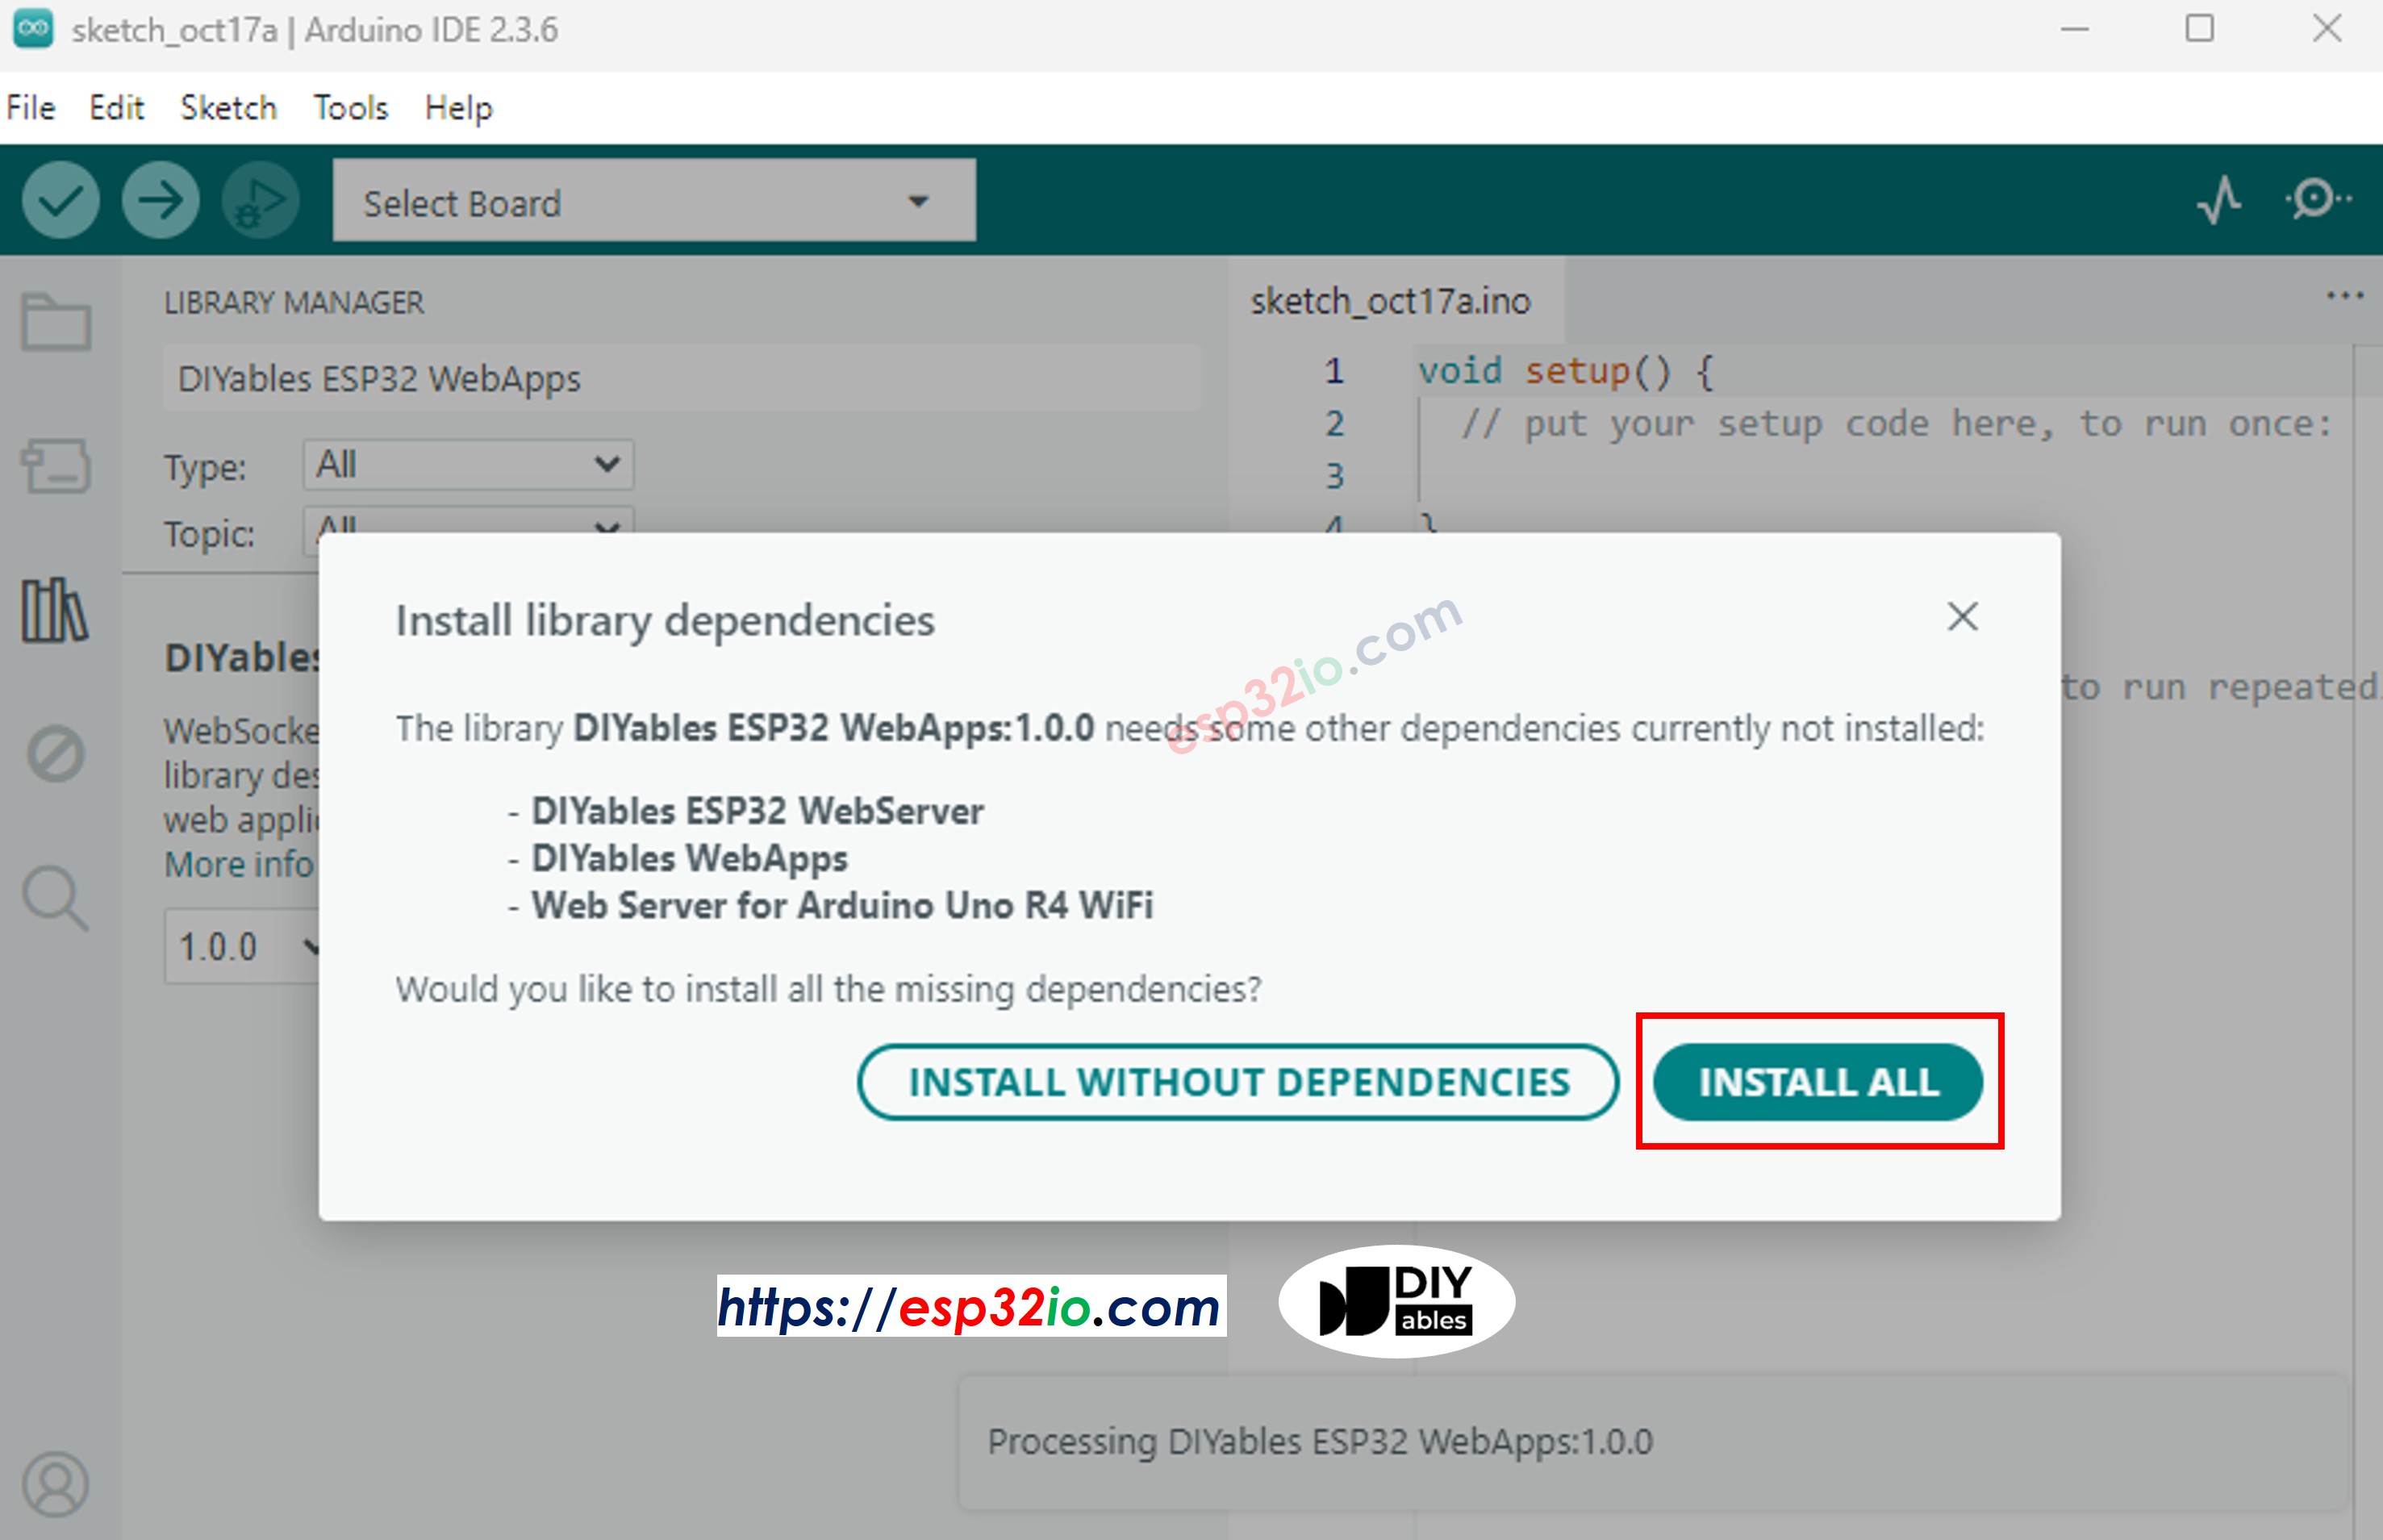
- 다른 라이브러리 의존성 설치를 요청받게 됩니다
- 모든 라이브러리 의존성을 설치하려면 Install All 버튼을 클릭하세요.
- Arduino IDE에서, File 예제 DIYables ESP32 WebApps WebMonitor 예제를 열거나, 위의 코드를 복사하여 Arduino IDE의 에디터에 붙여넣으십시오
/*
* DIYables WebApp Library - Web Monitor Example
*
* This example demonstrates the Web Monitor feature:
* - Real-time serial monitor in web browser
* - Send commands from browser to Arduino
* - Automatic message timestamping
*
* Hardware: ESP32 Boards
*
* Setup:
* 1. Update WiFi credentials below
* 2. Upload the sketch to your Arduino
* 3. Open Serial Monitor to see the IP address
* 4. Navigate to http://[IP_ADDRESS]/webmonitor
*/
#include <DIYables_ESP32_Platform.h>
#include <DIYablesWebApps.h>
// WiFi credentials - UPDATE THESE WITH YOUR NETWORK
const char WIFI_SSID[] = "YOUR_WIFI_SSID";
const char WIFI_PASSWORD[] = "YOUR_WIFI_PASSWORD";
// Create WebApp server and page instances
ESP32ServerFactory serverFactory;
DIYablesWebAppServer webAppsServer(serverFactory, 80, 81);
DIYablesHomePage homePage;
DIYablesWebMonitorPage webMonitorPage;
// Demo variables
unsigned long lastMessage = 0;
int messageCount = 0;
void setup() {
Serial.begin(9600);
delay(1000);
Serial.println("DIYables ESP32 WebApp - Web Monitor Example");
// Add home and web monitor pages
webAppsServer.addApp(&homePage);
webAppsServer.addApp(&webMonitorPage);
// Optional: Add 404 page for better user experience
webAppsServer.setNotFoundPage(DIYablesNotFoundPage());
// Initialize LED for status indication
pinMode(LED_BUILTIN, OUTPUT);
// Start the WebApp server
if (!webAppsServer.begin(WIFI_SSID, WIFI_PASSWORD)) {
while (1) {
Serial.println("Failed to start WebApp server!");
delay(1000);
}
}
// Set up monitor callback for incoming commands
webMonitorPage.onWebMonitorMessage([](const String& message) {
Serial.println("Command from web: " + message);
// Process simple commands
if (message == "LED_ON") {
digitalWrite(LED_BUILTIN, HIGH);
webMonitorPage.sendToWebMonitor("LED turned ON");
return;
}
if (message == "LED_OFF") {
digitalWrite(LED_BUILTIN, LOW);
webMonitorPage.sendToWebMonitor("LED turned OFF");
return;
}
if (message == "STATUS") {
String status = "Arduino Status: LED=" + String(digitalRead(LED_BUILTIN) ? "ON" : "OFF");
webMonitorPage.sendToWebMonitor(status);
return;
}
if (message == "HELP") {
webMonitorPage.sendToWebMonitor("Available commands: LED_ON, LED_OFF, STATUS, HELP");
return;
}
webMonitorPage.sendToWebMonitor("Unknown command: " + message);
});
// Send welcome message
webMonitorPage.sendToWebMonitor("Arduino Web Monitor ready!");
webMonitorPage.sendToWebMonitor("Type HELP for available commands");
}
void loop() {
// Handle WebApp server communications
webAppsServer.loop();
// Send periodic updates to web monitor
if (millis() - lastMessage > 5000) { // Every 5 seconds
messageCount++;
// Send sensor readings or status updates
String message = "Message #" + String(messageCount) + " - Uptime: " + String(millis() / 1000) + "s";
webMonitorPage.sendToWebMonitor(message);
lastMessage = millis();
}
// Add your main application code here
delay(10);
}
- 다음 줄들을 업데이트하여 코드에서 와이파이 자격 증명을 구성합니다:
const char WIFI_SSID[] = "YOUR_WIFI_NETWORK";
const char WIFI_PASSWORD[] = "YOUR_WIFI_PASSWORD";
- Arduino IDE에서 ESP32에 코드를 업로드하려면 Upload 버튼을 클릭하세요
- 시리얼 모니터를 여세요
- 시리얼 모니터에서 결과를 확인하세요. 아래와 같은 모습입니다
8
Serial.println("Hello World!");
Message (Enter to send message to 'ESP32 Dev Module' on 'COM15')
New Line
9600 baud
DIYables WebApp - Web Monitor Example
INFO: Added app /
INFO: Added app /web-monitor
DIYables WebApp Library
Platform: ESP32
Network connected!
IP address: 192.168.0.2
HTTP server started on port 80
Configuring WebSocket server callbacks...
WebSocket server started on port 81
WebSocket URL: ws://192.168.0.2:81
WebSocket server started on port 81
==========================================
DIYables WebApp Ready!
==========================================
📱 Web Interface: http://192.168.0.2
🔗 WebSocket: ws://192.168.0.2:81
📋 Available Applications:
🏠 Home Page: http://192.168.0.2/
📊 Web Monitor: http://192.168.0.2/web-monitor
==========================================
- 아무 것도 보이지 않으면 ESP32 보드를 재부팅하십시오.
- 표시된 IP 주소를 기록해 두고, 이 주소를 스마트폰이나 PC의 웹 브라우저 주소창에 입력하십시오.
- 예: http://192.168.0.2
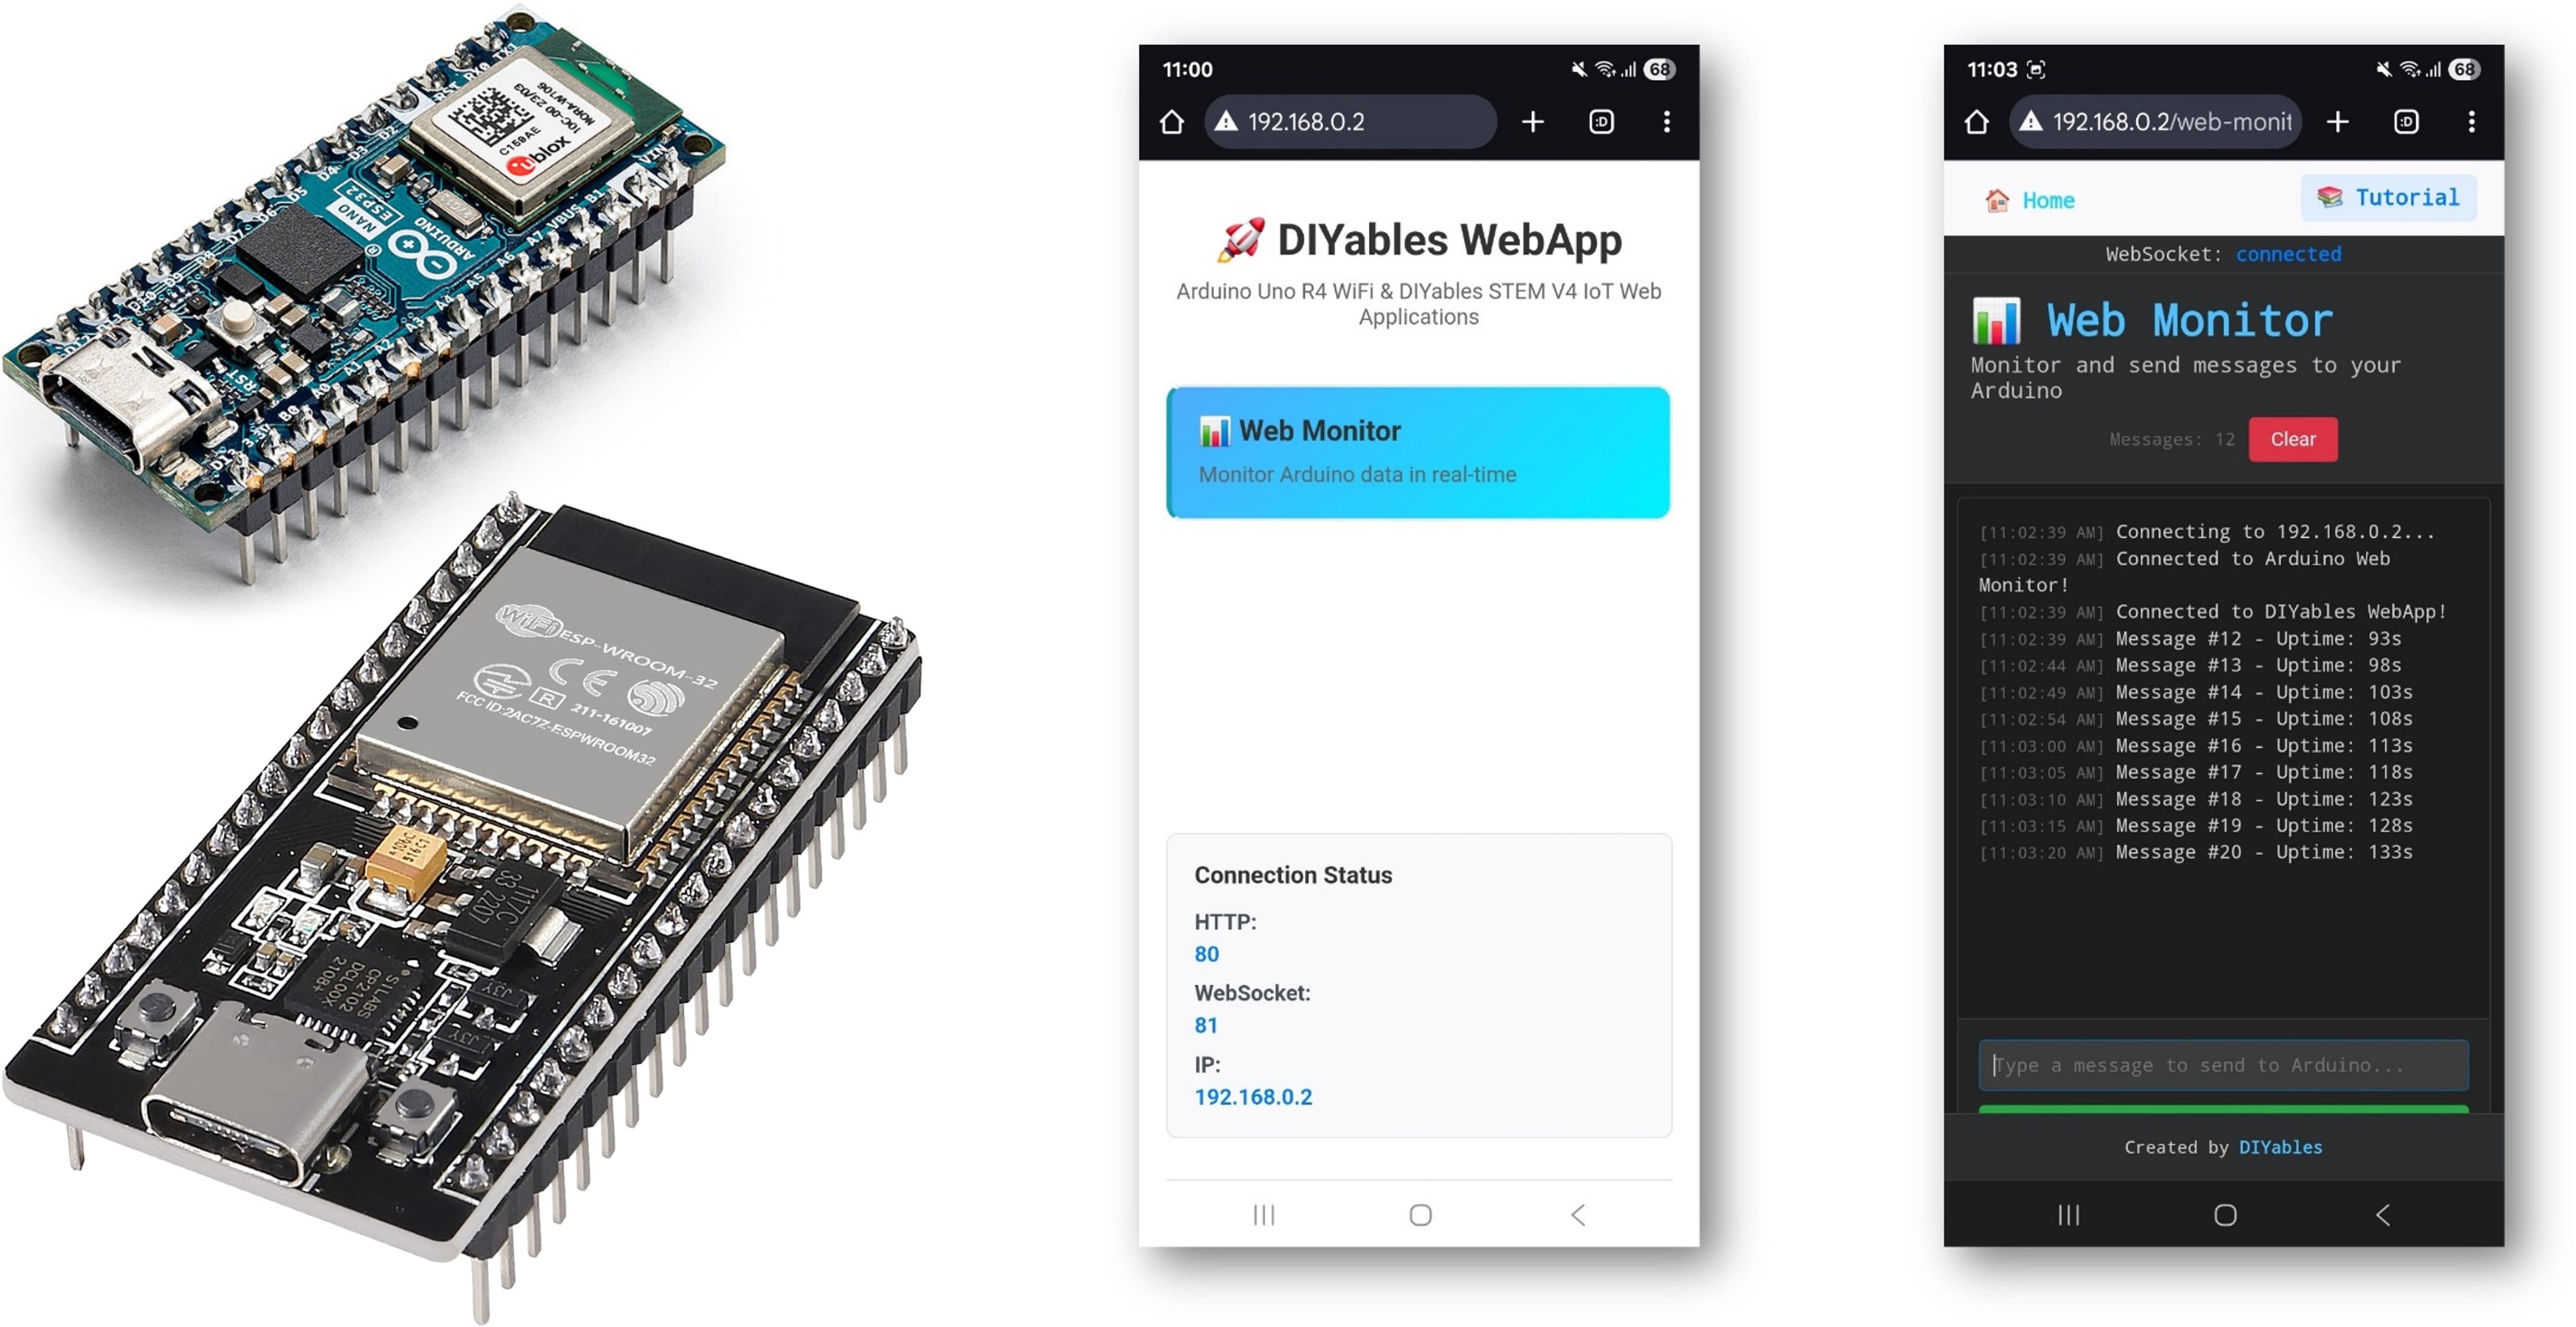
- 아래 이미지와 같은 홈 페이지가 표시됩니다:
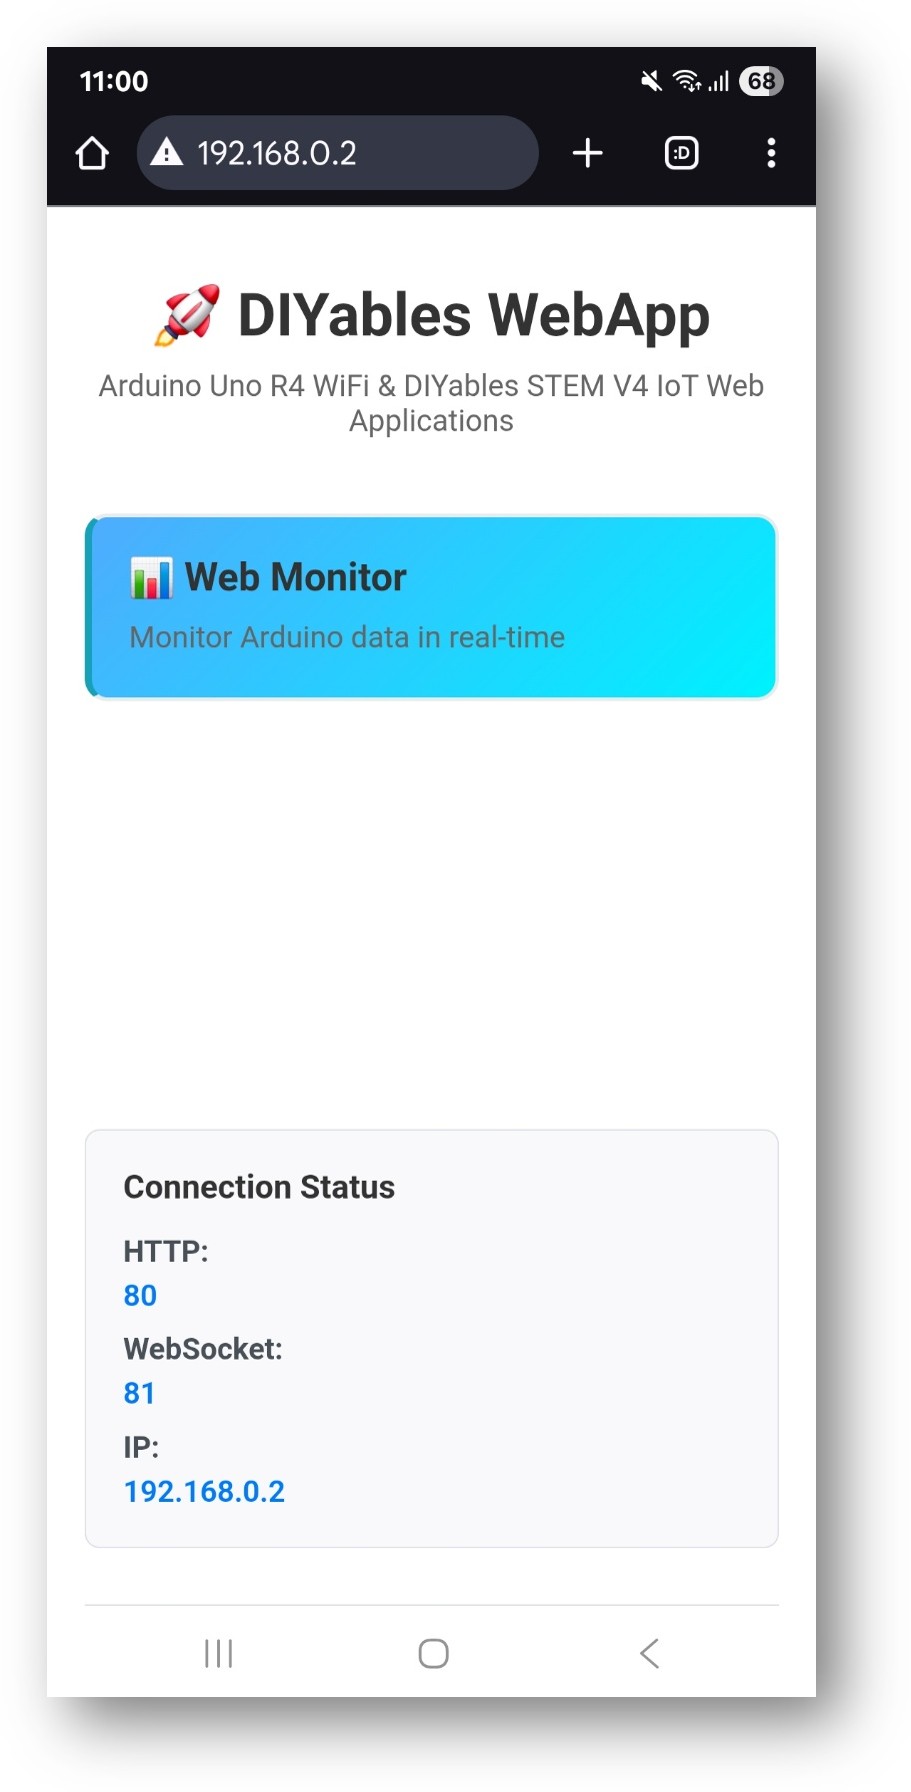
- 웹 모니터 링크를 클릭하면 아래와 같은 웹 모니터 앱의 UI가 표시됩니다:
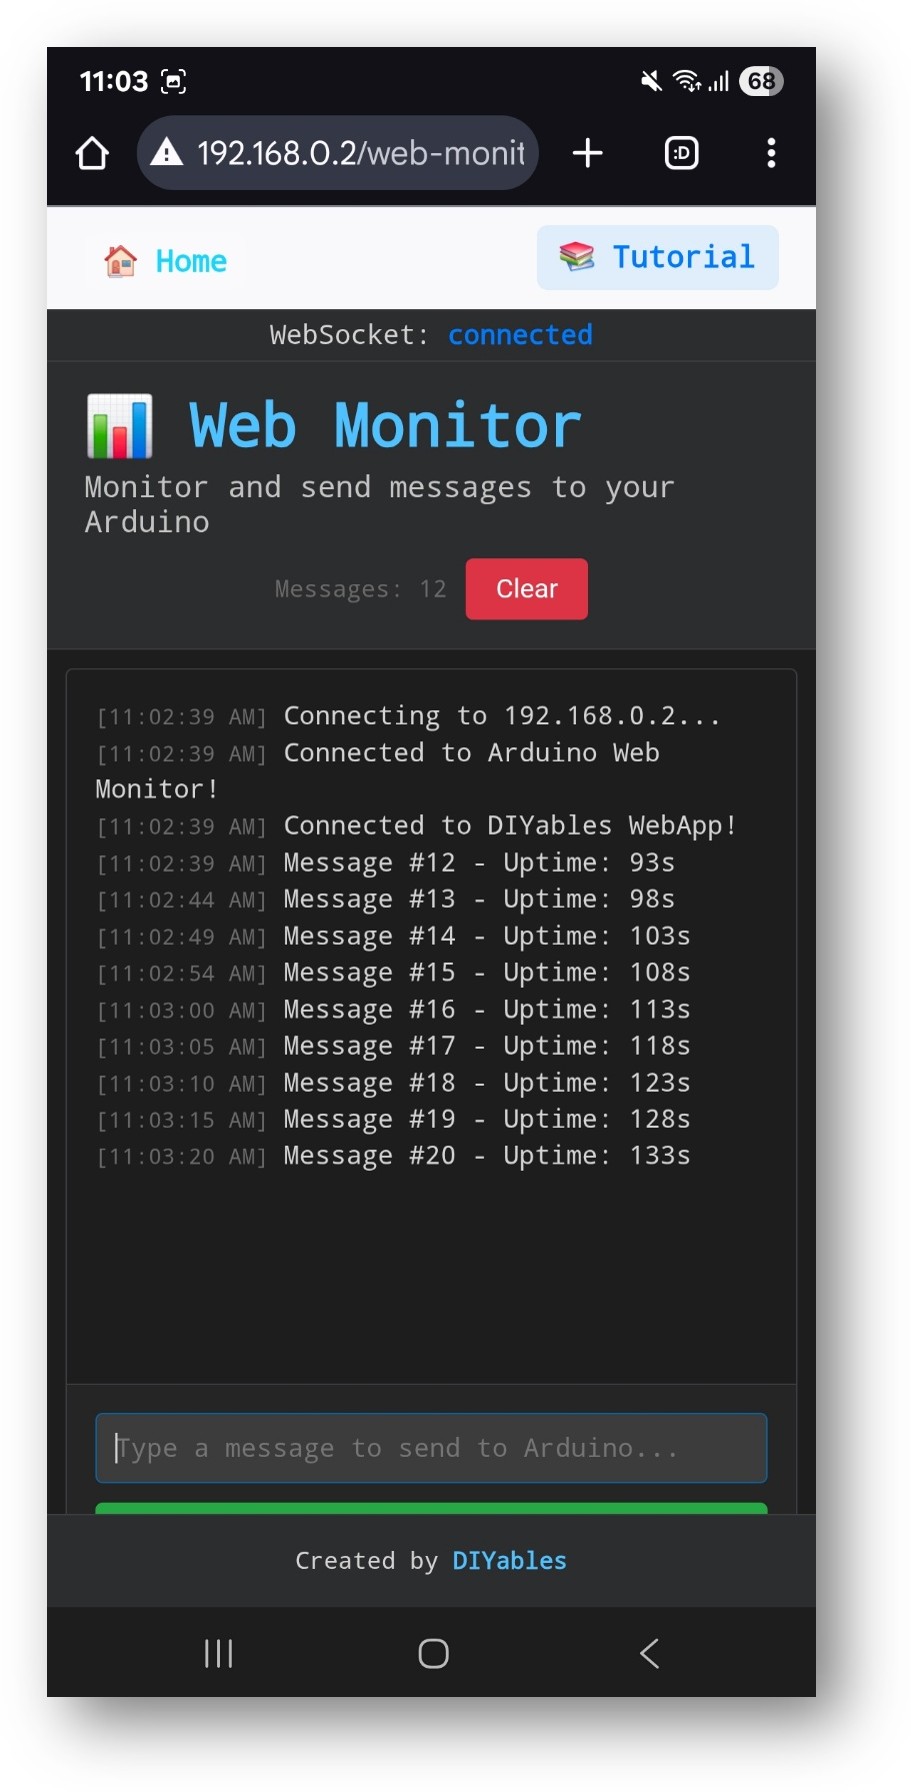
- 또한 IP 주소 뒤에 /web-monitor를 붙여 페이지에 직접 접속할 수도 있습니다. 예를 들어: http://192.168.0.2/web-monitor
- 웹 모니터 인터페이스를 통해 ESP32에 명령을 보내고 아두이노의 실시간 시리얼 출력을 확인해 보세요.
사용 방법
시리얼 출력 보기
- 웹 모니터 인터페이스를 여세요
- ESP32가 5초마다 상태 메시지를 자동으로 보냅니다
- 모든 Serial.println() 출력이 모니터에 표시됩니다
- 메시지는 자동으로 타임스탬프가 부여됩니다
명령 전송
- 아래 입력 필드에 명령을 입력하세요
- Enter 키를 누르거나 전송 버튼을 클릭하세요
- ESP32가 명령을 처리하고 응답합니다
내장 명령어
예시에는 이러한 시연 명령어들이 포함되어 있습니다:
LED 제어
- "led on" → 내장된 LED를 켭니다
- "led off" → 내장된 LED를 끕니다
- "led toggle" → LED의 상태를 토글합니다
- "blink" → LED가 3번 깜빡입니다
시스템 명령어
- "status" → ESP32의 상태 및 가동 시간 표시
- "help" → 사용 가능한 명령어를 나열합니다
- "reset counter" → 메시지 카운터를 초기화합니다
- "memory" → 가용 메모리 정보를 표시합니다
디버그 명령어
- "test" → 테스트 메시지를 보냅니다
- "echo [message]" → 당신의 메시지를 그대로 되돌려 보냅니다
- "repeat [n] [message]" → 메시지를 n번 반복합니다
인터페이스 기능
키보드 단축키
- 엔터 → 명령 보내기
- ↑/↓ 화살표 키 → 명령 이력 탐색
- Ctrl+L → 화면 지우기(구현되어 있을 경우)
- Ctrl+A → 텍스트 전체 선택
모니터 제어
- 자동 스크롤 → 새 메시지로 자동으로 스크롤합니다
- 지우기 → 모니터 화면을 지웁니다
- 복사 → 선택한 텍스트를 클립보드에 복사합니다
창의적 맞춤화 - 고급 디버깅 도구 구축
이 웹 모니터 예제를 확장하여 프로젝트를 위한 강력한 디버깅 및 제어 인터페이스를 만들어 보세요! 창의적인 필요에 맞게 사용자 정의 명령, 센서 모니터링 및 실시간 데이터 시각화를 추가하세요.
코드 구조
주요 구성 요소
- 웹 애플리케이션 서버: HTTP 및 WebSocket 연결을 처리합니다.
- 모니터 페이지: 터미널 형식의 웹 인터페이스를 제공합니다.
- 메시지 처리기: 수신된 명령을 처리합니다.
- 시리얼 브리지: 시리얼 출력을 웹 인터페이스로 전달합니다.
핵심 기능
// Handle commands from web interface
void handleWebCommand(String command, String clientId) {
// Process command and execute actions
}
// Send message to web monitor
void sendToWebMonitor(String message) {
// Forward message via WebSocket
}
사용자 정의 명령 추가
새 명령을 추가하려면 handleWebCommand 함수를 수정하십시오:
if (command.startsWith("your_command")) {
// Extract parameters
String param = command.substring(12); // After "your_command"
// Execute your action
digitalWrite(LED_BUILTIN, HIGH);
// Send response
sendToWebMonitor("Command executed: " + param);
}
실용적 응용
개발 및 디버깅
void loop() {
// Debug sensor readings
int sensorValue = analogRead(A0);
sendToWebMonitor("Sensor A0: " + String(sensorValue));
// Debug variables
sendToWebMonitor("Loop count: " + String(loopCount++));
delay(1000);
}
원격 시스템 모니터링
void checkSystemHealth() {
// Monitor memory
int freeMemory = getFreeMemory();
sendToWebMonitor("Free memory: " + String(freeMemory) + " bytes");
// Monitor sensors
float temperature = getTemperature();
sendToWebMonitor("Temperature: " + String(temperature) + "°C");
// Monitor connectivity
if (WiFi.status() == WL_CONNECTED) {
sendToWebMonitor("WiFi: Connected (RSSI: " + String(WiFi.RSSI()) + ")");
} else {
sendToWebMonitor("WiFi: Disconnected");
}
}
구성 관리
// Handle configuration commands
if (command.startsWith("config ")) {
String setting = command.substring(7);
if (setting.startsWith("interval ")) {
int interval = setting.substring(9).toInt();
updateInterval = interval * 1000; // Convert to milliseconds
sendToWebMonitor("Update interval set to " + String(interval) + " seconds");
}
if (setting == "save") {
saveConfigToEEPROM();
sendToWebMonitor("Configuration saved to EEPROM");
}
}
고급 기능
메시지 필터링
메시지 유형 및 필터링 추가:
enum MessageType { INFO, WARNING, ERROR, DEBUG };
void sendToWebMonitor(String message, MessageType type = INFO) {
String prefix;
switch(type) {
case WARNING: prefix = "[WARN] "; break;
case ERROR: prefix = "[ERROR] "; break;
case DEBUG: prefix = "[DEBUG] "; break;
default: prefix = "[INFO] ";
}
webMonitorPage.sendMessage(prefix + message);
}
명령어 구문 분석
정교한 명령 구문 분석 구현:
struct Command {
String name;
String parameters[5];
int paramCount;
};
Command parseCommand(String input) {
Command cmd;
int spaceIndex = input.indexOf(' ');
if (spaceIndex > 0) {
cmd.name = input.substring(0, spaceIndex);
// Parse parameters...
} else {
cmd.name = input;
cmd.paramCount = 0;
}
return cmd;
}
데이터 로깅
모니터 데이터를 SD 카드 또는 EEPROM에 기록:
#include <SD.h>
void logMessage(String message) {
File logFile = SD.open("monitor.log", FILE_WRITE);
if (logFile) {
logFile.print(millis());
logFile.print(": ");
logFile.println(message);
logFile.close();
}
}
문제 해결
일반적인 문제
- 웹 모니터에 출력이 없음
- Setup()에서 Serial.begin()이 호출되었는지 확인
- WebSocket 연결 확인(초록색 상태 표시)
- 브라우저 콘솔에서 오류를 확인
- 작동하지 않는 명령어
- 명령이 지정된 대로 정확히 수행되도록 보장합니다
- 명령의 대소문자 구분을 확인합니다
- 모니터에서 응답 메시지를 확인합니다
- 인터페이스 로딩이 느립니다
- 와이파이 신호 강도 확인
- 메시지 전송 빈도 감소
- 브라우저 캐시 삭제
4. 웹소켓 연결 끊김
- 네트워크 안정성 점검
- 메시지 크기 축소
- 재연결 로직 구현
디버깅 팁
자세한 디버깅 활성화:
#define DEBUG_WEBMONITOR 1
#if DEBUG_WEBMONITOR
#define DEBUG_PRINT(x) Serial.print(x)
#define DEBUG_PRINTLN(x) Serial.println(x)
#else
#define DEBUG_PRINT(x)
#define DEBUG_PRINTLN(x)
#endif
WebSocket 상태 모니터링:
void checkWebSocketStatus() {
if (server.getClientCount() > 0) {
sendToWebMonitor("WebSocket clients connected: " + String(server.getClientCount()));
}
}
보안 고려사항
명령 검증
항상 들어오는 명령을 검증하십시오:
bool isValidCommand(String command) {
// Check command length
if (command.length() > 100) return false;
// Check for dangerous characters
if (command.indexOf("\\") >= 0 || command.indexOf("/") >= 0) return false;
// Check against whitelist
String allowedCommands[] = {"led", "status", "help", "test"};
String cmdName = command.substring(0, command.indexOf(' '));
for (String allowed : allowedCommands) {
if (cmdName.equals(allowed)) return true;
}
return false;
}
접근 제어
기본 인증 구현:
bool isAuthorized(String clientId) {
// Check client authorization
return authorizedClients.indexOf(clientId) >= 0;
}
통합 예제
센서 모니터링 시스템
void monitorSensors() {
static unsigned long lastSensorRead = 0;
if (millis() - lastSensorRead > 5000) {
// Read multiple sensors
int light = analogRead(A0);
int temp = analogRead(A1);
int humidity = analogRead(A2);
// Send formatted data
String data = "Sensors - Light: " + String(light) +
", Temp: " + String(temp) +
", Humidity: " + String(humidity);
sendToWebMonitor(data);
lastSensorRead = millis();
}
}
홈 자동화 모니터
void monitorHome() {
// Door sensors
if (digitalRead(DOOR_SENSOR) == HIGH) {
sendToWebMonitor("ALERT: Front door opened");
}
// Motion detection
if (digitalRead(PIR_SENSOR) == HIGH) {
sendToWebMonitor("Motion detected in living room");
}
// Environmental monitoring
float temp = dht.readTemperature();
if (temp > 25.0) {
sendToWebMonitor("WARNING: Temperature high (" + String(temp) + "°C)");
}
}
다음 단계
WebMonitor 예제를 숙달한 후, 시도해 보세요:
- 채팅 - 상호작용을 위한 대화
- 디지털 핀 - 출력을 제어하기 위한
- 슬라이더 - 아날로그 값 제어를 위한
- 다중 웹앱 - 모니터링과 제어의 결합
지원
추가 도움이 필요하신 경우:
- API 참조 문서를 확인하세요.
- DIYables 튜토리얼 보기: https://esp32io.com/tutorials/diyables-esp32-webapps
- ESP32 커뮤니티 포럼들


