아두이노 DC 모터 쉴드
이 튜토리얼은 Motor Shield Rev3를 사용하여 Arduino로 DC 모터를 제어하는 방법을 안내합니다. 자세히 다음을 배울 것입니다:
- Motor Shield Rev3를 Arduino에 장착하는 방법.
- DC 모터와 외부 전원을 연결하는 방법.
- 모터 방향(앞으로/뒤로)을 제어하는 Arduino 프로그래밍 방법.
- PWM을 사용하여 모터 속도를 제어하는 Arduino 프로그래밍 방법.
- 브레이크를 활성화하고 해제하는 Arduino 프로그래밍 방법.
- 모터 전류를 읽는 Arduino 프로그래밍 방법.
- 두 채널을 사용하여 두 개의 DC 모터를 동시에 제어하는 방법.
필요한 하드웨어
| 1 | × | 아두이노 우노 R3 | 쿠팡 | 아마존 | |
| 1 | × | USB 2.0 타입 A-to-B 케이블 (USB-A PC용) | 쿠팡 | 아마존 | |
| 1 | × | USB 2.0 타입 C-to-B 케이블 (USB-C PC용) | 아마존 | |
| 1 | × | Motor Shield for Arduino | 쿠팡 | 아마존 | |
| 1 | × | DC Motor (e.g, 5V) | 아마존 | |
| 1 | × | Power source (e.g., 5V power Adapter) | 아마존 | |
| 1 | × | DC 커넥터 전원 연결 잭 플러그 소켓 | 쿠팡 | 아마존 | |
| 1 | × | (추천) 아두이노 우노용 스크루 터미널 블록 쉴드 | 쿠팡 | 아마존 | |
| 1 | × | (추천) Sensors/Servo Expansion Shield for Arduino Uno | 쿠팡 | 아마존 | |
| 1 | × | (추천) 아두이노 우노용 브레드보드 쉴드 | 쿠팡 | 아마존 | |
| 1 | × | (추천) 아두이노 우노용 케이스 | 쿠팡 | 아마존 | |
| 1 | × | (추천) 아두이노 우노용 프로토타이핑 베이스 플레이트 & 브레드보드 키트 | 아마존 |
Motor Shield Rev3에 대하여
Arduino Motor Shield Rev3는 L298P 듀얼 풀 브릿지 드라이버 IC를 기반으로 하여 두 개의 DC 모터(또는 하나의 스테퍼 모터)를 방향, 속도, 브레이크를 완전히 제어하며 구동할 수 있습니다.
쉴드에서 제공하는 기능:
- 두 개의 모터 채널(A와 B): 각 채널은 독립적으로 하나의 DC 모터를 구동할 수 있습니다.
- 방향 제어: 디지털 핀을 사용하여 모터를 앞 또는 뒤로 회전시킵니다.
- PWM 속도 제어: PWM 핀을 사용하여 모터 속도를 0에서 255까지 조정합니다.
- 브레이크 제어: 디지털 핀을 사용하여 각 채널의 브레이크를 걸거나 해제합니다.
- 전류 감지: 아날로그 핀을 통해 각 모터가 소비하는 전류를 읽습니다.
Motor Shield Rev3는 Arduino Uno 폼 팩터를 위해 설계되어 Arduino 보드 위에 직접 쌓을 수 있습니다 — 브레드보드나 복잡한 배선이 필요 없습니다.
핀 매핑
| 기능 | 채널 A | 채널 B |
|---|---|---|
| 방향 | D12 | D13 |
| PWM (속도) | D3 | D11 |
| 브레이크 | D9 | D8 |
| 전류 감지 | A0 | A1 |
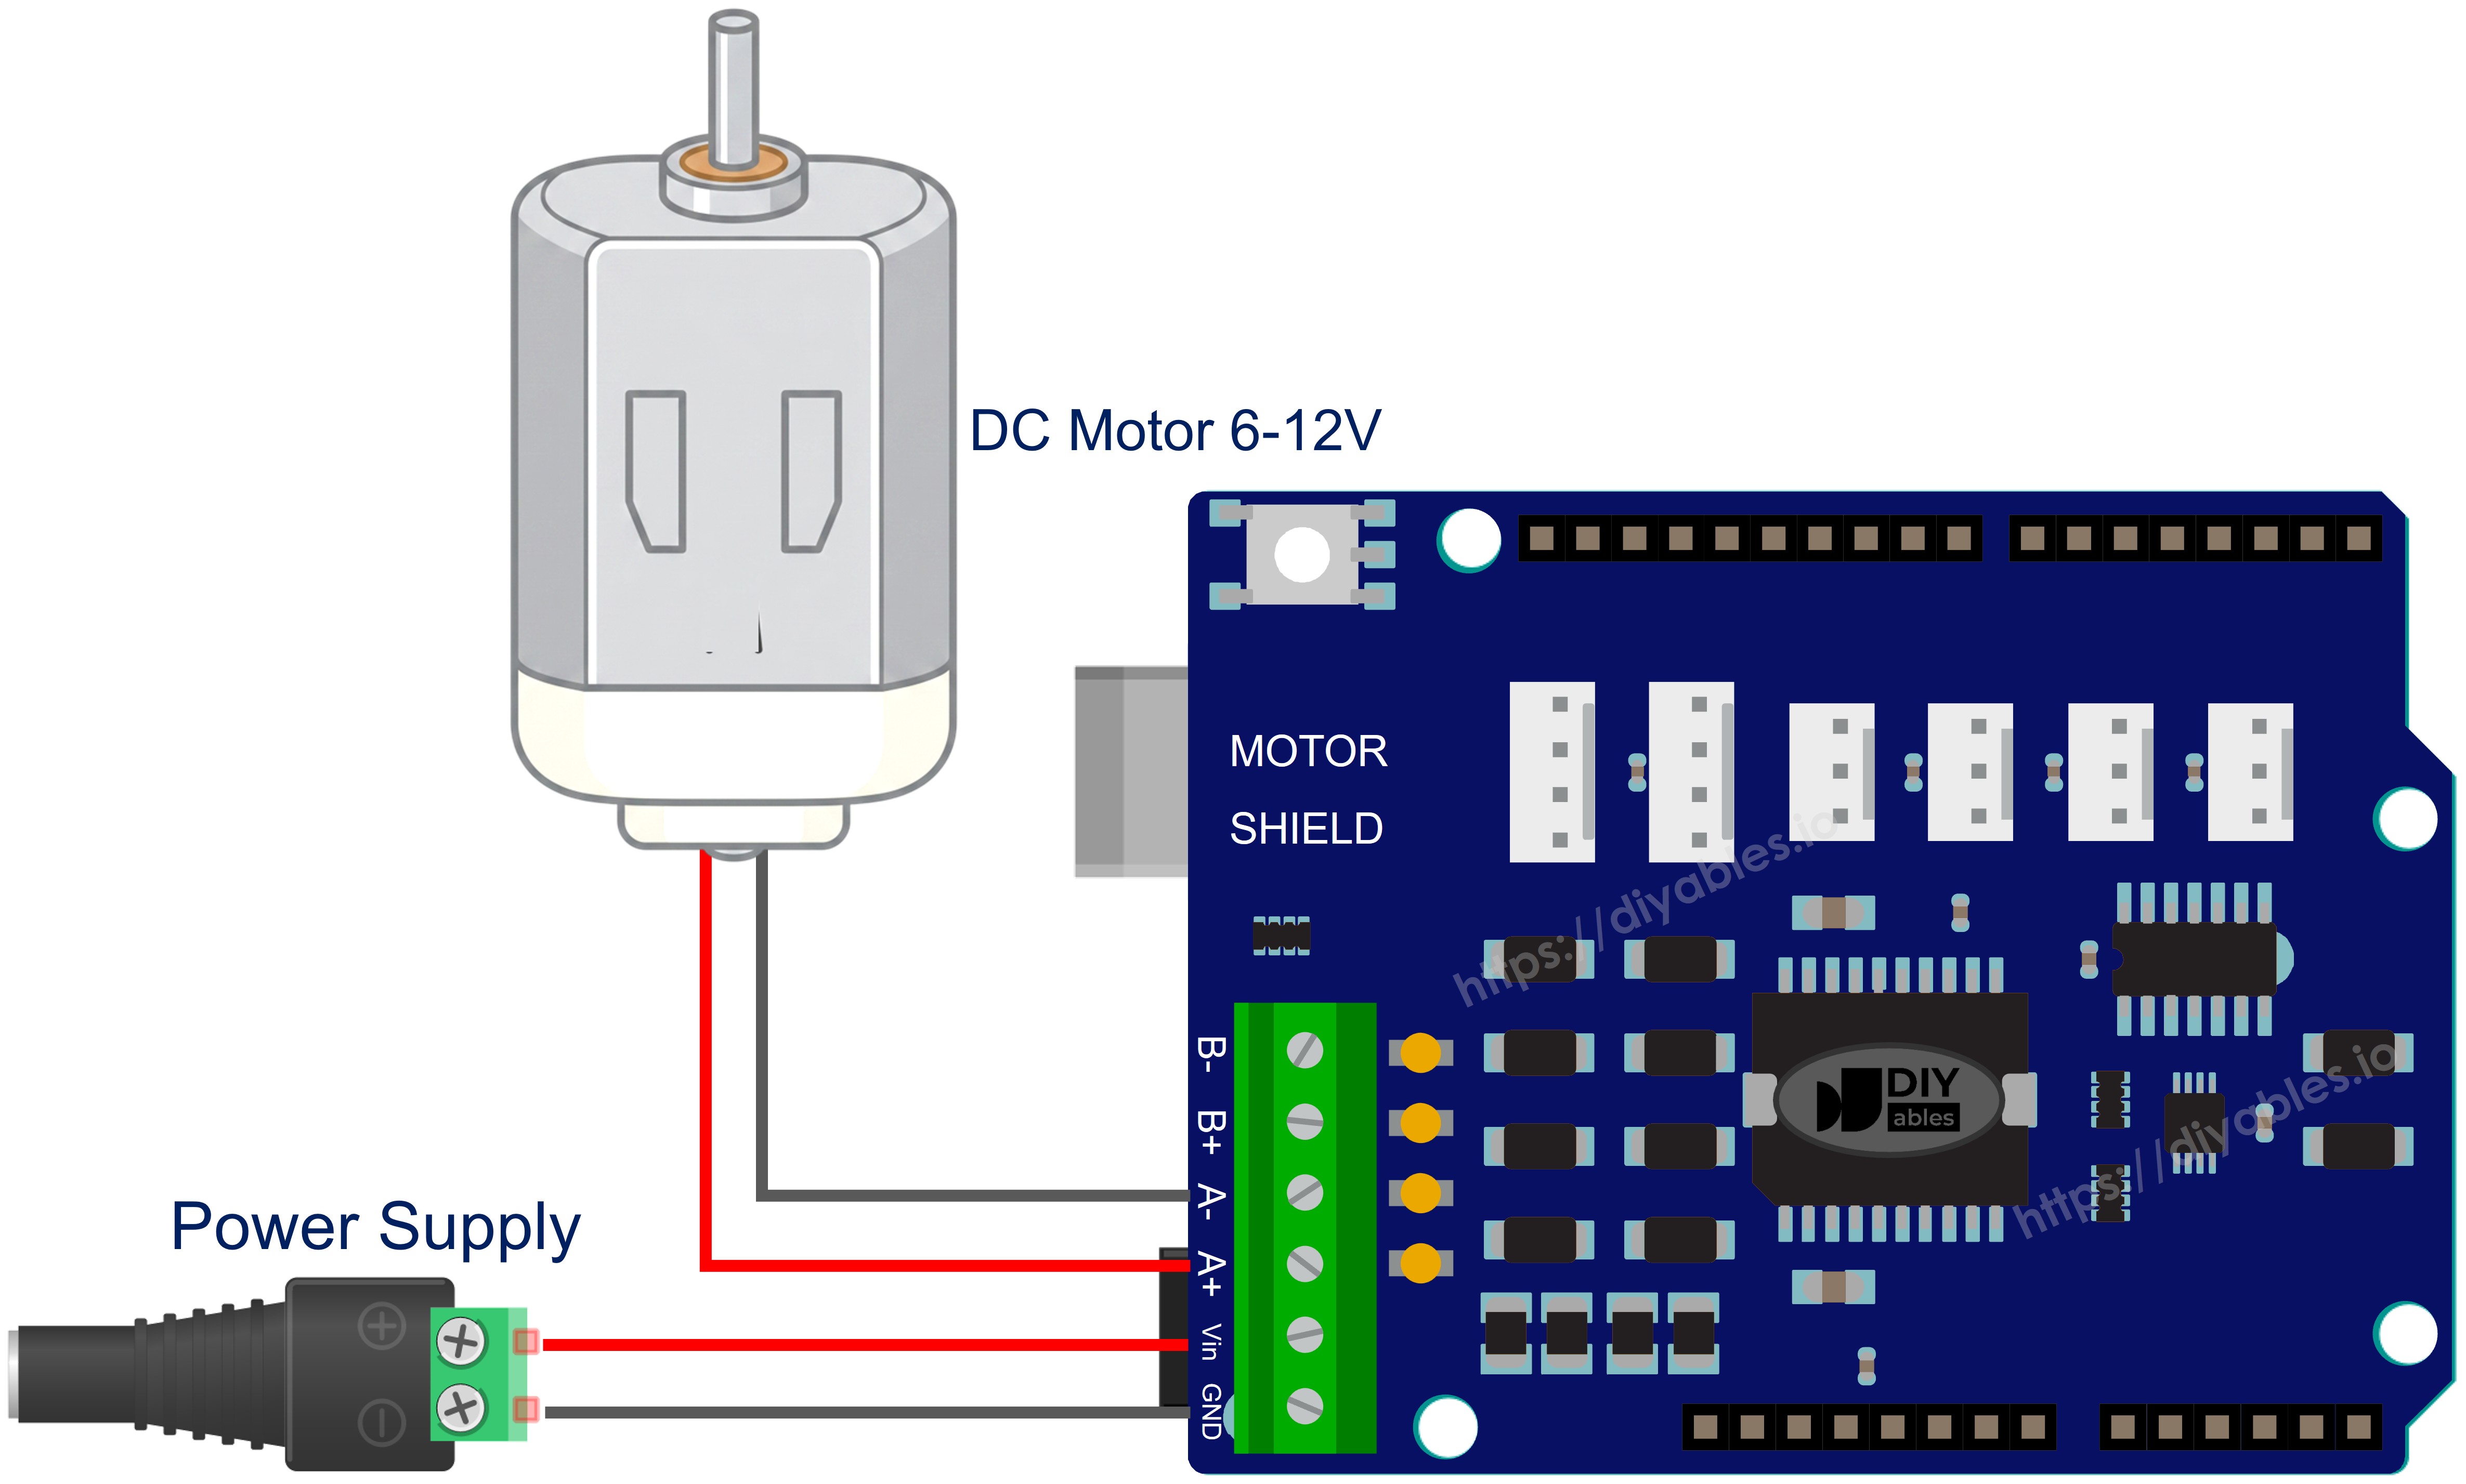
외부 전원
Motor Shield Rev3는 모터를 위한 외부 전원이 필요합니다. 전원 공급 장치(6~12V)를 쉴드의 전원 나사 단자에 연결합니다. 외부 전원은 모터를 구동하며, Arduino는 USB 또는 자체 전원 공급 장치를 통해 별도로 전원을 공급받을 수 있습니다.
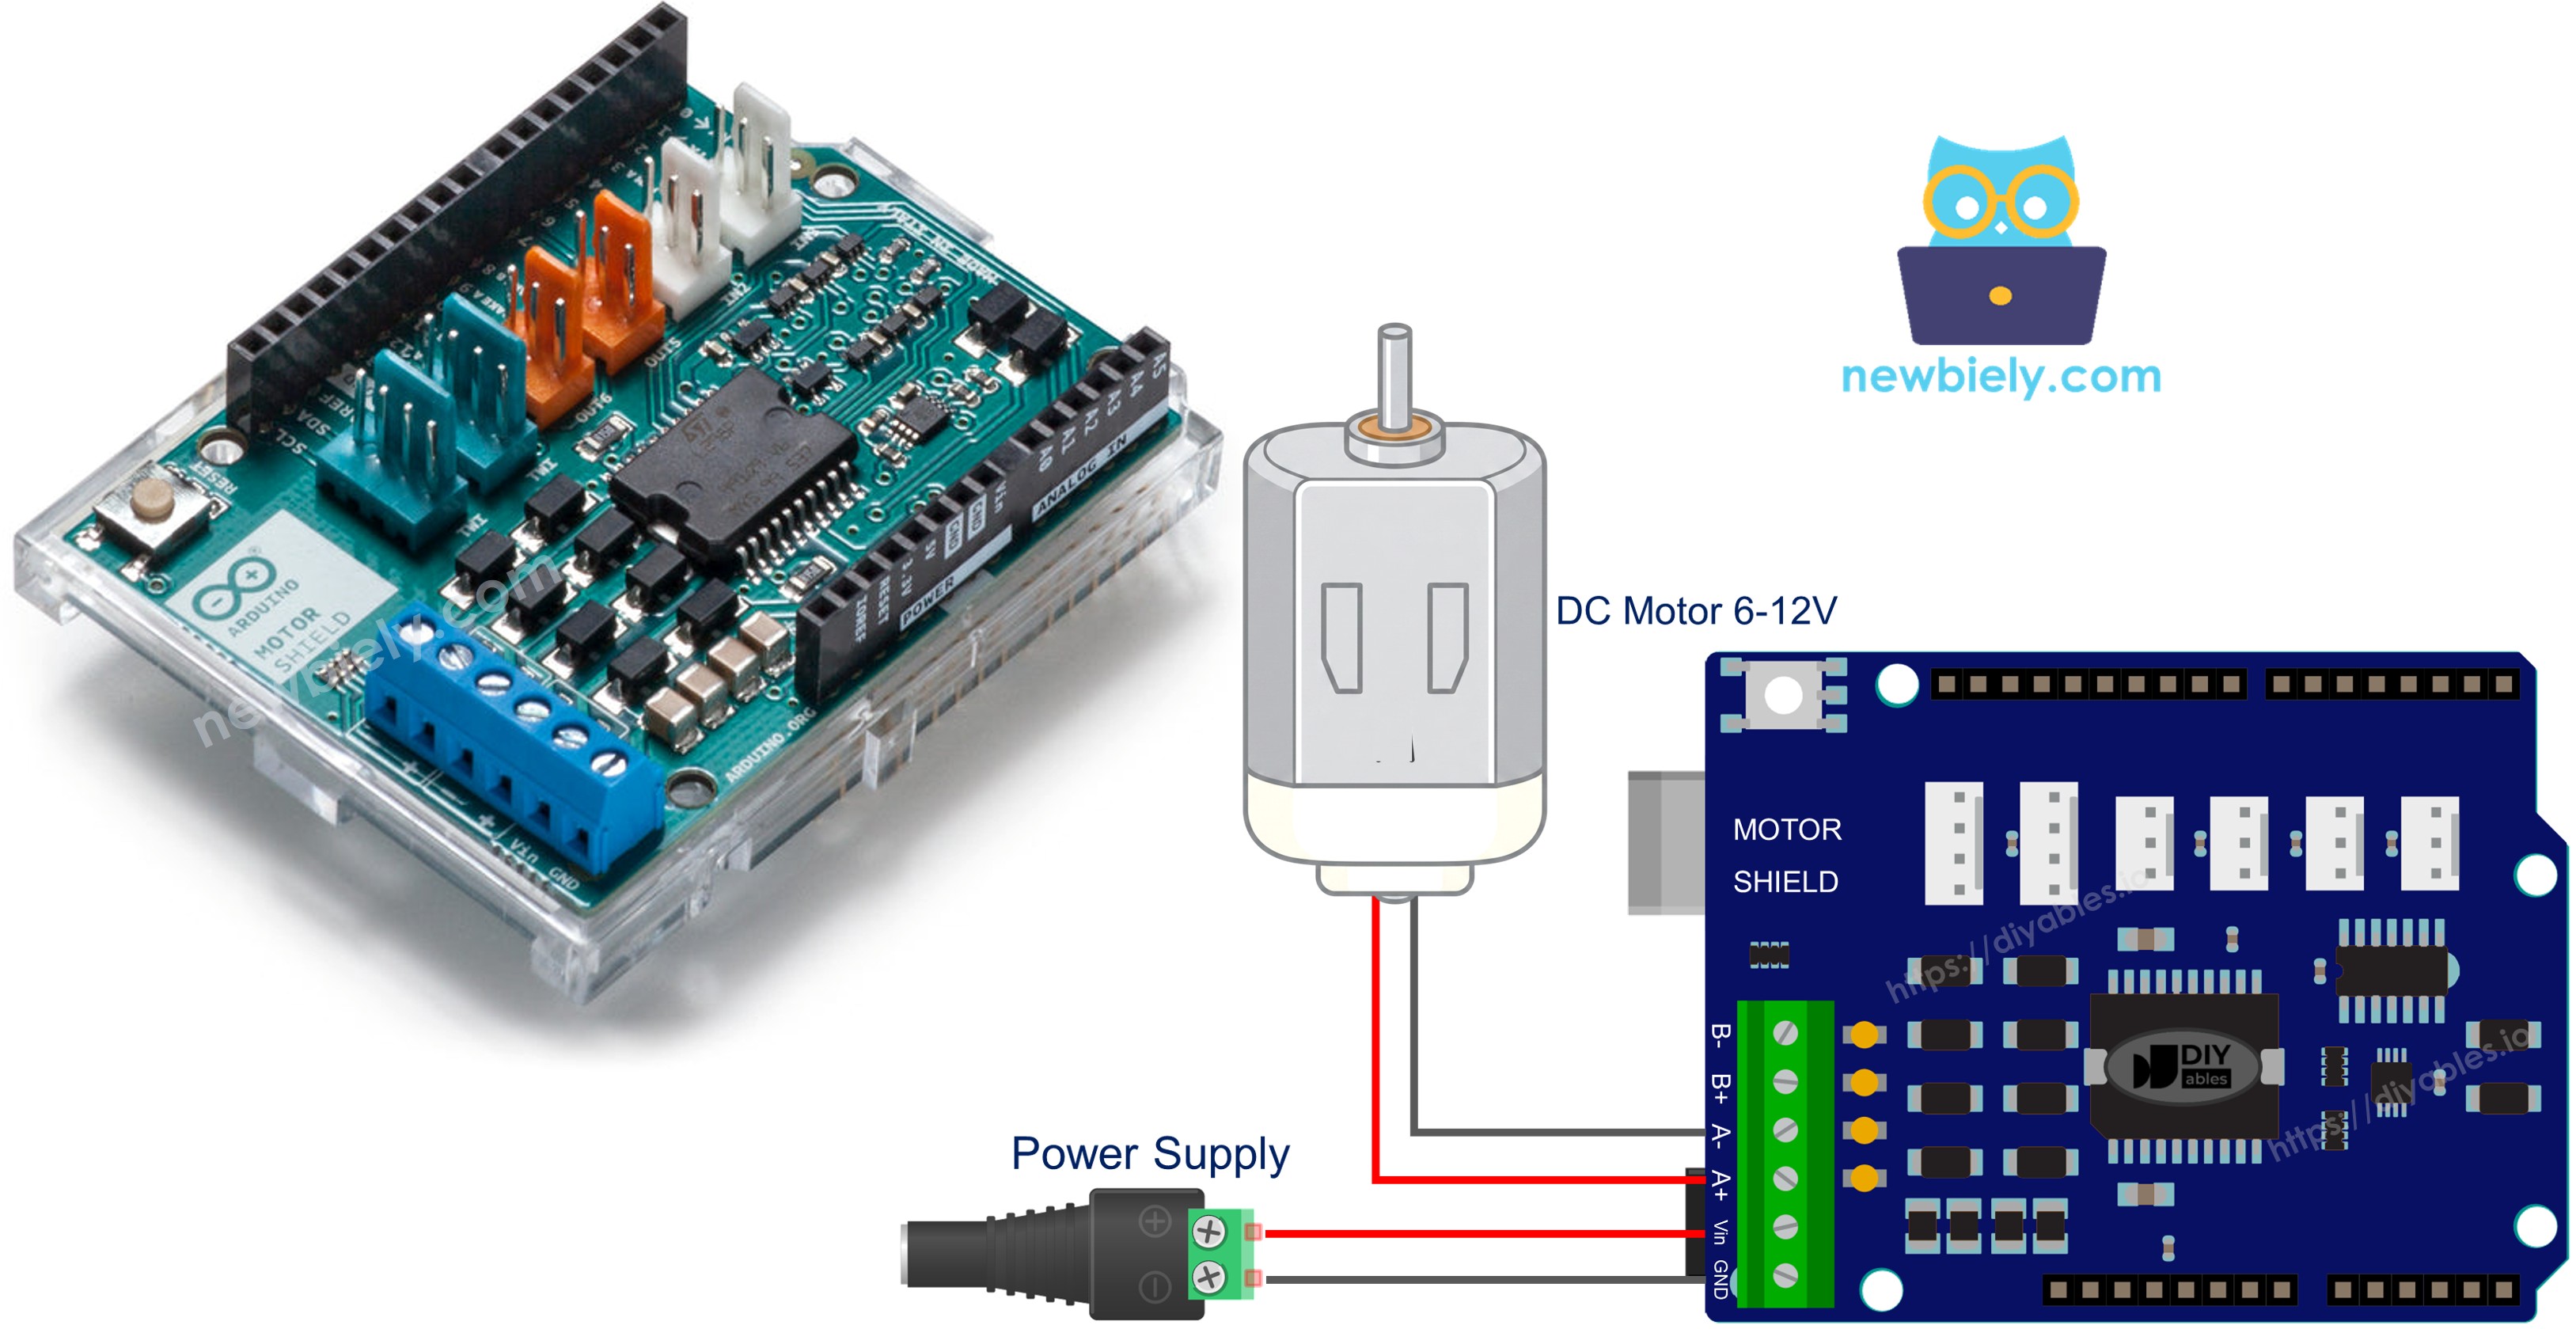
배선도
먼저 Arduino Motor Shield Rev3를 Arduino Uno 위에 핀을 신중히 정렬하여 장착합니다.
그런 다음 쉴드의 나사 단자를 사용하여 DC 모터를 채널 A에 연결합니다. 채널은 나사 단자 옆에 표시되어 있습니다.
마지막으로 외부 전원 공급 장치(예: 2x 3.7V 리튬 이온 배터리)를 쉴드의 전원 나사 단자에 연결합니다.
이 이미지는 Fritzing을 사용하여 만들어졌습니다. 이미지를 확대하려면 클릭하세요.
라이브러리 설치
- USB 케이블로 Arduino 보드를 컴퓨터에 연결합니다.
- Arduino IDE를 열고 올바른 보드와 포트를 선택합니다.
- Arduino IDE 왼쪽 바의 Libraries 아이콘으로 이동합니다.
- "DIYables_DC_Motor"를 검색하고 DIYables의 DIYables_DC_Motor 라이브러리를 찾습니다.
- Install 버튼을 클릭하여 최신 버전의 라이브러리를 설치합니다.
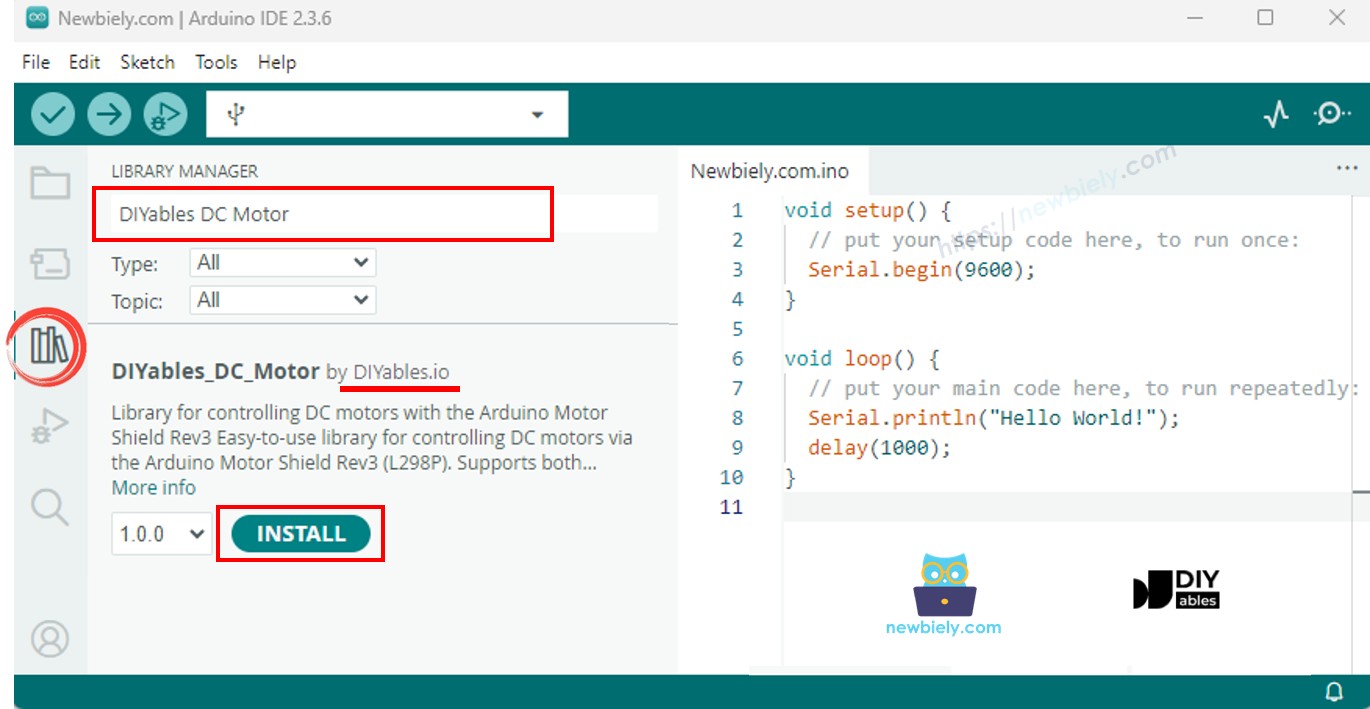
참고: 이 라이브러리는 외부 의존성 없이 자급자족합니다.
기본 구조
DC 모터 라이브러리를 사용하는 모든 스케치는 다음과 같은 기본 구조를 따릅니다:
motor.begin()은 방향, PWM, 브레이크 핀을 초기화합니다. 그 이후에는 motor.run()으로 방향과 속도를 설정하고, motor.brake()로 모터를 정지합니다. 모터 객체에 대한 loop() 호출이 필요 없습니다 — 모터는 상태를 변경할 때까지 계속 실행됩니다.
Arduino 코드 - 채널 A 모터 제어
다음 코드는 채널 A에서 DC 모터를 제어하는 방법을 시연합니다: 중간에 브레이크를 걸면서 2초마다 방향이 전환됩니다.
빠른 단계
- Arduino 보드에 Motor Shield Rev3를 장착합니다.
- DC 모터를 채널 A 나사 단자에 연결합니다.
- 외부 전원 공급 장치를 연결합니다.
- USB 케이블로 Arduino 보드를 컴퓨터에 연결합니다.
- Arduino IDE를 열고 올바른 보드와 포트를 선택합니다.
- 위 코드를 복사하여 Arduino IDE 편집기에 붙여넣습니다.
- Arduino IDE의 Upload 버튼을 클릭하여 Arduino에 코드를 업로드합니다.
- 시리얼 모니터를 열어 모터 상태 메시지를 확인합니다.
모터는 속도 30으로 2초간 앞으로 회전하고, 2초간 브레이크를 걸고, 2초간 뒤로 회전하며 반복합니다.
모터 API 요약
| 메서드 | 설명 | 예시 |
|---|---|---|
| run(direction, speed) | 방향과 속도 설정, 브레이크 해제 | motor.run(MOTOR_FORWARD, 100) |
| setSpeed(speed) | PWM 속도 설정(0~255) | motor.setSpeed(150) |
| setDirection(direction) | 방향만 설정 | motor.setDirection(MOTOR_BACKWARD) |
| brake() | 브레이크 활성화 및 속도를 0으로 설정 | motor.brake() |
| release() | 브레이크 해제 | motor.release() |
| readCurrent() | 전류 감지 핀에서 원시 ADC 읽기 | motor.readCurrent() |
Arduino 코드 - 채널 B 모터 제어
다음 코드는 채널 B에서 DC 모터를 제어하는 방법을 시연합니다.
빠른 단계
- DC 모터를 채널 A 대신 채널 B 나사 단자에 연결합니다.
- 위 코드를 복사하여 Arduino IDE 편집기에 붙여넣습니다.
- Arduino IDE의 Upload 버튼을 클릭하여 Arduino에 코드를 업로드합니다.
- 시리얼 모니터를 엽니다.
동작은 채널 A와 동일합니다 — 유일한 차이점은 사용된 채널입니다.
Arduino 코드 - 두 채널 모두
다음 코드는 각 채널에 하나씩 두 개의 DC 모터를 동시에 제어하는 방법을 시연합니다.
빠른 단계
- 채널 A에 DC 모터 하나를, 채널 B에 다른 DC 모터를 연결합니다.
- 위 코드를 복사하여 Arduino IDE 편집기에 붙여넣습니다.
- Arduino IDE의 Upload 버튼을 클릭하여 Arduino에 코드를 업로드합니다.
- 시리얼 모니터를 엽니다.
두 모터가 함께 앞으로 회전한 후 함께 뒤로 회전하고, 그 다음 반대 방향으로 회전합니다 — 중간에 브레이크 정지가 있습니다.
Arduino 코드 - 전류 감지
다음 코드는 내장 전류 감지 핀을 사용하여 DC 모터가 소비하는 전류를 읽는 방법을 시연합니다.
빠른 단계
- DC 모터를 채널 A에 연결합니다.
- 위 코드를 복사하여 Arduino IDE 편집기에 붙여넣습니다.
- Arduino IDE의 Upload 버튼을 클릭하여 Arduino에 코드를 업로드합니다.
- 시리얼 모니터를 엽니다.
- 500ms마다 업데이트되는 원시 ADC 전류 감지 값을 관찰합니다.
전류 감지 참고 사항
Motor Shield Rev3는 아날로그 핀 A0(채널 A)과 A1(채널 B)을 통해 전류 감지를 제공합니다. readCurrent() 메서드는 원시 ADC 값을 반환합니다. 실제 전류(암페어)로 변환하려면 쉴드의 전류 감지 회로를 기반으로 적절한 변환 계수를 적용해야 합니다.
Arduino 코드 - 사용자 정의 핀
다음 코드는 미리 정의된 채널 상수 대신 사용자 정의 핀 할당으로 모터 객체를 생성하는 방법을 시연합니다.
빠른 단계
- 생성자의 핀 번호를 배선에 맞게 조정합니다.
- 위 코드를 복사하여 Arduino IDE 편집기에 붙여넣습니다.
- Arduino IDE의 Upload 버튼을 클릭하여 Arduino에 코드를 업로드합니다.
이 방법은 비표준 모터 드라이버나 수정된 핀 구성을 사용할 때 유용합니다.
문제 해결
코드가 작동하지 않는 경우 다음과 같은 일반적인 문제를 해결할 수 있습니다:
- 모터가 회전하지 않음: 모터가 올바른 채널의 나사 단자에 제대로 연결되어 있는지 확인합니다.
- 잘못된 채널: 코드의 핀 정의가 모터를 연결한 채널(채널 A 또는 채널 B)과 일치하는지 확인합니다.
- 전원 없음: 외부 전원이 연결되고 작동 중인지 확인합니다. 모터 작동에는 외부 전원이 필요합니다 — USB만으로는 충분하지 않습니다.
- 약하거나 없는 회전: setSpeed() 또는 run()의 속도 값을 높입니다. 매우 낮은 속도(예: 20 미만)는 모터의 시작 토크를 극복하기에 충분하지 않을 수 있습니다.
- 방향 반전: 나사 단자에서 두 모터 와이어를 교환하거나, 코드에서 MOTOR_FORWARD를 MOTOR_BACKWARD로 변경합니다.
Arduino DC 모터 쉴드 - 전체 데모
아래는 DC 모터 쉴드의 모든 예제를 시연하는 단계별 동영상 튜토리얼입니다:
플랫폼 지원
이 라이브러리는 Arduino 표준 API(pinMode, digitalWrite, analogWrite, analogRead)만 사용하며 모든 Arduino 플랫폼(architectures=*)을 지원합니다.


