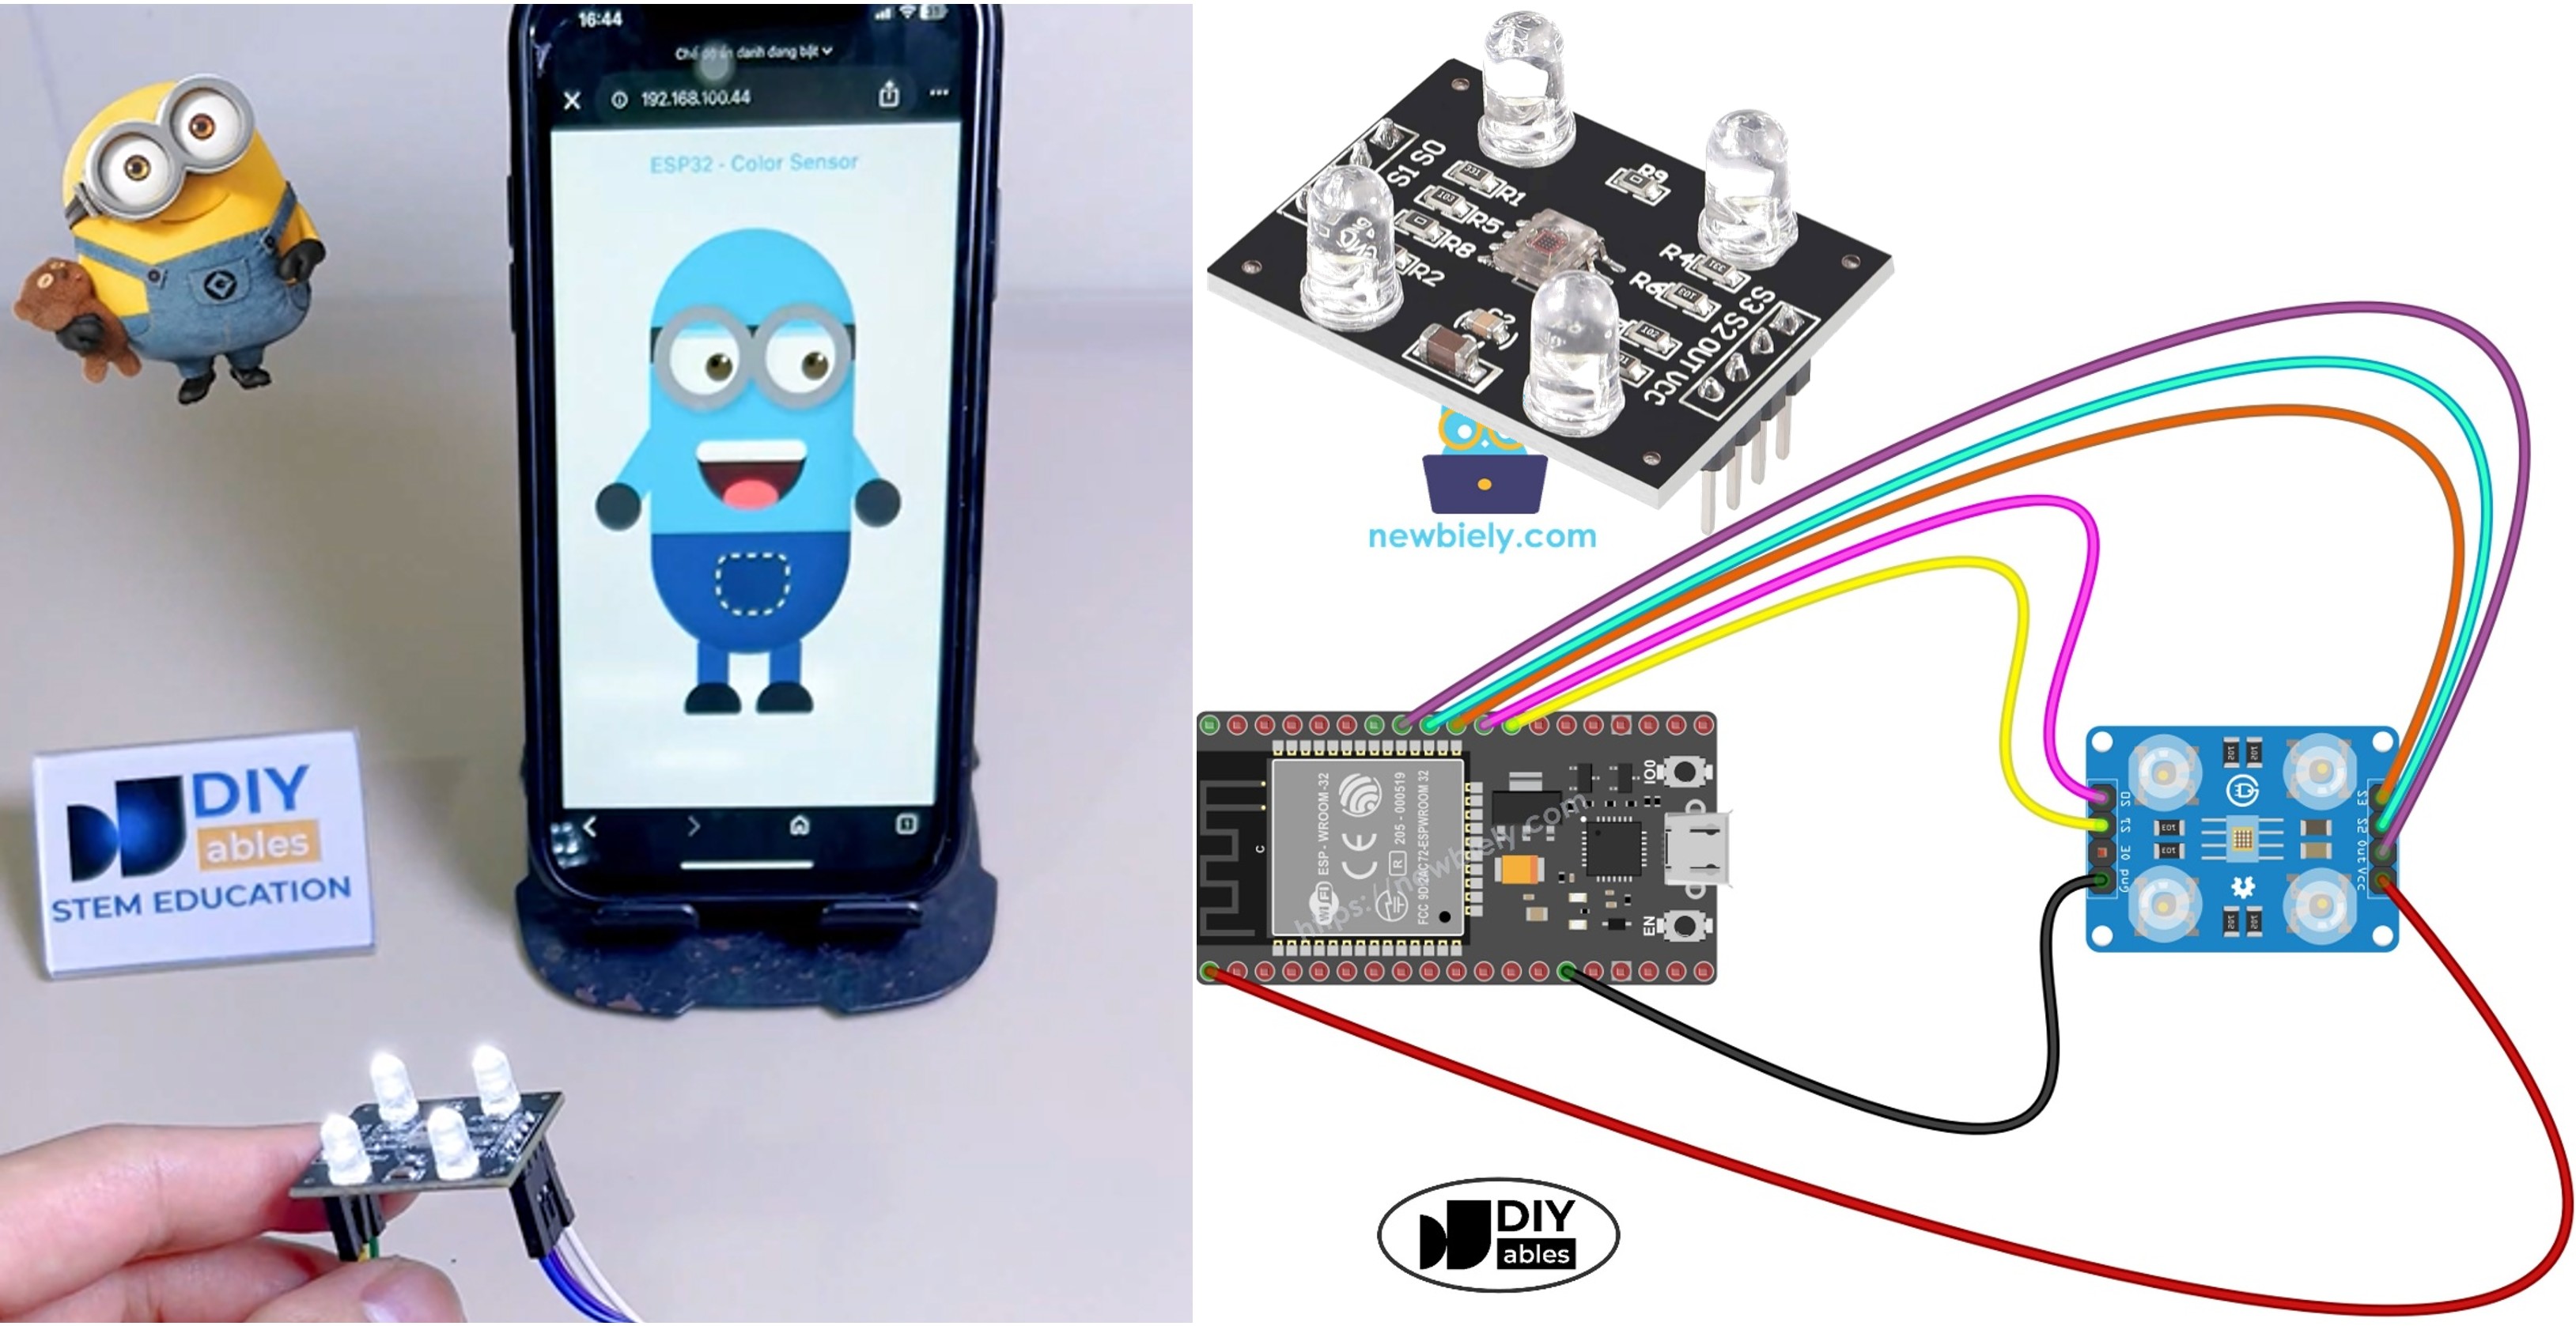
이 재미있는 프로젝트에서는 TCS3200D/TCS230 컬러 센서를 ESP32에 연결하고 감지된 색상을 실시간으로 웹 브라우저에 스트리밍합니다. 웹 페이지에는 장난스러운 애니메이션 미니언 캐릭터가 있으며 센서가 감지하는 내용에 따라 피부 색상이 라이브로 업데이트됩니다. 웹 인터페이스 구축과 WebSocket 통신 관리를 간소화하기 위해 이 프로젝트는 ESP32 맞춤형 웹앱 예제 - 초보자를 위한 간단한 웹 인터페이스 튜토리얼를 사용합니다.
다음은 동작 방식을 요약한 것입니다:
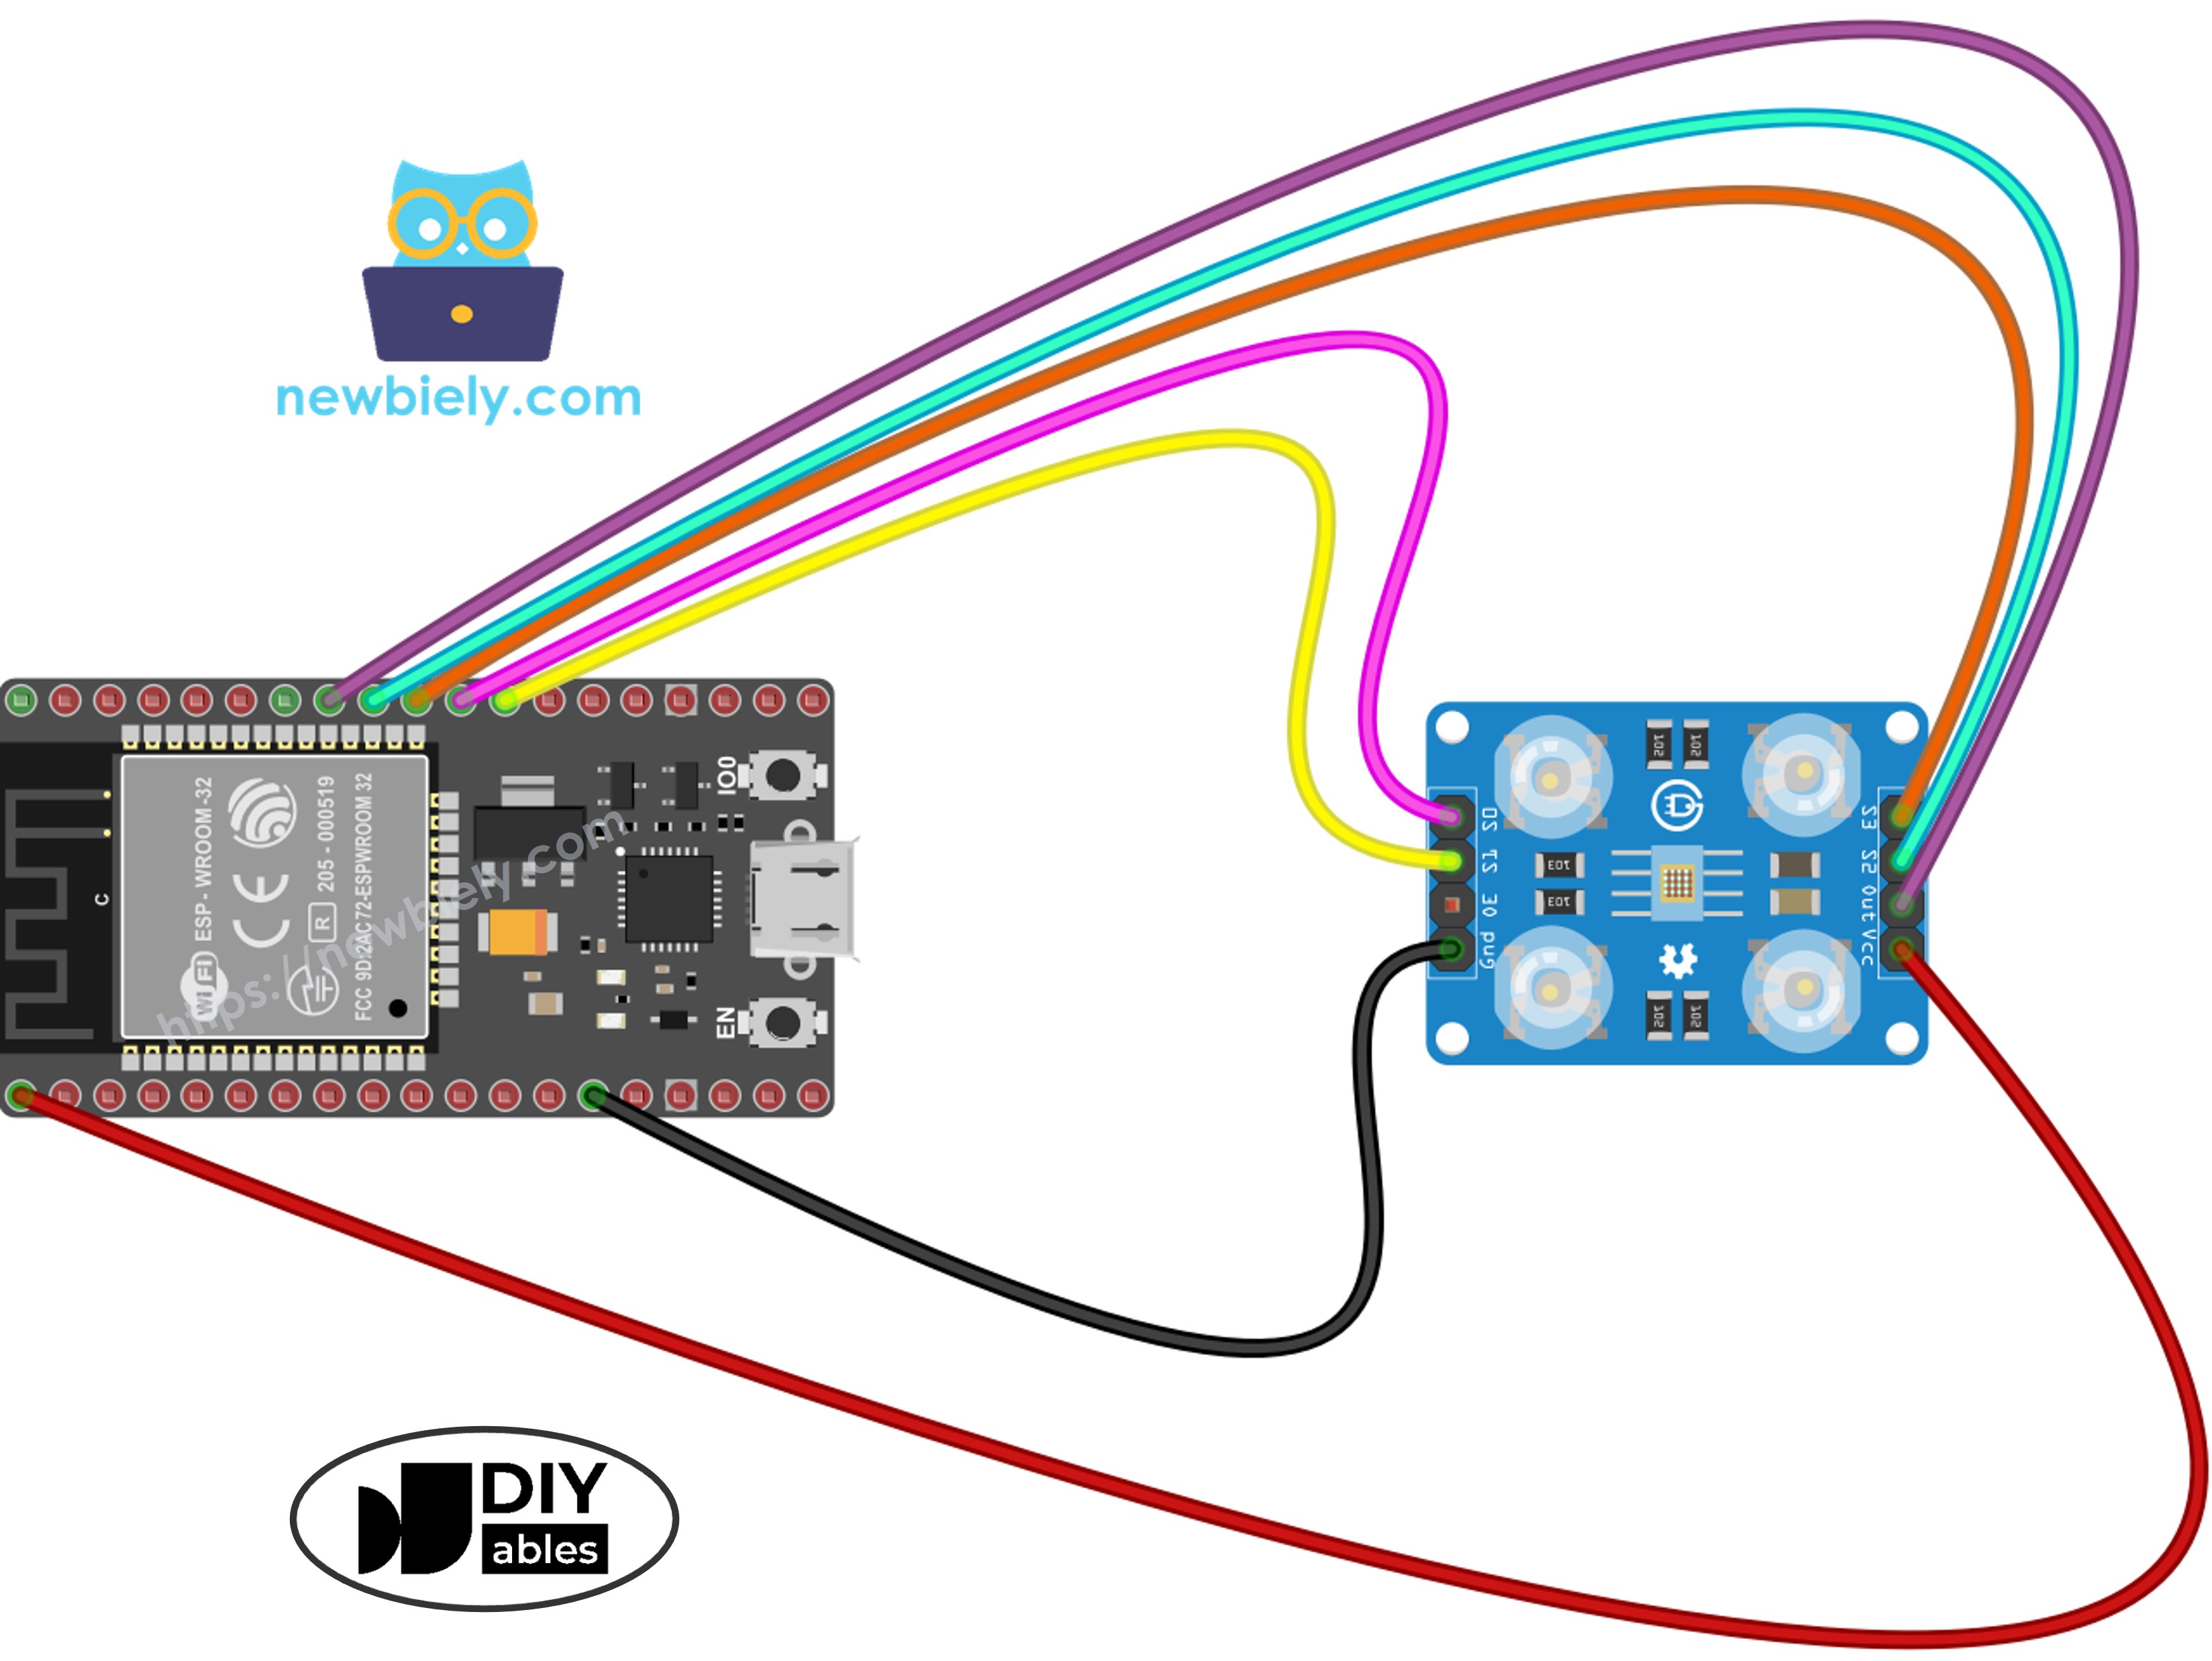
ESP32가 TCS3200D/TCS230 센서에서 RGB 색상 데이터를 읽습니다
RGB 값을 HEX 색상 코드(예: #FF8000)로 변환합니다
HEX 코드를 WebSocket을 통해 웹 브라우저로 스트리밍합니다
웹 페이지의 재미있는 애니메이션 미니언이 감지된 색상과 일치하도록 몸통, 팔, 눈꺼풀 색상을 즉시 변경합니다
이 색상 문자열은 DIYables ESP32 WebApps 라이브러리를 통해 WebSocket으로 연결된 모든 웹 브라우저에 브로드캐스트됩니다.
웹 페이지에서 JavaScript가 색상을 받아 미니언 캐릭터의 몸통, 팔, 눈꺼풀에 즉시 적용합니다.
ESP32 코드 - 컬러 센서 미니언 웹 앱
이 프로젝트는 4개의 파일로 구성됩니다:
ColorSensorESP32.ino - 메인 스케치: 센서를 초기화하고, 색상을 읽어 웹 페이지로 전송합니다
CustomWebApp.h - 헤더 파일: 커스텀 웹 앱 페이지 클래스를 선언합니다
CustomWebApp.cpp - 구현 파일: "Color sensor:" 식별자를 사용하여 WebSocket 메시지를 관리합니다
custom_page_html.h - 웹 페이지: 들어오는 색상에 반응하는 HTML/CSS/JavaScript로 만든 애니메이션 미니언
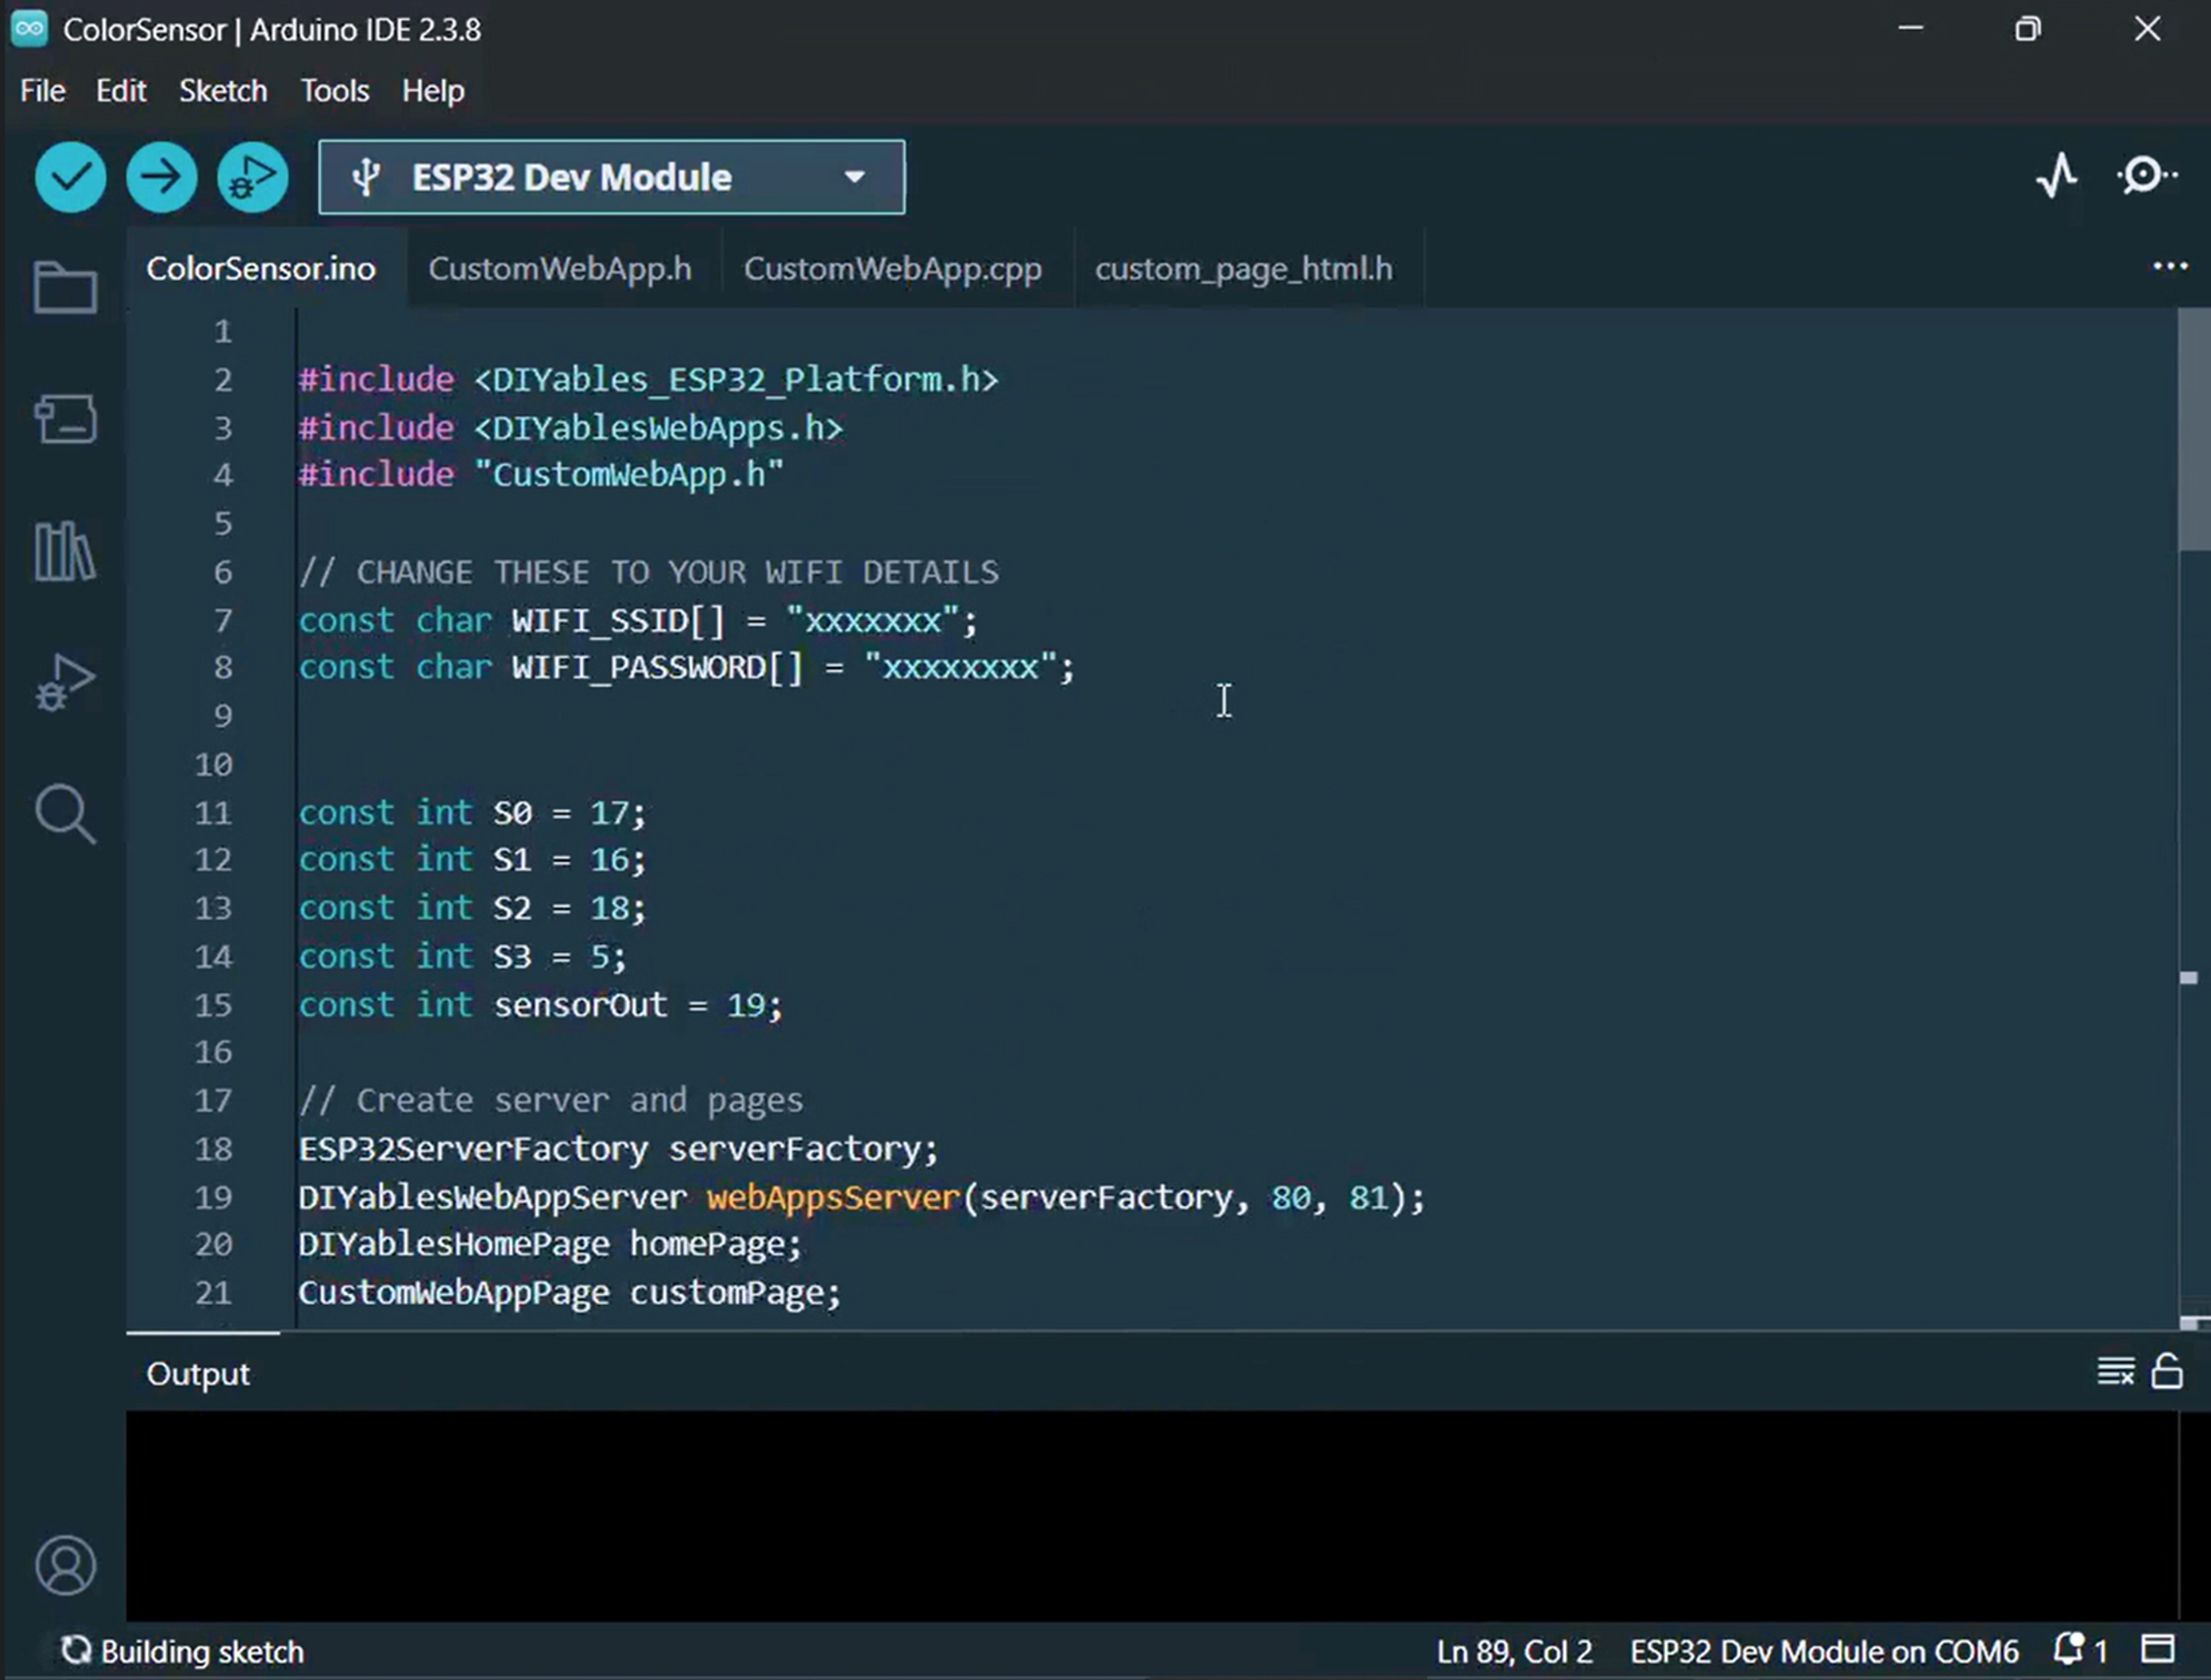
ColorSensorESP32.ino
/* * 이 ESP32 코드는 newbiely.kr 에서 개발되었습니다 * 이 ESP32 코드는 어떠한 제한 없이 공개 사용을 위해 제공됩니다. * 상세한 지침 및 연결도에 대해서는 다음을 방문하세요: * https://newbiely.kr/tutorials/esp32/esp32-color-sensor-via-web */#include <DIYables_ESP32_Platform.h>#include <DIYablesWebApps.h>#include"CustomWebApp.h"// CHANGE THESE TO YOUR WIFI DETAILSconstchar WIFI_SSID[] = "YOUR_WIFI_SSID";constchar WIFI_PASSWORD[] = "YOUR_WIFI_PASSWORD";// Configure TCS3200 pins for ESP32constint S0 = 17;constint S1 = 16;constint S2 = 18;constint S3 = 5;constint sensorOut = 19;// Create server and pagesESP32ServerFactory serverFactory;DIYablesWebAppServerwebAppsServer(serverFactory, 80, 81);DIYablesHomePage homePage;CustomWebAppPage customPage;unsignedlong lastColorRead = 0;voidsetup() {Serial.begin(9600);delay(1000);Serial.println("Starting Custom WebApp...");// Initialize TCS3200 pinspinMode(S0, OUTPUT);pinMode(S1, OUTPUT);pinMode(S2, OUTPUT);pinMode(S3, OUTPUT);pinMode(sensorOut, INPUT);// Set frequency scaling to 20%digitalWrite(S0, HIGH);digitalWrite(S1, LOW);// Add pages to serverwebAppsServer.addApp(&homePage);webAppsServer.addApp(&customPage);// Start WiFi and web serverif (!webAppsServer.begin(WIFI_SSID, WIFI_PASSWORD)) {while (1) {Serial.println("Failed to connect to WiFi!");delay(1000); } }Serial.println("Custom WebApp ready!"); customPage.sendToWeb("Arduino is ready!");}voidloop() {// Handle web serverwebAppsServer.loop();// Send sensor data every 1 secondif (millis() - lastColorRead > 1000) {// Read Red colordigitalWrite(S2, LOW);digitalWrite(S3, LOW);int r = map(pulseIn(sensorOut, LOW), 31, 150, 255, 0);// Read Green colordigitalWrite(S2, HIGH);digitalWrite(S3, HIGH);int g = map(pulseIn(sensorOut, LOW), 35, 180, 255, 0);// Read Blue colordigitalWrite(S2, LOW);digitalWrite(S3, HIGH);int b = map(pulseIn(sensorOut, LOW), 30, 150, 255, 0);// Convert to HEX color and send to Webchar hexColor[8]; sprintf(hexColor, "#%02X%02X%02X", constrain(r, 0, 255), constrain(g, 0, 255), constrain(b, 0, 255)); customPage.sendToWeb(String(hexColor));Serial.println("Sent to Minion: " + String(hexColor)); lastColorRead = millis(); }}
CustomWebApp.h
/* * 이 ESP32 코드는 newbiely.kr 에서 개발되었습니다 * 이 ESP32 코드는 어떠한 제한 없이 공개 사용을 위해 제공됩니다. * 상세한 지침 및 연결도에 대해서는 다음을 방문하세요: * https://newbiely.kr/tutorials/esp32/esp32-color-sensor-via-web */#ifndef CUSTOM_WEBAPP_H#define CUSTOM_WEBAPP_H#include <DIYablesWebApps.h>/** * Simple Custom WebApp Page * * This is a template for creating your own custom web applications. * It provides basic controls like buttons and sliders that communicate * with your Arduino in real-time. */class CustomWebAppPage : public DIYablesWebAppPageBase {private:// WebSocket message identifier for this custom appstaticconstString APP_IDENTIFIER;public: CustomWebAppPage();// ========================================// REQUIRED METHODS - USED BY LIBRARY - DON'T CHANGE THESE!// ========================================void handleHTTPRequest(IWebClient& client) override;void handleWebSocketMessage(IWebSocket& ws, const char* message, uint16_tlength) override;const char* getPageInfo() constoverride;String getNavigationInfo() constoverride;// ========================================// YOUR METHODS - USE THESE IN YOUR CODE!// ========================================void onCustomMessageReceived(void (*callback)(const String& payload));void sendToWeb(const String& message);};#endif
CustomWebApp.cpp
/* * 이 ESP32 코드는 newbiely.kr 에서 개발되었습니다 * 이 ESP32 코드는 어떠한 제한 없이 공개 사용을 위해 제공됩니다. * 상세한 지침 및 연결도에 대해서는 다음을 방문하세요: * https://newbiely.kr/tutorials/esp32/esp32-color-sensor-via-web */#include"CustomWebApp.h"#include"custom_page_html.h"// Define the static member - WebSocket message identifier for this custom appconstString CustomWebAppPage::APP_IDENTIFIER = "Color sensor:";// Callback function for handling messages from web browservoid (*customMessageCallback)(const String& payload) = nullptr;CustomWebAppPage::CustomWebAppPage() : DIYablesWebAppPageBase("/custom") {}void CustomWebAppPage::handleHTTPRequest(IWebClient& client) {// Send the HTML page to web browser sendHTTPHeader(client); client.print(CUSTOM_PAGE_HTML);}void CustomWebAppPage::handleWebSocketMessage(IWebSocket& ws, const char* message, uint16_tlength) {String messageStr = String(message, length);Serial.print("Color sensor WebApp received: ");Serial.println(messageStr);// Only handle messages that start with our app identifierif (messageStr.startsWith(APP_IDENTIFIER)) {String payload = messageStr.substring(APP_IDENTIFIER.length()); // Remove identifier// Call your callback function with the payloadif (customMessageCallback) { customMessageCallback(payload); } }}void CustomWebAppPage::onCustomMessageReceived(void (*callback)(const String& payload)) { customMessageCallback = callback;}void CustomWebAppPage::sendToWeb(const String& message) {// Send message to web browser with app identifierString fullMessage = APP_IDENTIFIER + message; broadcastToAllClients(fullMessage.c_str());}const char* CustomWebAppPage::getPageInfo() const {return"🔧 Color sensor WebApp";}String CustomWebAppPage::getNavigationInfo() const {String result = "<a href=\""; result += getPagePath(); result += "\" class=\"app-card custom\" style=\"background: linear-gradient(135deg, #007bff 0%, #0056b3 100%);\">"; result += "<h3>🔧 Color sensor WebApp</h3>"; result += "<p>Simple template for your own apps</p>"; result += "</a>";return result;}
loop() 내부의 map() 호출에서 캘리브레이션 값을 캘리브레이션 중에 기록한 숫자로 교체합니다. 예를 들어, 캘리브레이션 결과가 redMin = 42, redMax = 210, greenMin = 55, greenMax = 185, blueMin = 60, blueMax = 172라면 해당 줄을 다음과 같이 업데이트합니다:
int r = map(pulseIn(sensorOut, LOW), 42, 210, 255, 0);int g = map(pulseIn(sensorOut, LOW), 55, 185, 255, 0);int b = map(pulseIn(sensorOut, LOW), 60, 172, 255, 0);
업로드 버튼을 클릭하여 ESP32에 코드를 플래시합니다.
시리얼 모니터를 엽니다. 다음과 같은 내용이 표시됩니다:
Newbiely | Arduino IDE 2.3.8
──
☐
✕
File
Edit
Sketch
Tools
Help
ESP32 Dev Module
Newbiely.ino
···
8Serial.println("Hello World!");
Output
Serial Monitor
Message (Enter to send message to 'ESP32 Dev Module' on 'COM15')
New Line
9600 baud
Starting Custom WebApp...
Custom WebApp ready!
INFO: Added app /
INFO: Added app /custom
DIYables ESP32 WebApp Library
Network connected!
IP address: 192.168.0.5
HTTP server started on port 80
WebSocket server started on port 81
==========================================
DIYables WebApp Ready!
==========================================
📱 Web Interface: http://192.168.0.5
🔗 WebSocket: ws://192.168.0.5:81
📋 Available Applications:
🏠 Home Page: http://192.168.0.5/
🔧 Color sensor WebApp: http://192.168.0.5/custom
==========================================
Sent to Minion: #FFD200
Sent to Minion: #00C832
Sent to Minion: #0028FF
Ln 11, Col 1
ESP32 Dev Module on COM15
2
아무것도 표시되지 않으면 ESP32의 리셋 버튼을 눌러보세요.
시리얼 모니터에 표시된 IP 주소를 복사하여 스마트폰이나 컴퓨터의 웹 브라우저에서 열어보세요.
예를 들어: http://192.168.0.5
홈 페이지에서 컬러 센서 WebApp 카드를 탭하여 미니언 페이지를 엽니다.
또는 http://[IP_ADDRESS]/custom으로 직접 이동합니다.
화면에 웃고 있는 애니메이션 미니언이 표시됩니다.
TCS3200 센서 근처에 색깔 있는 물체를 가져다 대면 미니언의 피부 색상이 감지된 색상과 일치하도록 즉시 업데이트됩니다!
단계별 동영상 가이드를 참조할 수 있습니다.
코드 이해하기
ESP32 측 (ColorSensorESP32.ino)
메인 스케치는 다음 작업을 수행합니다:
TCS3200 센서 설정: S0/S1을 20% 주파수 스케일링으로 구성하고 S2/S3를 필터 선택을 위해 준비합니다.
매초 색상 샘플링: loop() 내부에서 ESP32가 빨강, 초록, 파랑 색상 필터를 순환하면서 pulseIn()으로 펄스 폭을 측정하고 캘리브레이션 데이터와 map()을 사용하여 각 값을 0~255로 변환합니다.
HEX로 포맷: 세 RGB 값을 sprintf()와 constrain()을 사용하여 HEX 문자열(예: #FF8000)로 결합합니다.
브라우저로 브로드캐스트: HEX 색상이 customPage.sendToWeb()을 통해 연결된 모든 웹 클라이언트에 전송됩니다.
웹 페이지 측 (custom_page_html.h)
HTML 파일에는 다음이 포함됩니다:
CSS만으로 만든 애니메이션 미니언: 깜빡이는 눈, 혀가 흔들리는 웃음 입, CSS 애니메이션과 작은 JavaScript 인터벌로 구동되는 무작위로 움직이는 동공이 있습니다.
WebSocket 리스너: JavaScript가 포트 81에서 ESP32의 WebSocket 서버에 지속적으로 연결하여 들어오는 색상 메시지를 처리합니다.
라이브 색상 적용: 수신된 HEX 색상이 미니언의 몸통, 팔, 눈꺼풀에 CSS transition을 사용하여 부드럽게 적용됩니다.
자동 재연결: WebSocket 연결이 끊어지면 사용자 개입 없이 2초마다 연결을 재시도합니다.
반응형 레이아웃: 미니언이 스마트폰부터 데스크톱까지 모든 화면 크기에 자동으로 맞게 조정됩니다.
메시지 프로토콜
이 프로젝트는 DIYables ESP32 WebApps 커스텀 앱 프레임워크를 따릅니다. 메시지는 "Color sensor:" 식별자로 태그됩니다:
ESP32 전송: Color sensor:#FF8000 (식별자 접두사 + HEX 색상 값)
브라우저 수신: JavaScript가 Color sensor: 접두사를 제거하고 나머지 #FF8000을 미니언에 적용합니다