ESP32 블루투스 아날로그 게이지 예제 아날로그 게이지 디스플레이 튜토리얼
개요
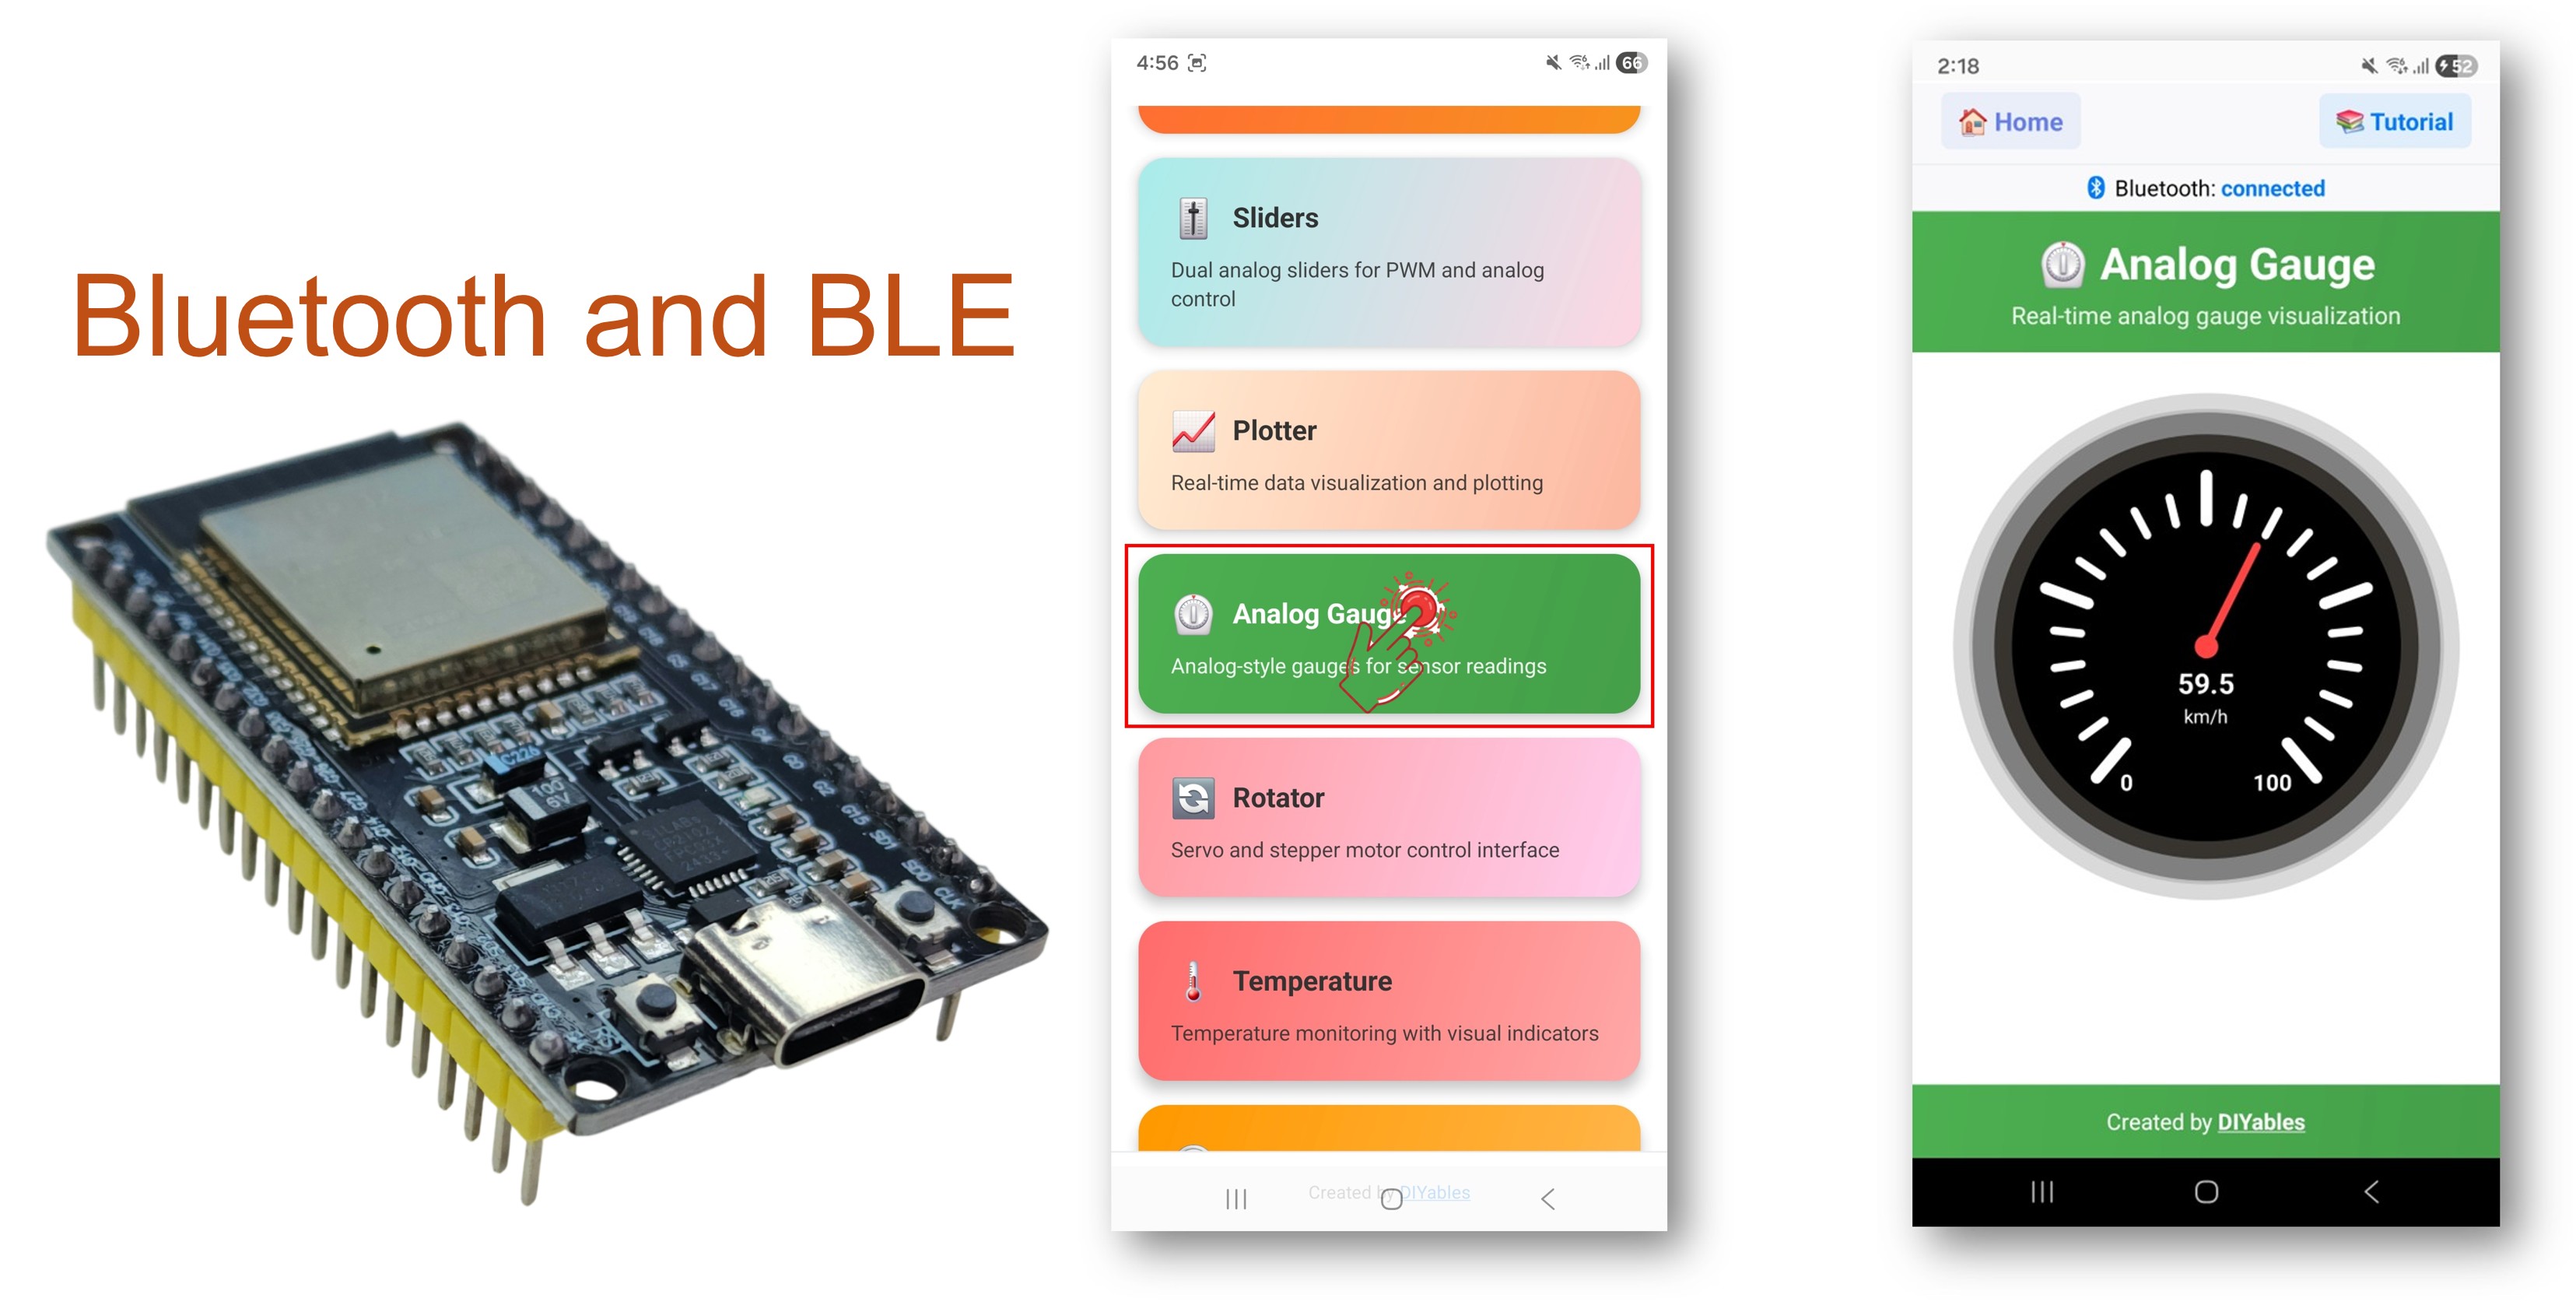
블루투스 아날로그 게이지 예제는 DIYables Bluetooth STEM 앱을 통해 접근할 수 있는 클래식 아날로그 미터 스타일의 디스플레이를 제공합니다. ESP32 보드용으로 설계되었으며 BLE(블루투스 저에너지)와 클래식 블루투스 연결을 모두 지원합니다. 설정 가능한 범위와 단위 레이블이 있는 숫자 값을 전송하세요 — 속도계, 압력 게이지, 전압 미터, 그리고 아날로그 다이얼 디스플레이가 필요한 모든 애플리케이션에 적합합니다.
이 예제는 두 가지 블루투스 모드를 지원합니다:
- ESP32 BLE (블루투스 저에너지): Android와 iOS 모두에서 작동
- ESP32 클래식 블루투스: Android에서만 작동. iOS는 클래식 블루투스를 지원하지 않습니다. iOS 지원이 필요한 경우 BLE를 사용하세요.
기능
- 아날로그 게이지 디스플레이: 클래식 다이얼/미터 스타일 시각화
- 설정 가능한 범위: 게이지의 최솟값과 최댓값 설정
- 커스텀 단위: km/h, PSI, V, %, 또는 임의의 커스텀 단위 문자열 표시
- 실시간 업데이트: 부드러운 바늘 움직임으로 라이브 수치 전송
- 요청 콜백: 앱이 필요 시 현재 값을 요청할 수 있음
- BLE & 클래식 블루투스: 프로젝트에 맞는 블루투스 모드 선택
- 크로스 플랫폼: BLE 모드는 Android와 iOS 모두에서 작동; 클래식 블루투스는 Android에서만 작동
- 저전력 옵션: BLE 모드는 클래식 블루투스보다 전력 소모가 적음
필요한 하드웨어
| 1 | × | 38-pin ESP32 ESP-WROOM-32 Dev Module - Narrow | 쿠팡 | 아마존 | |
| 1 | × | (또는) 38-pin ESP32 ESP-WROOM-32 Dev Module - Wide | 쿠팡 | 아마존 | |
| 1 | × | (또는) 30-pin ESP32 ESP-WROOM-32 Dev Module - Wide | 아마존 | |
| 1 | × | (또는) ESP32 Uno-form board | 아마존 | |
| 1 | × | (또는) ESP32 S3 Uno-form board | 아마존 | |
| 1 | × | USB 케이블 타입-A to 타입-C (USB-A PC용) | 쿠팡 | 아마존 | |
| 1 | × | USB 케이블 타입-C to 타입-C (USB-C PC용) | 아마존 | |
| 1 | × | 브레드보드 | 쿠팡 | 아마존 | |
| 1 | × | 점퍼케이블 | 쿠팡 | 아마존 | |
| 1 | × | (추천) ESP32용 스크루 터미널 확장 보드 | 쿠팡 | 아마존 | |
| 1 | × | (추천) Breakout Expansion Board for ESP32 | 쿠팡 | 아마존 | |
| 1 | × | (추천) ESP32용 전원 분배기 | 쿠팡 | 아마존 |
공개: 이 포스팅 에 제공된 일부 링크는 아마존 제휴 링크입니다. 이 포스팅은 쿠팡 파트너스 활동의 일환으로, 이에 따른 일정액의 수수료를 제공받습니다.
ESP32 코드
빠른 시작
다음 지침을 단계별로 따르세요:
- ESP32가 처음이라면 ESP32 - 소프트웨어 설치 튜토리얼을 참조하세요.
- USB 케이블로 ESP32 보드를 컴퓨터에 연결합니다.
- 컴퓨터에서 Arduino IDE를 실행합니다.
- 적절한 ESP32 보드와 COM 포트를 선택합니다.
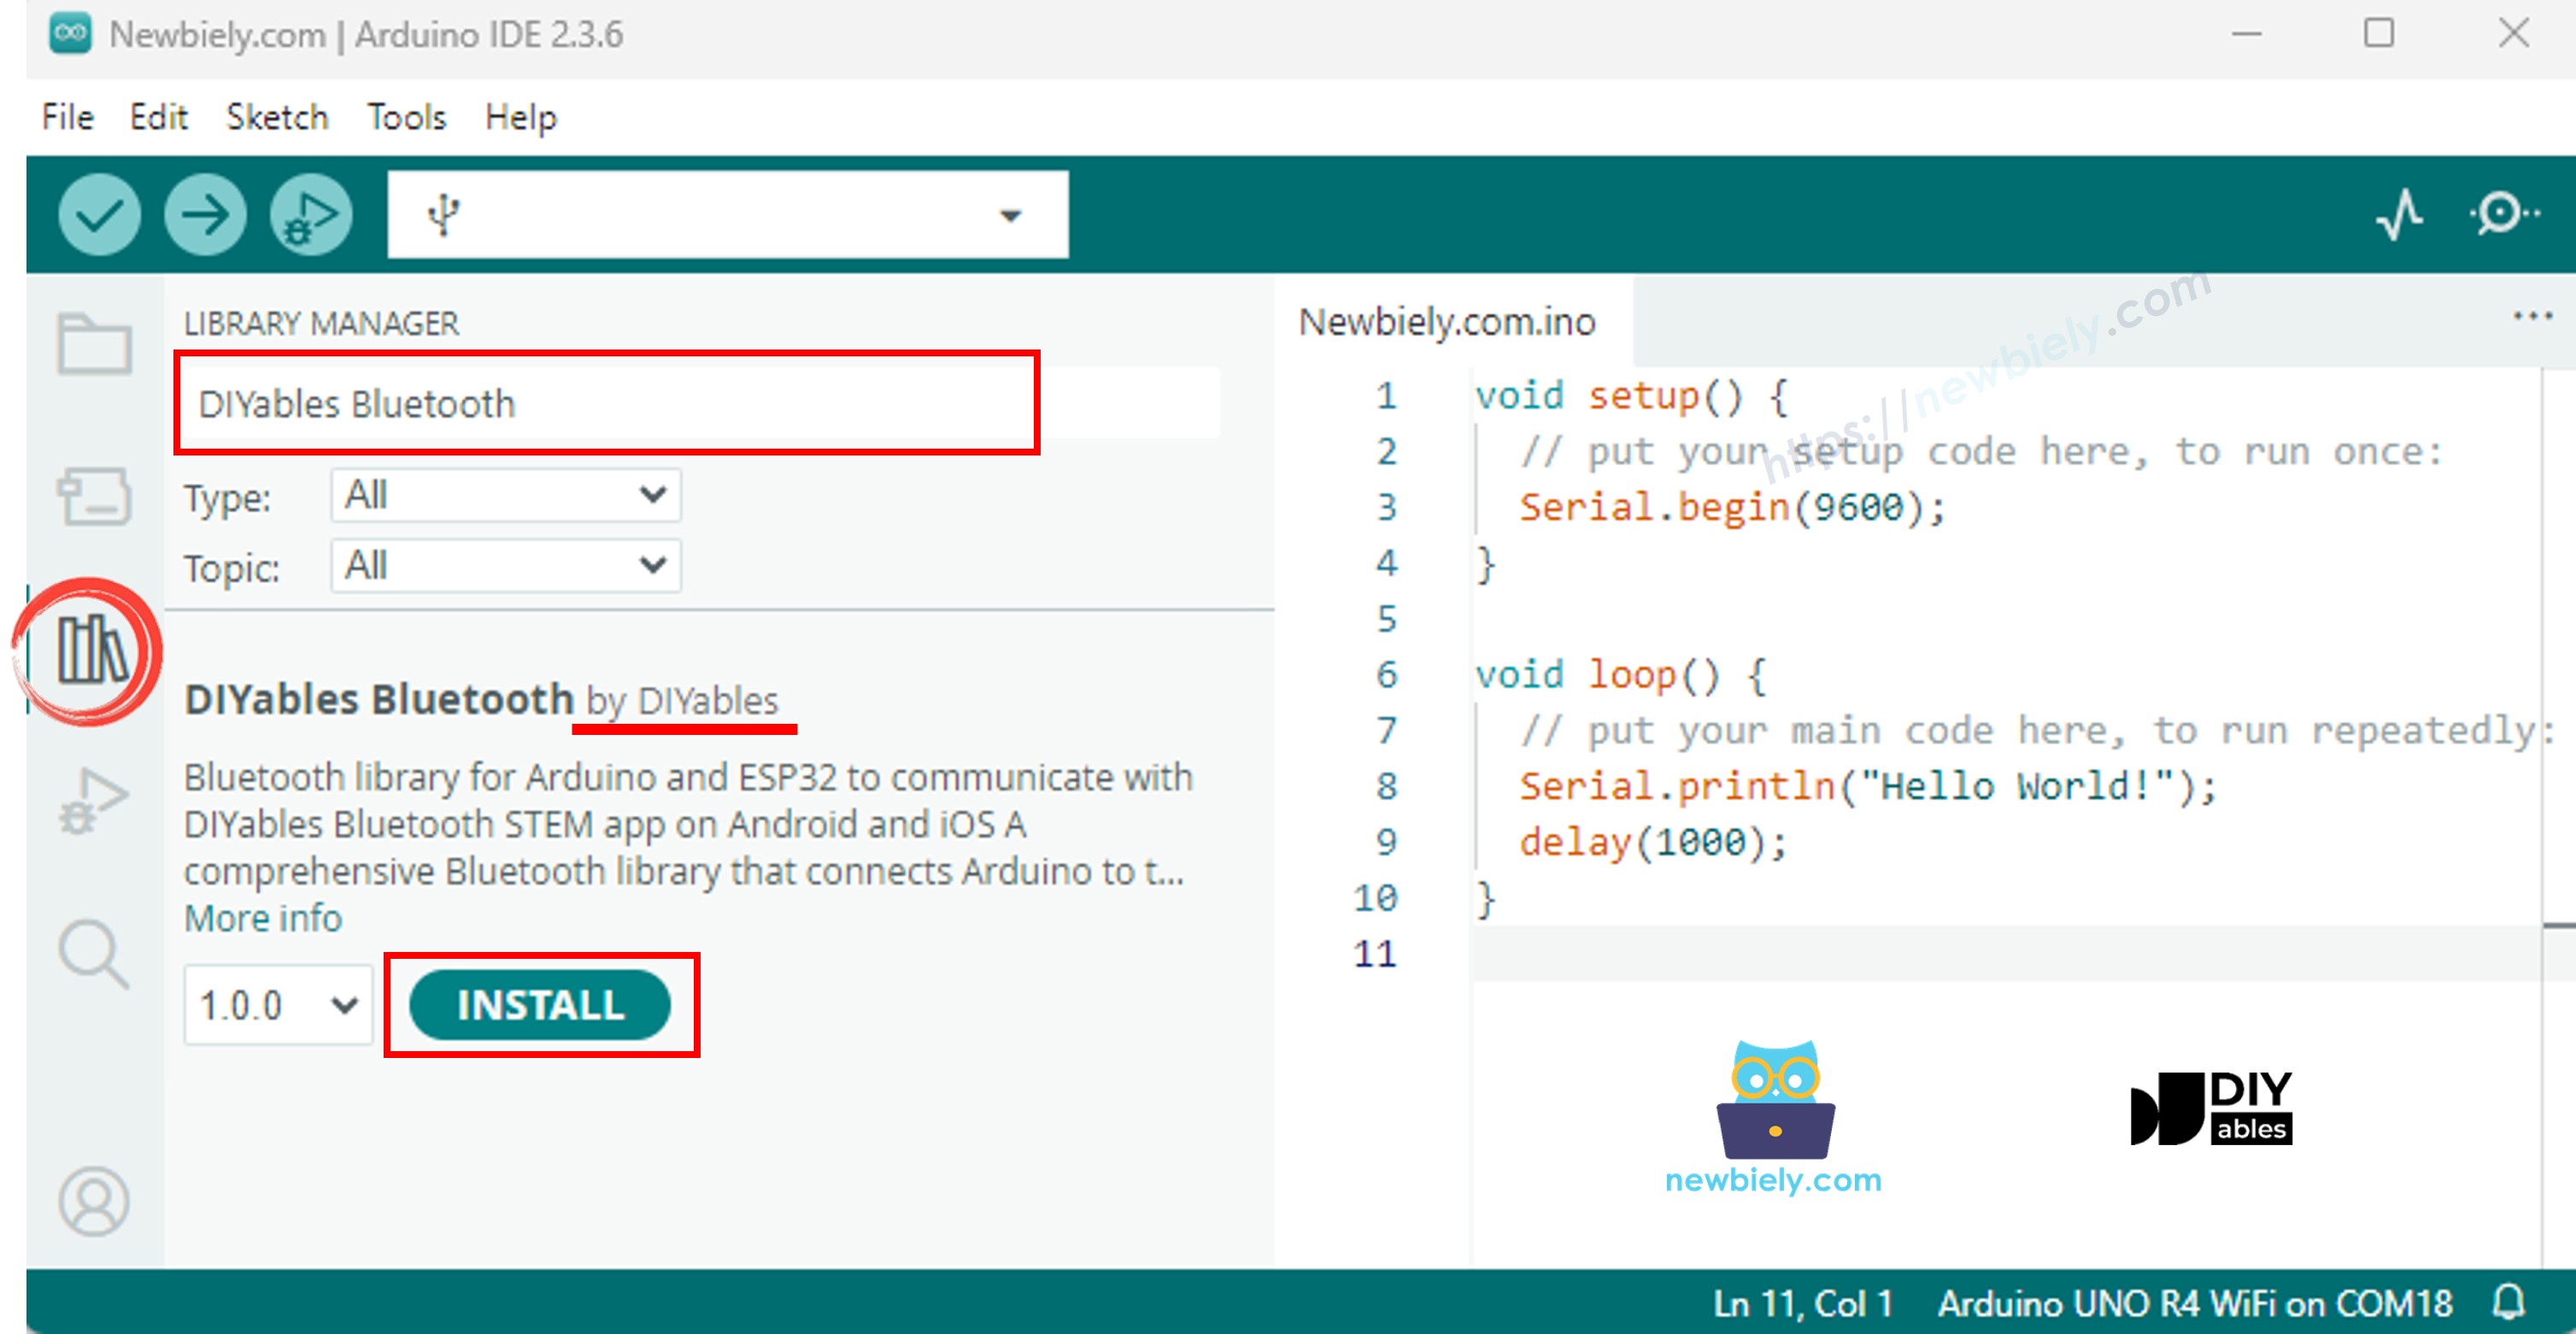
- Arduino IDE 왼쪽 바의 라이브러리 아이콘으로 이동합니다.
- "DIYables Bluetooth"를 검색한 다음 DIYables의 DIYables Bluetooth 라이브러리를 찾습니다.
- 설치 버튼을 클릭하여 라이브러리를 설치합니다.
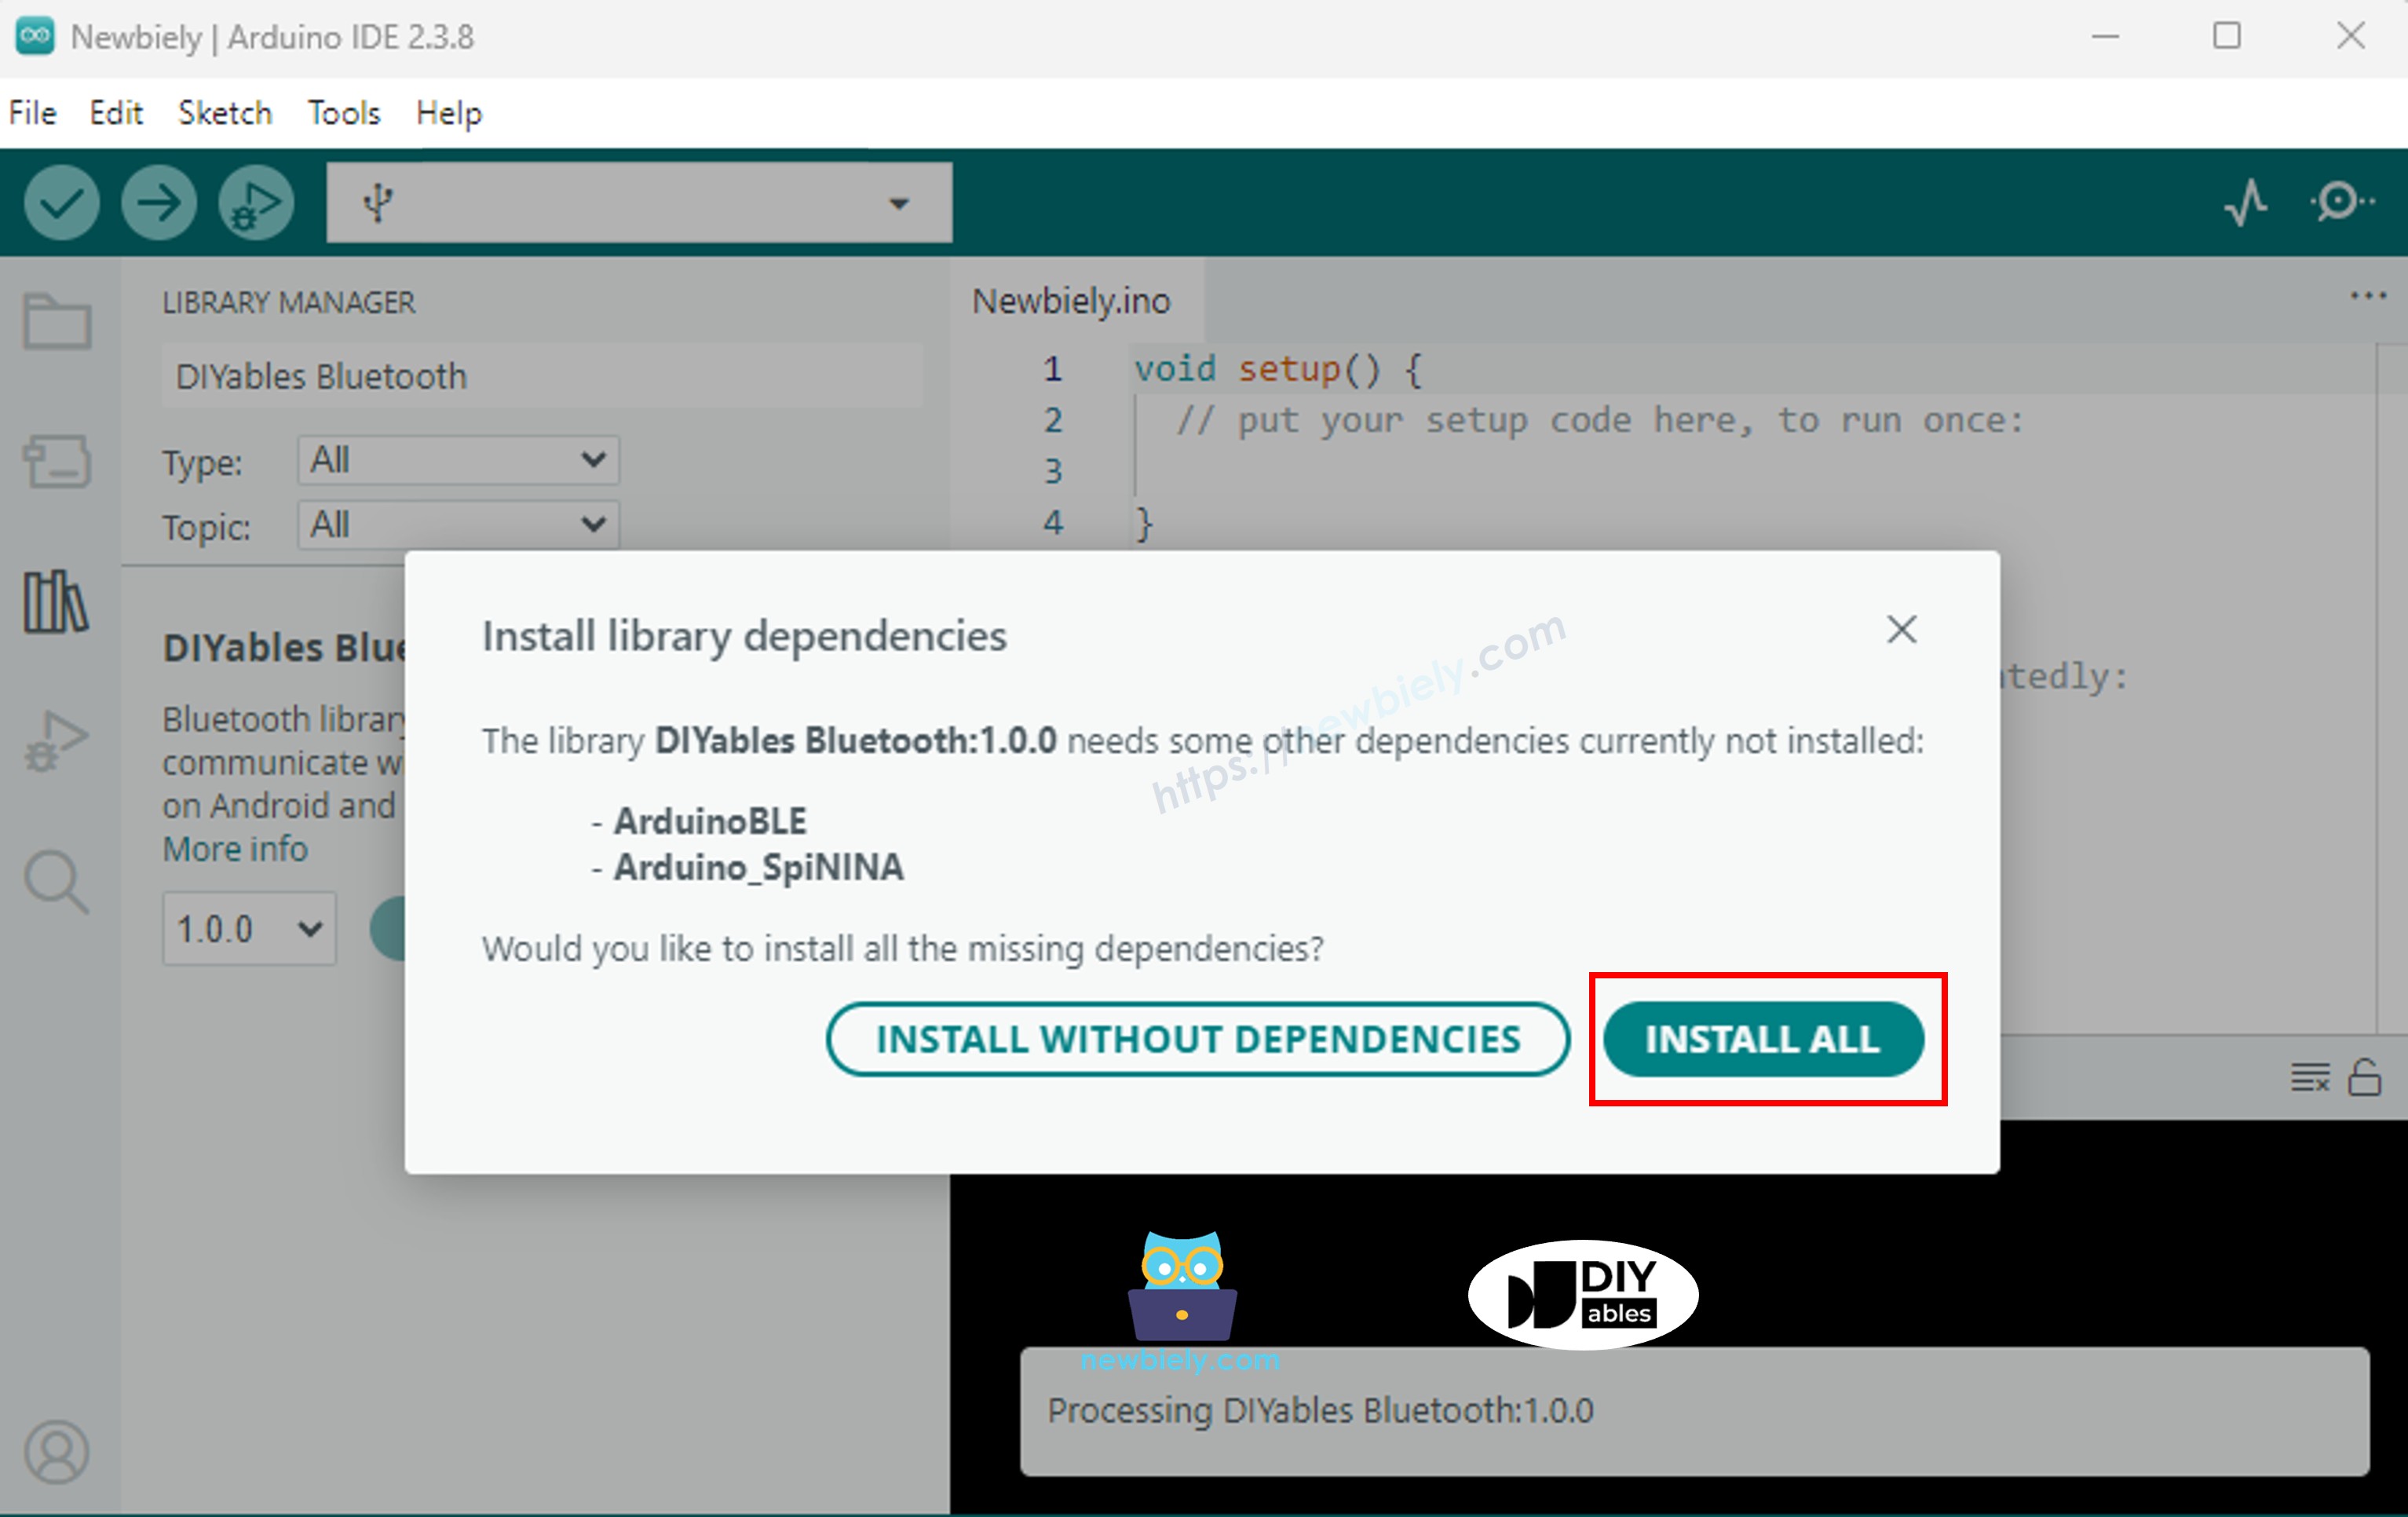
- 다른 라이브러리 종속성 설치 여부를 묻는 메시지가 표시됩니다.
- 모두 설치 버튼을 클릭하여 모든 라이브러리 종속성을 설치합니다.
필요에 따라 아래 두 가지 블루투스 모드 중 하나를 선택하세요:
ESP32 클래식 블루투스 코드 (Android의 앱에서만 작동)
참고: 클래식 블루투스는 iOS에서 지원되지 않습니다. iOS 지원이 필요한 경우 아래 BLE 코드를 사용하세요.
- Arduino IDE에서 파일 예제 DIYables Bluetooth Esp32Bluetooth_AnalogGauge 예제로 이동하거나, 위의 코드를 복사하여 Arduino IDE 편집기에 붙여넣습니다.
/*
* DIYables Bluetooth Library - ESP32 Classic Bluetooth Analog Gauge Example
* Works with DIYables Bluetooth STEM app on Android
* Note: Classic Bluetooth is NOT supported on iOS. Use BLE examples for iOS support.
*
* This example demonstrates the Bluetooth Analog Gauge feature:
* - Display values on an analog meter/gauge
* - Configurable range and unit
* - Perfect for sensor monitoring (speed, pressure, voltage, etc.)
*
* Compatible Boards:
* - ESP32 (all variants with Classic Bluetooth)
* - ESP32-WROOM-32
* - ESP32-DevKitC
* - ESP32-WROVER
*
* Note: Select "Huge APP (3MB No OTA/1MB SPIFFS)" partition scheme
* in Arduino IDE: Tools > Partition Scheme
*
* Optional: Analog sensor (potentiometer, pressure sensor, etc.)
*
* Setup:
* 1. Upload the sketch to your ESP32
* 2. Open Serial Monitor (115200 baud) to see connection status
* 3. Use DIYables Bluetooth App to connect and view the gauge
*
* Tutorial: https://diyables.io/bluetooth-app
* Author: DIYables
*/
#include <DIYables_BluetoothServer.h>
#include <DIYables_BluetoothAnalogGauge.h>
#include <platforms/DIYables_Esp32Bluetooth.h>
// Create Bluetooth instances
DIYables_Esp32Bluetooth bluetooth("ESP32_Gauge");
DIYables_BluetoothServer bluetoothServer(bluetooth);
// Create Analog Gauge app instance (min=0, max=100, unit="km/h")
DIYables_BluetoothAnalogGauge bluetoothGauge(0.0, 100.0, "km/h");
// Variables for gauge value
float currentValue = 0.0;
unsigned long lastUpdate = 0;
const unsigned long UPDATE_INTERVAL = 200; // Update every 200ms
// Optional: Analog input pin for sensor
const int ANALOG_PIN = 34; // ESP32 ADC pin
// Function to read sensor value
float readSensorValue() {
// TODO: Replace with actual sensor reading
// Examples:
// - Pressure sensor: readPressure()
// - Voltage sensor: analogRead(34) * (3.3 / 4095.0)
// - Speed sensor: calculateSpeed()
// Option 1: Read from analog pin and map to gauge range
// int rawValue = analogRead(ANALOG_PIN);
// return map(rawValue, 0, 4095, 0, 100);
// Option 2: Simulated data (sine wave)
static float phase = 0;
phase += 0.05;
if (phase > 2 * PI) phase = 0;
return 50 + 50 * sin(phase); // Oscillates between 0-100
}
void setup() {
Serial.begin(115200);
delay(1000);
Serial.println("DIYables Bluetooth - ESP32 Analog Gauge Example");
// Optional: Initialize analog pin
// pinMode(ANALOG_PIN, INPUT);
// Initialize Bluetooth server with platform-specific implementation
bluetoothServer.begin();
// Add gauge app to server
bluetoothServer.addApp(&bluetoothGauge);
// Set up connection event callbacks
bluetoothServer.setOnConnected([]() {
Serial.println("Bluetooth connected!");
// Send initial value
currentValue = readSensorValue();
bluetoothGauge.send(currentValue);
Serial.print("Initial value sent: ");
Serial.print(currentValue);
Serial.print(" ");
Serial.println(bluetoothGauge.getUnit());
});
bluetoothServer.setOnDisconnected([]() {
Serial.println("Bluetooth disconnected!");
});
// Optional: Handle requests for current value
bluetoothGauge.onValueRequest([]() {
currentValue = readSensorValue();
bluetoothGauge.send(currentValue);
Serial.print("Value requested - Sent: ");
Serial.print(currentValue);
Serial.print(" ");
Serial.println(bluetoothGauge.getUnit());
});
// You can change gauge configuration at runtime:
// bluetoothGauge.setRange(0.0, 200.0); // Change range to 0-200
// bluetoothGauge.setUnit("mph"); // Change unit to mph
// bluetoothGauge.setRange(0.0, 3.3); // For voltage (0-3.3V on ESP32)
// bluetoothGauge.setUnit("V");
Serial.println("Waiting for Bluetooth connection...");
Serial.print("Gauge range: ");
Serial.print(bluetoothGauge.getMin());
Serial.print(" - ");
Serial.print(bluetoothGauge.getMax());
Serial.print(" ");
Serial.println(bluetoothGauge.getUnit());
}
void loop() {
// Handle Bluetooth server communications
bluetoothServer.loop();
// Send gauge updates periodically (only when connected)
if (bluetooth.isConnected() && millis() - lastUpdate >= UPDATE_INTERVAL) {
lastUpdate = millis();
// Read sensor value
currentValue = readSensorValue();
// Send to Bluetooth app
bluetoothGauge.send(currentValue);
// Print to Serial Monitor
Serial.print("Gauge: ");
Serial.print(currentValue, 1);
Serial.print(" ");
Serial.println(bluetoothGauge.getUnit());
}
delay(10);
}
- Arduino IDE에서 업로드 버튼을 클릭하여 ESP32에 코드를 업로드합니다.
- 시리얼 모니터를 엽니다.
- 시리얼 모니터에서 결과를 확인합니다. 다음과 같이 표시됩니다:
8
Serial.println("Hello World!");
Message (Enter to send message to 'ESP32 Dev Module' on 'COM15')
New Line
9600 baud
DIYables Bluetooth - ESP32 Analog Gauge Example
Waiting for Bluetooth connection...
ESP32 BLE 코드 (Android과 iOS 앱 모두에서 작동)
- Arduino IDE에서 파일 예제 DIYables Bluetooth Esp32BLE_AnalogGauge 예제로 이동하거나, 위의 코드를 복사하여 Arduino IDE 편집기에 붙여넣습니다.
/*
* DIYables Bluetooth Library - ESP32 BLE Analog Gauge Example
* Works with DIYables Bluetooth STEM app on Android and iOS
*
* This example demonstrates the Bluetooth Analog Gauge feature:
* - Display values on an analog meter/gauge
* - Configurable range and unit
* - Perfect for sensor monitoring (speed, pressure, voltage, etc.)
*
* Compatible Boards:
* - ESP32-WROOM-32
* - ESP32-DevKitC
* - ESP32-WROVER
* - ESP32-S3
* - ESP32-C3
* - Any ESP32 board supporting BLE
*
* Note: Select "Huge APP (3MB No OTA/1MB SPIFFS)" partition scheme
* in Arduino IDE: Tools > Partition Scheme
*
* Optional: Analog sensor (potentiometer, pressure sensor, etc.)
*
* Setup:
* 1. Upload the sketch to your ESP32
* 2. Open Serial Monitor (115200 baud) to see connection status
* 3. Use DIYables Bluetooth App to connect and view the gauge
*
* Tutorial: https://diyables.io/bluetooth-app
* Author: DIYables
*/
#include <DIYables_BluetoothServer.h>
#include <DIYables_BluetoothAnalogGauge.h>
#include <platforms/DIYables_Esp32BLE.h>
// BLE Configuration
const char* DEVICE_NAME = "ESP32BLE_Gauge";
const char* SERVICE_UUID = "19B10000-E8F2-537E-4F6C-D104768A1214";
const char* TX_UUID = "19B10001-E8F2-537E-4F6C-D104768A1214";
const char* RX_UUID = "19B10002-E8F2-537E-4F6C-D104768A1214";
// Create Bluetooth instances
DIYables_Esp32BLE bluetooth(DEVICE_NAME, SERVICE_UUID, TX_UUID, RX_UUID);
DIYables_BluetoothServer bluetoothServer(bluetooth);
// Create Analog Gauge app instance (min=0, max=100, unit="km/h")
DIYables_BluetoothAnalogGauge bluetoothGauge(0.0, 100.0, "km/h");
// Variables for gauge value
float currentValue = 0.0;
unsigned long lastUpdate = 0;
const unsigned long UPDATE_INTERVAL = 200; // Update every 200ms
// Optional: Analog input pin for sensor
const int ANALOG_PIN = 34; // ESP32 ADC pin
// Function to read sensor value
float readSensorValue() {
// TODO: Replace with actual sensor reading
// Option 1: Read from analog pin and map to gauge range
// int rawValue = analogRead(ANALOG_PIN);
// return map(rawValue, 0, 4095, 0, 100); // ESP32 has 12-bit ADC
// Option 2: Simulated data (sine wave)
static float phase = 0;
phase += 0.05;
if (phase > 2 * PI) phase = 0;
return 50 + 50 * sin(phase); // Oscillates between 0-100
}
void setup() {
Serial.begin(115200);
delay(1000);
Serial.println("DIYables Bluetooth - ESP32 BLE Analog Gauge Example");
// Initialize Bluetooth server with platform-specific implementation
bluetoothServer.begin();
// Add gauge app to server
bluetoothServer.addApp(&bluetoothGauge);
// Set up connection event callbacks
bluetoothServer.setOnConnected([]() {
Serial.println("Bluetooth connected!");
currentValue = readSensorValue();
bluetoothGauge.send(currentValue);
Serial.print("Initial value sent: ");
Serial.print(currentValue);
Serial.print(" ");
Serial.println(bluetoothGauge.getUnit());
});
bluetoothServer.setOnDisconnected([]() {
Serial.println("Bluetooth disconnected!");
});
bluetoothGauge.onValueRequest([]() {
currentValue = readSensorValue();
bluetoothGauge.send(currentValue);
Serial.print("Value requested - Sent: ");
Serial.print(currentValue);
Serial.print(" ");
Serial.println(bluetoothGauge.getUnit());
});
Serial.println("Waiting for Bluetooth connection...");
Serial.print("Gauge range: ");
Serial.print(bluetoothGauge.getMin());
Serial.print(" - ");
Serial.print(bluetoothGauge.getMax());
Serial.print(" ");
Serial.println(bluetoothGauge.getUnit());
}
void loop() {
bluetoothServer.loop();
if (bluetooth.isConnected() && millis() - lastUpdate >= UPDATE_INTERVAL) {
lastUpdate = millis();
currentValue = readSensorValue();
bluetoothGauge.send(currentValue);
Serial.print("Gauge: ");
Serial.print(currentValue, 1);
Serial.print(" ");
Serial.println(bluetoothGauge.getUnit());
}
delay(10);
}
- Arduino IDE에서 업로드 버튼을 클릭하여 ESP32에 코드를 업로드합니다.
- 시리얼 모니터를 엽니다.
- 시리얼 모니터에서 결과를 확인합니다. 다음과 같이 표시됩니다:
8
Serial.println("Hello World!");
Message (Enter to send message to 'ESP32 Dev Module' on 'COM15')
New Line
9600 baud
DIYables Bluetooth - ESP32 BLE Analog Gauge Example
Waiting for Bluetooth connection...
모바일 앱
- ESP32 클래식 블루투스 코드를 사용하는 경우, 앱을 열기 전에 Android 폰과 ESP32를 페어링해야 합니다:
- 폰의 설정 > 블루투스로 이동합니다.
- 블루투스가 켜져 있는지 확인합니다.
- 폰이 사용 가능한 기기를 검색합니다.
- 사용 가능한 기기 목록에서 "ESP32_Gauge"를 찾아 탭합니다.
- 페어링 요청을 확인합니다(PIN 필요 없음).
- 기기 이름 아래에 "페어링됨"이 표시될 때까지 기다립니다.
- ESP32 BLE 코드를 사용하는 경우, 페어링이 필요 없습니다. 다음 단계로 진행하면 됩니다.
- DIYables 블루투스 앱을 엽니다.
- 앱을 처음 열 때 권한을 요청합니다. 다음을 허용해 주세요:
- 주변 기기 권한 (Android 12+) / 블루투스 권한 (iOS) - 블루투스 기기를 검색하고 연결하는 데 필요
- 위치 권한 (Android 11 이하만 해당) - BLE 기기 검색을 위해 이전 Android 버전에서 필요
- 폰에서 블루투스가 켜져 있는지 확인합니다.
- 홈 화면에서 연결 버튼을 탭합니다. 앱이 BLE 및 클래식 블루투스 기기를 모두 검색합니다.
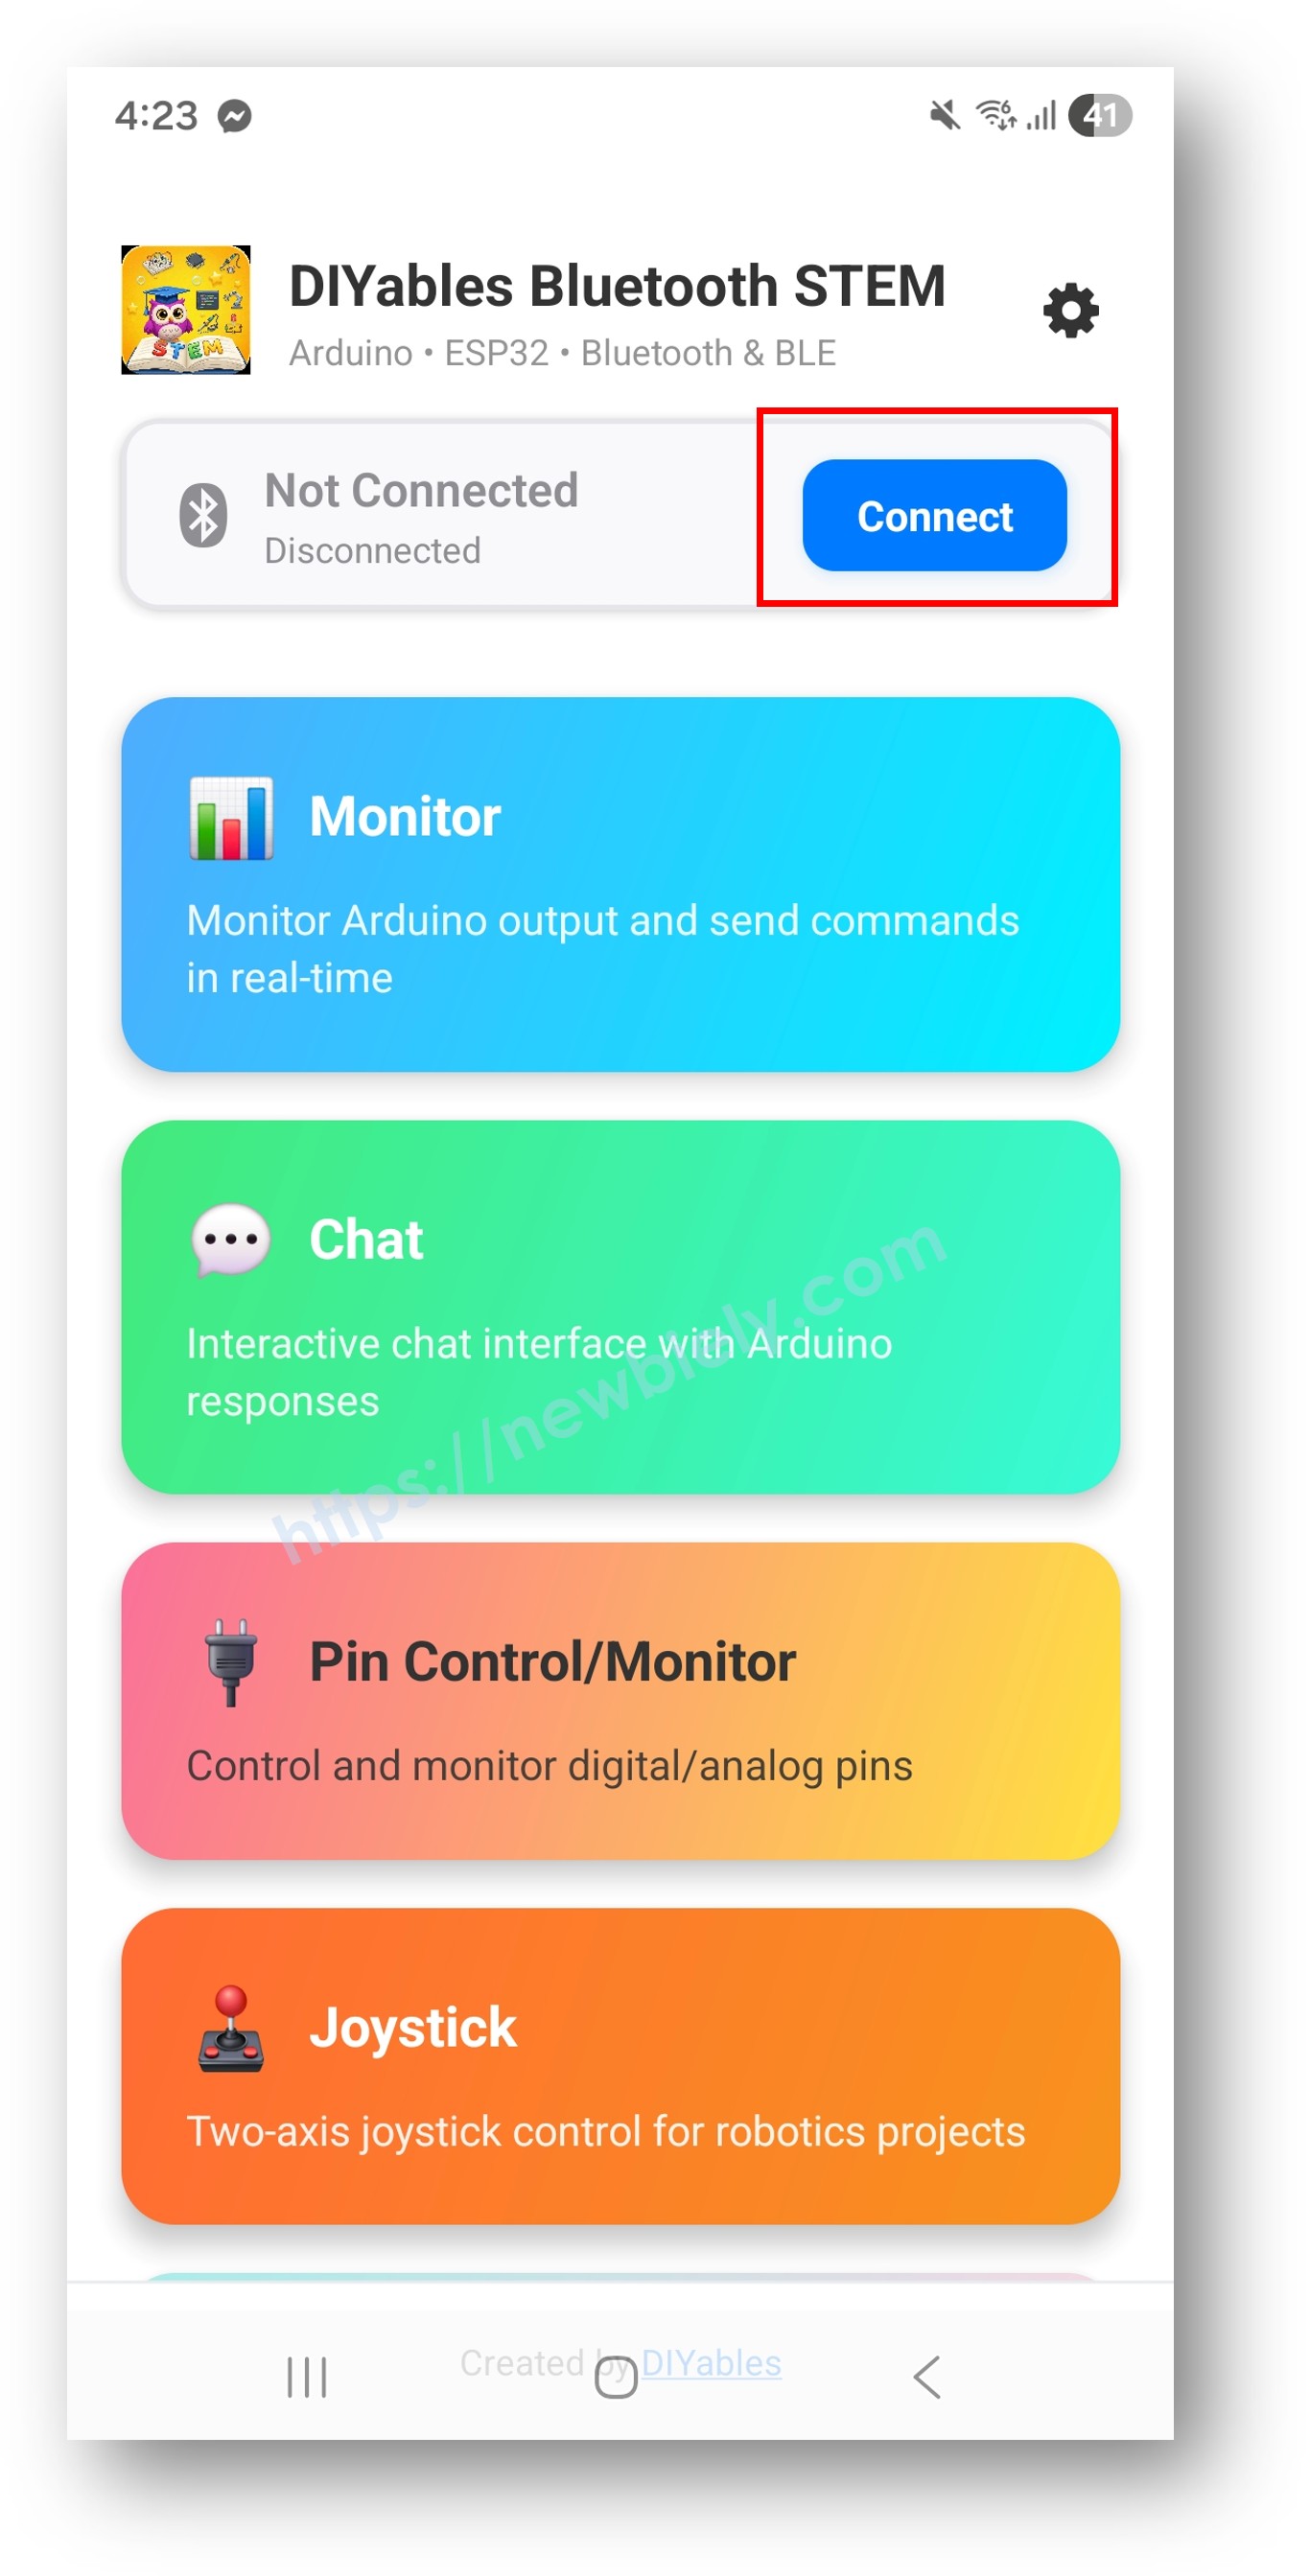
- 검색 결과에서 기기를 찾아 탭하여 연결합니다:
- 클래식 블루투스의 경우: "ESP32_Gauge" 탭
- BLE의 경우: "ESP32BLE_Gauge" 탭
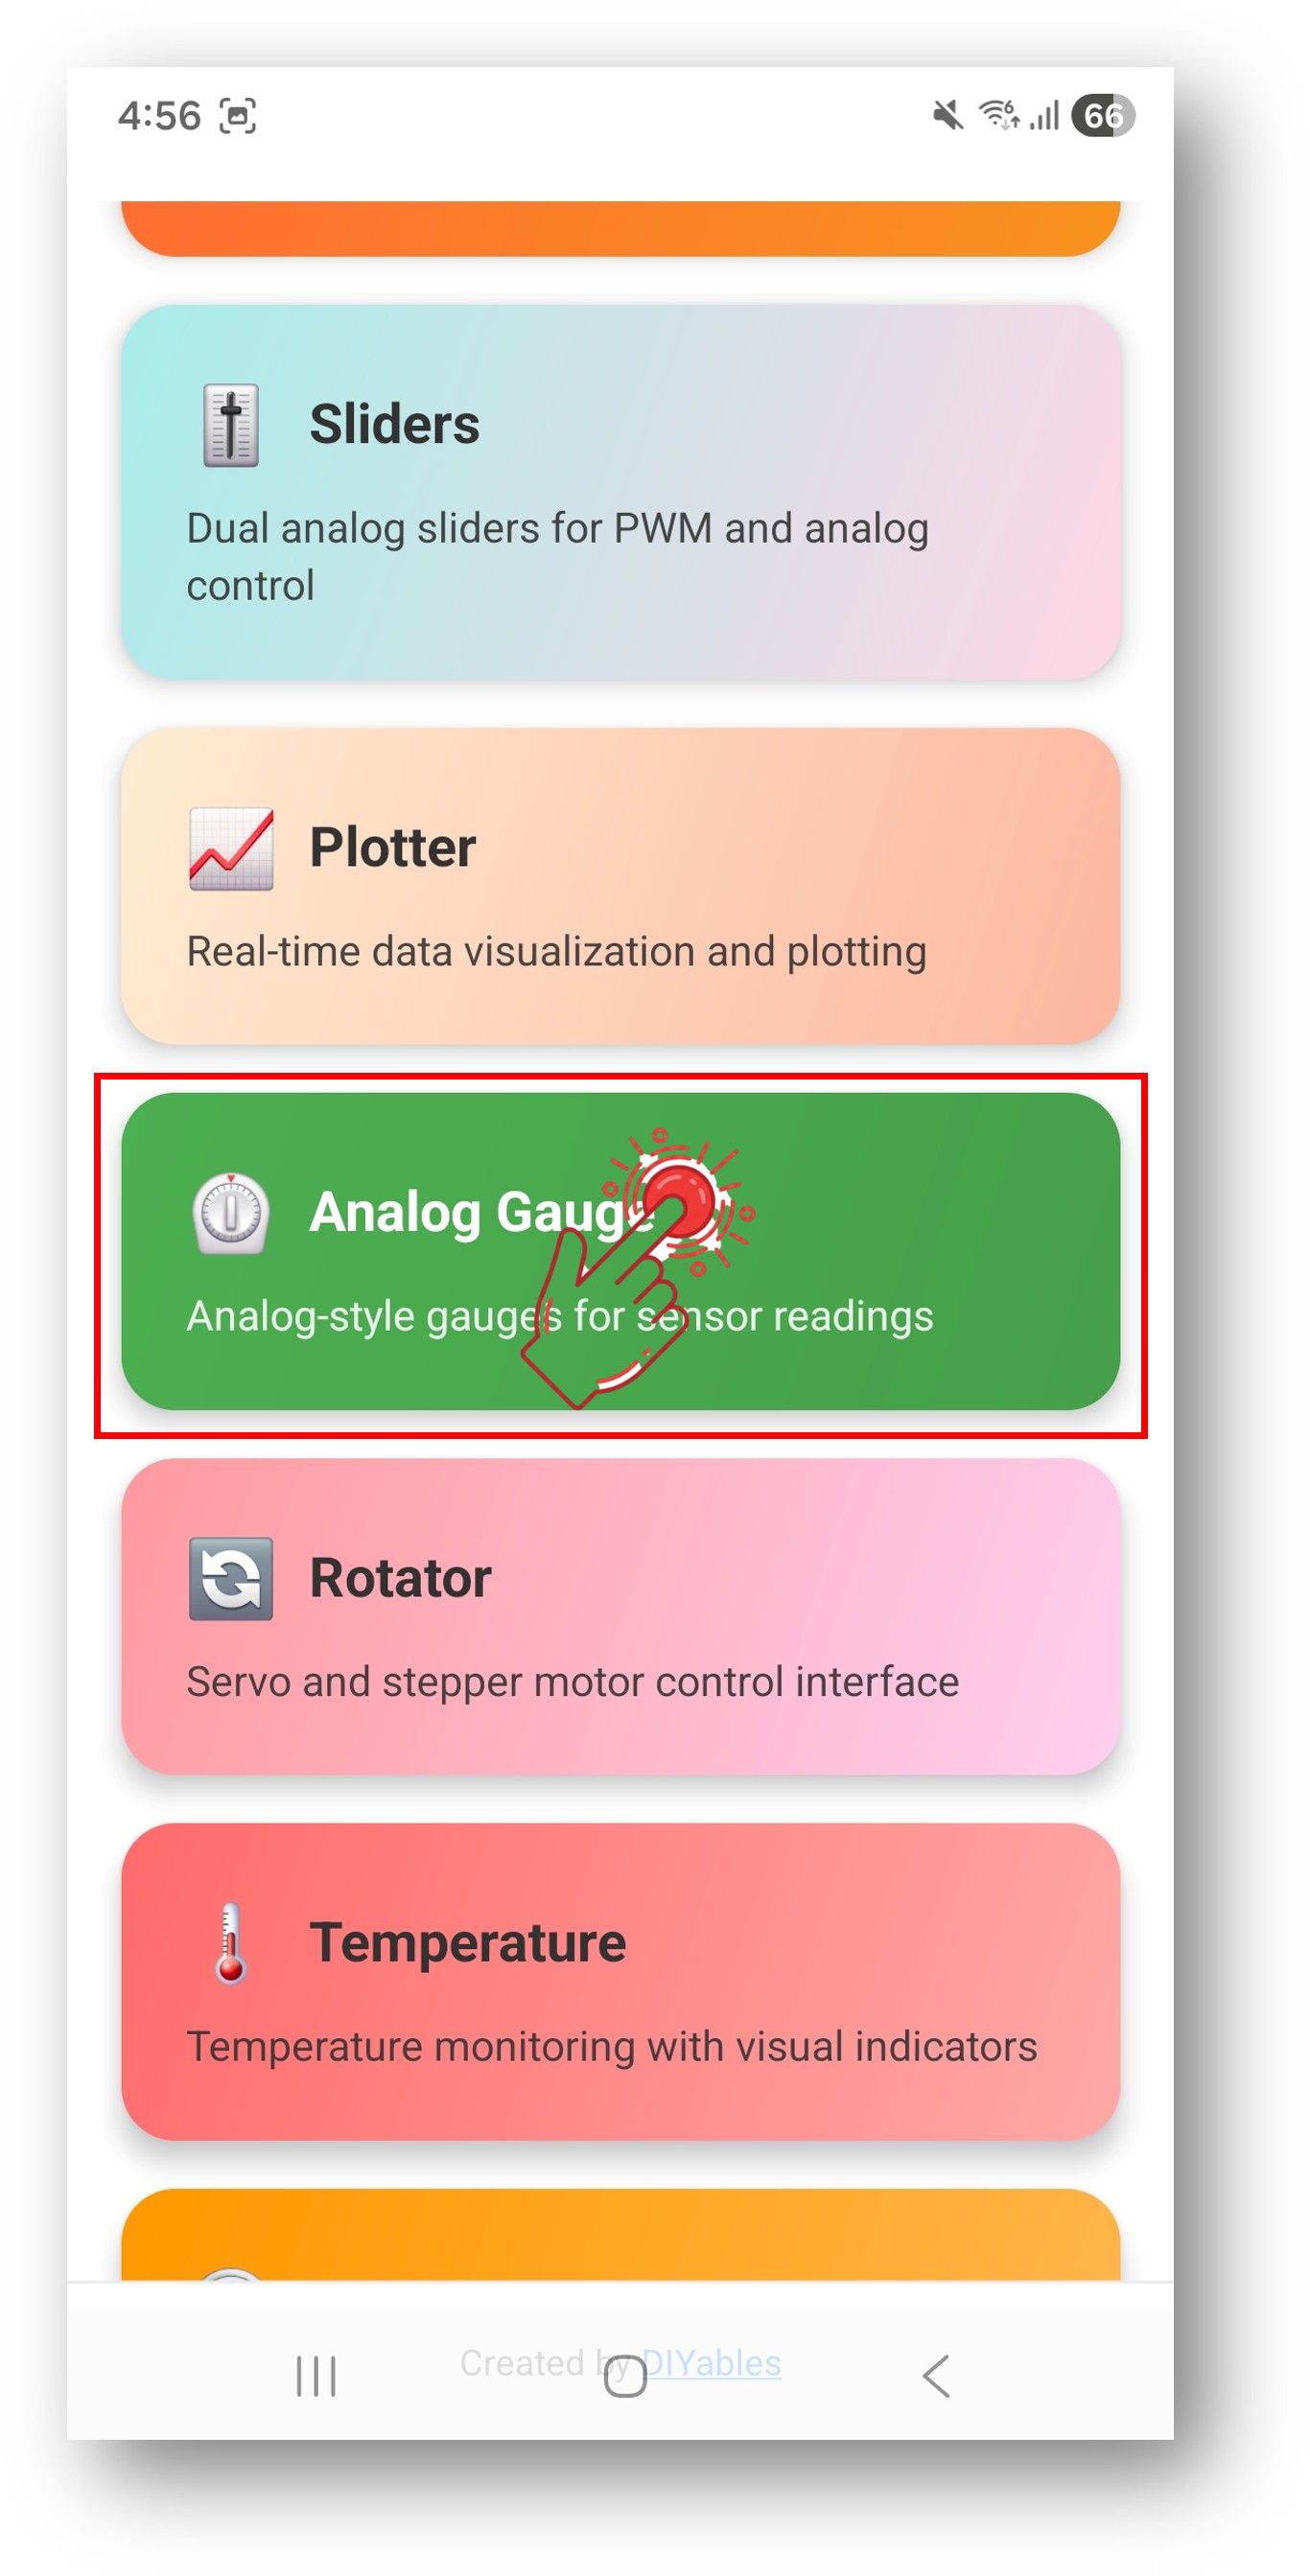
- 연결되면 앱이 자동으로 홈 화면으로 돌아갑니다. 앱 메뉴에서 Analog Gauge 앱을 선택합니다.
참고: 홈 화면에서 설정 아이콘을 탭하여 홈 화면에서 앱을 숨기거나 표시할 수 있습니다. 자세한 내용은 DIYables 블루투스 앱 사용 설명서를 참조하세요.
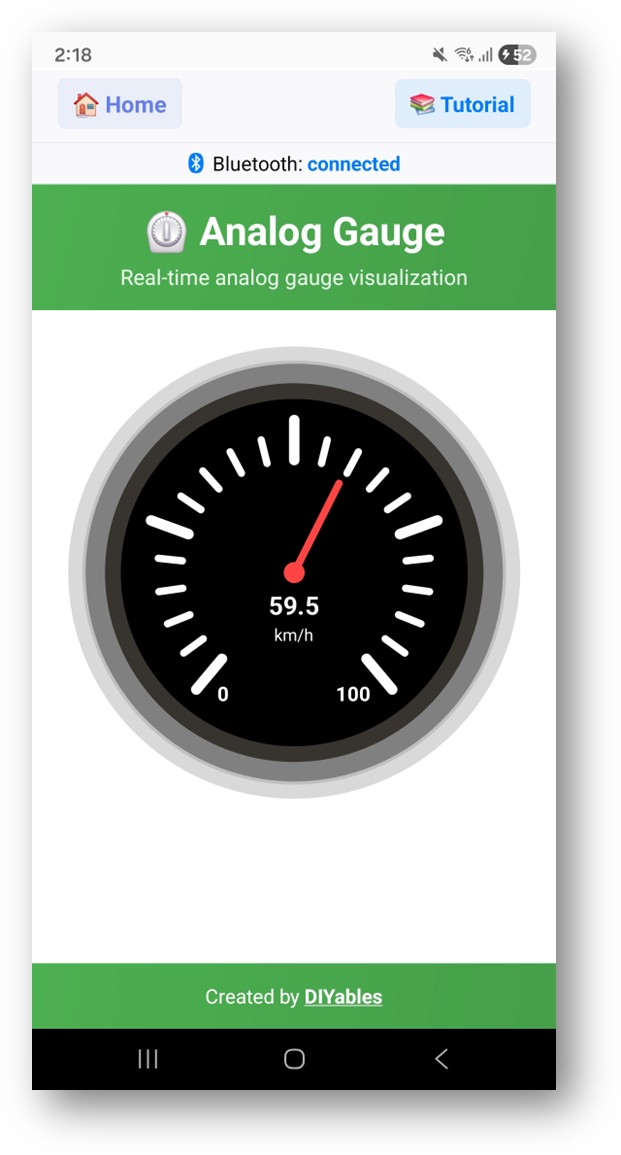
- 아날로그 게이지가 바늘이 움직이면서 현재 값을 표시합니다.
Arduino IDE의 시리얼 모니터를 다시 보면 다음과 같이 표시됩니다:
8
Serial.println("Hello World!");
Message (Enter to send message to 'ESP32 Dev Module' on 'COM15')
New Line
9600 baud
Bluetooth connected!
Gauge value: 50.0 km/h
Gauge value: 75.0 km/h
Gauge value: 93.3 km/h
Gauge value: 100.0 km/h
- 앱에서 실시간으로 게이지 바늘이 움직이는 것을 확인하세요.
창의적인 커스터마이징 - 프로젝트에 맞게 코드 조정하기
게이지 범위와 단위 설정
디스플레이 범위와 단위를 설정합니다:
// Constructor: DIYables_BluetoothAnalogGauge(min, max, unit)
DIYables_BluetoothAnalogGauge bluetoothGauge(0.0, 100.0, "km/h");
// Change range at runtime
bluetoothGauge.setRange(0.0, 200.0);
// Change unit
bluetoothGauge.setUnit("MPH");
// Read current configuration
float minVal = bluetoothGauge.getMin(); // Returns 0.0
float maxVal = bluetoothGauge.getMax(); // Returns 100.0
String unit = bluetoothGauge.getUnit(); // Returns "km/h"
게이지 값 전송
// Send current reading
float speed = 72.5;
bluetoothGauge.send(speed);
// Send text message
bluetoothGauge.send("Calibrating...");
앱의 값 요청 처리
bluetoothGauge.onValueRequest([]() {
float currentValue = readSensor();
bluetoothGauge.send(currentValue);
Serial.println("App requested value: " + String(currentValue));
});
연결 이벤트 처리
bluetoothServer.setOnConnected([]() {
Serial.println("Bluetooth connected!");
bluetoothGauge.send(currentValue); // Send current reading
});
bluetoothServer.setOnDisconnected([]() {
Serial.println("Bluetooth disconnected!");
});
아날로그 게이지 사용 방법
앱 인터페이스
DIYables 블루투스 앱의 아날로그 게이지 인터페이스에는 다음이 표시됩니다:
- 다이얼/바늘: 바늘이 움직이는 클래식 아날로그 미터
- 숫자 표시: 현재 정확한 값 표시
- 단위 레이블: 설정된 단위 문자열 표시
- 눈금: 최솟값부터 최댓값까지 눈금 표시
일반적인 단위 설정
- 속도: DIYables_BluetoothAnalogGauge(0.0, 200.0, "km/h")
- 압력: DIYables_BluetoothAnalogGauge(0.0, 100.0, "PSI")
- 전압: DIYables_BluetoothAnalogGauge(0.0, 5.0, "V")
- 백분율: DIYables_BluetoothAnalogGauge(0.0, 100.0, "%")
- RPM: DIYables_BluetoothAnalogGauge(0.0, 8000.0, "RPM")
프로그래밍 예제
전압 미터
const int VOLTAGE_PIN = 34;
const float VREF = 3.3;
const float DIVIDER_RATIO = 5.0; // Voltage divider ratio
// Gauge configured for 0-16V range
DIYables_BluetoothAnalogGauge bluetoothGauge(0.0, 16.0, "V");
void loop() {
bluetoothServer.loop();
static unsigned long lastUpdate = 0;
if (millis() - lastUpdate >= 500) {
lastUpdate = millis();
int raw = analogRead(VOLTAGE_PIN);
float voltage = (raw / 4095.0) * VREF * DIVIDER_RATIO;
bluetoothGauge.send(voltage);
Serial.println("Voltage: " + String(voltage, 2) + " V");
}
delay(10);
}
압력 게이지 (BMP280)
#include <Adafruit_BMP280.h>
Adafruit_BMP280 bmp;
// Gauge configured for atmospheric pressure range
DIYables_BluetoothAnalogGauge bluetoothGauge(900.0, 1100.0, "hPa");
void setup() {
Serial.begin(115200);
bmp.begin(0x76);
// ... Bluetooth setup ...
bluetoothGauge.onValueRequest([]() {
float pressure = bmp.readPressure() / 100.0; // Pa to hPa
bluetoothGauge.send(pressure);
});
}
void loop() {
bluetoothServer.loop();
static unsigned long lastUpdate = 0;
if (millis() - lastUpdate >= 1000) {
lastUpdate = millis();
float pressure = bmp.readPressure() / 100.0;
bluetoothGauge.send(pressure);
Serial.println("Pressure: " + String(pressure, 1) + " hPa");
}
delay(10);
}


